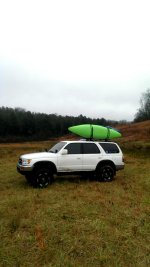
Thebrandon's 2000 SR5 4X4 Kayak Hauler Thread

Ended up ordering these to go along with some other lights I have in the mail. Everything should be here next week I hope and ready to install.

I probably should save money for some sliders before I get anything else.

t4r3-ditch-brk.jpg


Do you have a link for these brackets? I'm in the market for some. Thanks. Glad to hear you're out of the woods with the head gasket, look forward to seeing more of this!
 
Whitewater kayaker here! Nothing looks better than a runner with some boats on top!

Also, I love my ditch lights.
 

Attachments

  • 1412287266631.jpg
    1412287266631.jpg
    146.3 KB · Views: 346
  • 1420232279441.jpg
    1420232279441.jpg
    117.3 KB · Views: 352
And as an employee of Humminbird, I have to recommend our products if you ever decide to get a fishfinder set up!
 
I'm just curious, what made you think the rack was going bad? Nice rig btw.

I still think it is going bad. It has a very slow leak, and it looks like there is play in the guide. There is a distinctive clunk noise coming from the guide when the wheel is turned. The inner tie rod ends were brand new when this was installed, so I do not believe they are an issue. and the outer tie rods are still solid.

Edit:

Also here is a just for fun picture. I feel like I need more lift in the back. Might be time to look at some new springs.
2015-01-12%2005.38.53_zpsqlxh70tt.jpg~original
 
Last edited:
And as an employee of Humminbird, I have to recommend our products if you ever decide to get a fishfinder set up!

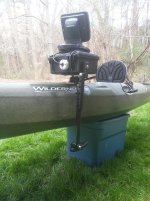
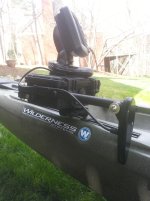
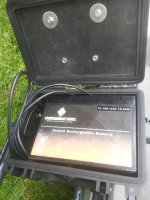
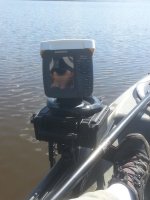
I like mine but you guys need to make something like what I jerry rigged together so that you can put the Fish Finder where you want it, take it off and on when you need it, and all self contained with battery and everything in a waterproof case.
I can just undo mine and pick it up all complete with finder/battery/transducer with a carry handle. Takes literally 10 seconds to completely set it up, or take it off.
This makes it so much easier to use a fish finder on a Kayak without drilling holes in it and messing up the hull by trying to install a transducer.
 

Attachments

  • 117.jpg
    117.jpg
    136.3 KB · Views: 310
  • 122.jpg
    122.jpg
    130.7 KB · Views: 318
  • 123.jpg
    123.jpg
    133.7 KB · Views: 310
  • 20130329_110116.jpg
    20130329_110116.jpg
    127.9 KB · Views: 314
I like mine but you guys need to make something like what I jerry rigged together so that you can put the Fish Finder where you want it, take it off and on when you need it, and all self contained with battery and everything in a waterproof case.
I can just undo mine and pick it up all complete with finder/battery/transducer with a carry handle. Takes literally 10 seconds to completely set it up, or take it off.
This makes it so much easier to use a fish finder on a Kayak without drilling holes in it and messing up the hull by trying to install a transducer.

That is a pretty awesome set up, unfortunately we dont get into hardware too much other than in-dash kits and more high end stuff like that. It might be different if more people wanted to put fish finders on kayaks, but thats just the market.
 
That is a pretty awesome set up, unfortunately we dont get into hardware too much other than in-dash kits and more high end stuff like that. It might be different if more people wanted to put fish finders on kayaks, but thats just the market.

Thats a pity because Kayak fishing is a very fast growing way to fish.
I have been fishing out of a kayak since about 1994 but in the past 10 years it has grown huge.
Several magazines devoted solely to kayak fishing

Kayak Fishing Magazine

The Fisherman's Journal | A Kayak Fishing Magazine

There are several just Kayak Fishing Tournaments now.

Probably sell a million of them
 
Got some stuff in the mail yesterday :)

20150113_133747_zpsgwwazklu.jpg~original


This is the new Hi-lift with the handle keeper and roof top mounts I am planning to use. I went with the 60" Hi-lift. The 48" just seemed like it was not big enough for a lifted vehicle.
20150113_171638_zpsxispvhrh.jpg~original


Close up of the roof top mount, mounts straight to some Yakima mounts. These could hold 100 lbs of kayak and gear flying down the freeway, so I feel like I can trust them with a lift bolted to it.
20150113_171716_zpsfkxahnuj.jpg~original


The tool I'll keep on hand if/when I need to remove the lift.
20150113_171650_zps3nmotafi.jpg~original


Lotus slider adapter. I don't have sliders yet, but this fits on my front and rear bumpers like a charm.
20150113_171816_zpssecpfawd.jpg~original


I haven't put it on the truck yet. I took the truck into the shop that did the work on my rear diff because the pinion seal was leaking. So they are taking care of that.

CBI ditch light brackets came in too. I just have to find the time to put them on and wire up the lights. That should hopefully happen in the next couple days.

I will definitely need to make a new base for the lift. The one that comes with it is just too small.
 
Hi-lift mounted up top and fit perfectly. I need to take a picture of it actually on the truck. This fish lives on the lift.
2015-01-14%2015.19.40_zpsoxmenota.jpg~original


This is my light bar, and ditch lights on.
The CBI brackets install very easily. I found the instructions on their website to be very helpful for the install, event though it is pretty straight forward. They seemed a little outdated though, but I will go over that when I have more in depth photos of everything installed.
2015-01-15%2023.34.45_zps6fzffces.jpg~original
 
Here are the ditch lights
20150116_170655_zpsktkmxbxk.jpg~original


Picture of the cut outs I did to make the brackets fit, and the wires going in behind the cut out.
20150116_171205_zpspvl3fzm3.jpg~original

20150116_171230_zpsbb2ydkbm.jpg~original


The awkward antenna in the way of the light.
20150116_170705_zpsnc0y34ec.jpg~original


And the Hi-lift up top with the bass on the front. I took the base off of the lift and keep it inside the truck.
20150116_170638_zpspfrqxwi3.jpg~original


That's it for now. Hopefully sometime soon I will have some sliders to throw on.
 
My power steering pump decided to fall apart on me. The shaft the pulley spins can come completely out. I decided I'm going to replace the whole pump since I don't know what kind of damage happened on the inside to make the c-clip in there come off. While I'm doing this I'll also be throwing on a cooler for the PS pump. Should be a neat little project and I'm hoping it will help with the high temperatures we get here in AZ.
 
My intake box broke again. A crack right behind the filter that lets dirty air in. Patched it up with some tape for now.

Instead of buying another box that will probably break, I bought a Volant intake. I wanted something that had a box like the factory one to help protect the filter from the elements and theoretically allow cooler air to enter. And if this box happens to crack or anything it wont matter because the air will still be filtered before entering the motor.

It should be here Wednesday, and I'll try to remember to get some install and final product pictures for everyone.
 
Here are some pictures of the intake, and some of the stuff you can expect when you see it for the first time.

Why did I replace the intake? My intake box cracked behind the filter. I replaced the intake only to have it break again. I figured something like this would be a great replacement because if the box breaks, I am still getting filtered air.

1. An intake installation is pretty straight forward. The intructions provided in the box provided little help though. And after checking on Volant's website, I found out I apparently was missing the second page included here:
http://www.volant.com/3dkls/iddb/Tfile/FILE/Instructions/Trucks/18000_Toyota/18634_2.pdf

2. This one REALLY irks me. I have put intakes on pretty much every vehicle I have owned, slow diesel tractors (for fun), boosted AWD cars, and other 4x4 trucks, and this is one of the worst things I have seen. The MAF sensor location is a joke. I have seen better quality mounts in cheap eBay intake tubes. It comes with an o-ring and piece of rubber to use in between the MAF and intake tube, but the problem is the sensor did not fit all the way in the pre-made hole, so it was impossible to make a proper seal. I had to bore it out a tad, and made my own gasket to make sure it was air tight.
20150804_175641_zpsexj88mtu.jpg~original


3. The fittings on the intake tube fit the two new hoses that are provided, but there are three hoses that connect to the intake...the hose closest to the MAF is too small to fit over the new fittings. I live in AZ, rubber hoses tend to crack, and mine was no exception when trying to get this one on. I luckily had a replacement to use.

4. It is loud! I like this though. This is neither a pro or a con.

5. MAF is INSIDE the air box. I did not consider this a pro or a con, but it does mean you pretty much need to take apart the entire intake to clean the MAF.

Some of the hardware and fittings:
20150804_175709_zpsnkvh62ce.jpg~original


What it will look like under the hood. Still need to secure some hoses and tighten down the mounting points to be finished (dirt in your engine bay may vary):
20150805_091130_zpsdje6ulgd.jpg~original


Final thoughts:
For what you pay for this, I was expecting more to be honest. Overall, I am happy with the product. If I had not made the changes I did though, this would be a big disappointment full of leaks.

Maybe I got a bad apple?

 
Last edited:

Members online

No members online now.

Forum statistics

Threads
278,317
Messages
3,554,128
Members
248,016
Latest member
Advally Service

Trending content

Back
Top