TonyB66's Ownership -> Build Thread (2000 Limited)

One of mine is hanging by a thread but I put in back in so my panel isn't bare. Let us know what you find :)

Understood on that. I want to replace for aesthetics only as the piece seems plenty secure without them.

Hopefully they are still available in the correct color. I have one or two extras in my parts bin as spares for the next time they break. Those were really brittle and broke when I removed them the first time.

-Charlie

A little confusing on the color, so I was wondering just that. If not, I have some spray paint that is pretty dang close, and would do the trick.

On the doors, just missing one, the larger of the two, which looks to be 90467-07085-E4.

Is Oak and Tan one in the same? Wondering if those two colors are used interchangeably by some....
 
Last edited:
Is Oak and Tan one in the same? Wondering if those two colors are used interchangeably by some....
The official interior color name from Toyota is "Oak" but tan is the term most guys on here seem to use for that color. There are a few differences in colors of panels through the years (both the "Moon Mist" gray and the "Oak" tan) so it is good to check actual colors before ordering. On colored plastic bits, there is an additional two digit color code at the end of the normal part number.

I use www.toyodiy.com to find part numbers. Make an account to see the pics. Find part numbers, then do an image search on google to make sure it is exactly what you think it is. That has worked well for me.

-Charlie
 
The official interior color name from Toyota is "Oak" but tan is the term most guys on here seem to use for that color. There are a few differences in colors of panels through the years (both the "Moon Mist" gray and the "Oak" tan) so it is good to check actual colors before ordering. On colored plastic bits, there is an additional two digit color code at the end of the normal part number.

I use www.toyodiy.com to find part numbers. Make an account to see the pics. Find part numbers, then do an image search on google to make sure it is exactly what you think it is. That has worked well for me.

-Charlie

Charlie, that is a neat website! Registered, and used it already. Bookmarked too. Thanks much, again.

Just ordered the below at the local dealership. About seven bucks, and will be here in two to three days:

90467-07085-E4 (1)
90467-07041-E0 (2)
 
Thanks again for the help and the part numbers. Picked these up about an hour ago and they fit like a charm. Makes me think that I'm doing something while working on the house...

tonyb66-albums-misc+photos-picture49970-img-4581.jpg


No need to show boring photos of them installed, but they are the exact color, and look great.

With sufficient land excavated, I moved the 4Runner to the side of the house. With it staying there for weeks or longer without being driven, I dug out a 15 watt solar panel I had in storage under the house. It's from a Harbor Freight "special" many years ago, a 45 watt system (3 panels), with charge controller. I actually have three of these or 9 panels that I used a fair amount at the previous home that was in a remote canyon, that had quite a few power outages...

tonyb66-albums-misc+photos-picture49972-img-4576.jpg


It's on the shady side of the house, by design, which is not an ideal location for a solar panel. It seems to get enough light to maintain 12.5 volts, but I'm still monitoring, which will need to happen on overcast days too...

tonyb66-albums-misc+photos-picture49971-img-4579.jpg


Will take-out the HU sometime between now and the weekend to install one more USB cable, then maybe one final project (air filter, spark plugs, wires, clean TB, new TB gasket, clean IAC and new gasket) before we depart for Tahoe in three weeks.
 
Last edited:
For some reason I'm not able to upload images at this time...

I believe I have what looks to be oil in the intake tube from the airbox to the TB. Any ideas? PCV comes-to-mind...

I uploaded this last night (TB gasket before & after), so it looks like attaching works just fine, just upload is problematic...

tonyb66-albums-misc+photos-picture49985-img-4588.jpg


EDIT/ADD:

Working now...

Not the best photo, but here the oil is streaming out...

tonyb66-albums-misc+photos-picture49992-img-4593-1.jpg


I'd say 6-8 tablespoons have come-out so far...

tonyb66-albums-misc+photos-picture49991-img-4591.jpg


tonyb66-albums-misc+photos-picture49990-img-4592.jpg
 
Last edited:
So, since I had a brand new PCV and grommet, I figured that I'd tackle that now... I was going to wait until later as I feared that it might be difficult to remove the grommet; and that was the case.

The one installed didn't look all that bad though.

tonyb66-albums-maintenance-related-picture49996-img-4594.jpg


With all the oil found in the intake path, I wanted to replace it, to rule that out as the culprit.

Not a good photo, but I bent the end of an old screwdriver to help pull-out that grommet.

tonyb66-albums-maintenance-related-picture49995-img-4595.jpg


The top flange gradually all busted into pieces. I used an X-acto knife to make some strategic cuts, and I finally got it out. Took over an hour.

A shot of the new one installed, along with a cool reducer attachment I use on the shop vac. If any debris fell into the valve cover, this should have sucked it up...

tonyb66-albums-maintenance-related-picture49994-img-4596.jpg


I used a silicone spray on the grommet, hoping that might help to keep it soft and subtle....

I removed the airbox and thoroughly cleaned it and all of the plumbing up to the TB. I then used a plastic and rubber treatment on all of these items. This all took nearly an hour.

The MAF was removed and cleaned, as well as the TB and IAC. All will get re-installed tomorrow, with new gaskets, and a new air filter, after I do the spark plugs.
 
Replace your whole valve cover gaskets, not just your pcv.

Valve cover gaskets were done about a year ago, a little before I purchased the vehicle. It's possible the oil might have been in the air intake path for quite a while, with the issue resolved prior to my purchase. I'll keep an eye on things.
 
Got the TB and IAC pretty clean...

tonyb66-albums-maintenance-related-picture50003-img-4605.jpg


tonyb66-albums-maintenance-related-picture50000-img-4603.jpg


tonyb66-albums-maintenance-related-picture50002-img-4606.jpg


Did spark plugs and new wires too. Used anti-seize on the plugs, but couldn't find my dielectric grease. I did find silicone grease, so I used that instead. Torqued to 13 ft-lbs, the same as the TB bolts and nuts...

Put the airbox back, with a new filter along with the cleaned-up air path to the TB.

tonyb66-albums-maintenance-related-picture50001-img-4609.jpg


Started her up, and it sounds great and idles just fine. I didn't drive yet as the Super Bowl was just about to start, but I'll drive it after the game....

My routing can still use some tidying-up though.

tonyb66-albums-maintenance-related-picture50004-img-4610.jpg


In that photo above, at about 11 o'clock, there is an unused clip hanging on a hose or cable. What should that be attached to?
 
Well, I got a notice from the DMV that my plates were ready for pick-up. It took a little over four months...

Sort of nice timing as we leave for that Tahoe trip this Saturday. I attempted to make an appointment with the DMV, but they are several weeks out. So... I arrived this morning a few minutes before they opened (8 am) and was out by 8:15.

tonyb66-albums-misc+photos-picture50115-img-4622.jpg


Painting the screw heads black now...

I pulled the HU and inserted the second USB cable in the rear. Did a test run with the wife, and it works like a champ: mine (blue) for Apple's CarPlay, namely for navigation, and hers (black) to work the tunes on her phone.

Will alcohol clean the windshield, then RainX it next. All fluid levels looking good. Will check tire pressure again at some point before we leave...

The 4Runner is ready for what will hopefully be a fun are memorable family trip. I want to thank those of you who have helped along the way. You know who you are! Mostly service maintenance stuff, but dang important of course, especially after taking ownership. There were repairs and some improvements or upgrades made too; albeit not all that much, as I had indicated early-on.

The "mods" that we are more familiar with around here will come later, likely toward the end of summer or the beginning of fall - basically when the house remodel is mostly done. Later this week, adjustable front control arms (SPC, #25460) should arrive though. Eyeballing suspension and bumpers. Those four Cadillac horns (A, C, D & F) will be done and ready for local pick-up in a couple weeks...

After back from Tahoe, I have a biz trip abroad, and when I return, I'll be guns blazing on the house. I imagine I won't be posting here (thread and forum) as much, but will make time periodically...

Thanks again!
 
Had some time to find a place for two Lev-O-Gages...

tonyb66-albums-misc+photos-picture50122-img-4635.jpg


I removed the lid as I was not using this storage space, I guess for sunglasses or a garage door opener.

The garage floor is quite level, so zero'd them there, and secured them with silicone (GE Iron Grip). Looks like my driveway is about a 10 degree incline. Not a great photo, but I'm quite happy with how they fit in the space, and readability from the driver's seat...

Got these today too:

tonyb66-albums-misc+photos-picture50118-img-4623.jpg


tonyb66-albums-misc+photos-picture50117-img-4624.jpg


Something to tackle late summer or fall...
 
As I might have mentioned earlier, I got the Paranoid Fabrications ScanGauge II ashtray mount. I added an aluminum strip in the back, bent to the correct angle. JB Welded together...

tonyb66-albums-misc+photos-picture49199-img-4375.jpg


tonyb66-albums-misc+photos-picture49197-img-4376.jpg


With that backstop in place, the SC2 sits like this:

tonyb66-albums-misc+photos-picture49198-img-4377.jpg


Once I got it the way I wanted, I suspended it and painted it a flat black...
tonyb66-albums-misc+photos-picture49202-img-4378.jpg


It's angled upward quite nicely:

tonyb66-albums-misc+photos-picture49204-img-4380.jpg


tonyb66-albums-misc+photos-picture49203-img-4379.jpg
I just swung by one of the metal shops at work and had them cut me a couple of tabs out of scrap sheet metal to brace mine that I'll probably attach tomorrow. I talk to Paranoid every once in a while over on NASIOC and might suggest that he just slightly redesigns the mount and adds a little tab cut out that is bent down and braces against the back of the SC. As far as I could tell, I was the first person to ask him about the fitment in 3rd gens since he offered to let me return it if it didn't, but I didn't even know he made it until I saw this post.
 
I am sure it is exciting to be taking it out on it's first trip after all your hard work on it! I like the way you thoroughly research everything, and never do it halfway, and I'm sure it will pay off with a great Tahoe trip. Hopefully you can find some snow!
 
I am sure it is exciting to be taking it out on it's first trip after all your hard work on it! I like the way you thoroughly research everything, and never do it halfway, and I'm sure it will pay off with a great Tahoe trip. Hopefully you can find some snow!

Thanks for the thoughts and well-wishes.

Family rolling-out of bed now asi I type actually. My wife has no idea how to pack for such a trip, for herself and the little ones. She is from Taiwan, a tropical island "nation"... I tried to offer some input, in a very thoughtful and tactful way, but she's set on what to bring; yet recognizes she has no idea, lol. A lot of stuff is going into Jack (what the kids call him). So, I will next work on how to smartly pack so things will not just fit well, but be somewhat accessible during the journey.

Fighting a bug now, unfortunately. Wiped me out yesterday and I was unable to do work for my employer, which doesn't happen often. Found myself napping in the driveway yesterday, in the sun, drying to get warm, lol. So, packing meds, for everyone...

Supposed to snow tomorrow (Sunday)! Supposedly 1-3 inches...

https://www.wunderground.com/forecast/us/ca/tahoe-vista?cm_ven=localwx_10day

thenightman, thanks again, and everyone who has been so kind to help the past few months....

EDIT / ADD:

I will eventually get this, or something like it. Is this the only option for us?

https://www.ragofabrication.com/col...n-toyota-4runner-modular-storage-panel-system
 
Last edited:
In Tahoe, and I must say that all went quite well. Made great time. Averaged 70-85 most of the way, and the Runner felt very comfortable at those speeds. I was expecting it to bog-down more up the steeper inclines, forcing me into the far right lane. Not at all. That said, I eventually went-over there only because the ATF temps went north of 220. I think 224 was the high. So, I very much want to address that going-forward as our loads will get heavier, and the ambient temps hotter (summer months)...

tonyb66-albums-misc+photos-picture50203-img-4643.jpg
 
Last edited:
In Tahoe, and I must say that all went quite well. Made great time. Averaged 70-85 most of the way, and the Runner felt very comfortable at those speeds. I was expecting it to bog-down more up the steeper inclines, forcing me into the far right lane. Not at all. That said, I eventually went-over there only because the ATF temps went north of 220. I think 224 was the high. So, I very much want to address that going-forward as our loads will get heavier, and the ambient temps hotter (summer months)...
Turn OD off if the torque converter unlocks... (but yes, a trans cooler will be a helpful addition for the future)

-Charlie
 
Well, as I had said some time back, I am indeed still working on the house, and the end of the summer still looks to be about when it should be done.

I have managed to do a few things here and there on the 4Runner, like while waiting for tile thinest to cure...

I'd been wanting a "half" rack, ideally in aluminum, and Rocky Mountain Racks delivered the Antero. Thanks again Alex (Flemster).

tonyb66-albums-misc+photos-picture51513-img-5041.jpg


This is the extended version which is 9" longer and has an extra bar (five). That said, one of the bars is not installed as one end was mistakenly not threaded. My tap and die sets are metrics, so this install is not yet 100% done...

The extended Antero, with all hardware, weighs almost exactly 25 pounds. With the OEM rack weighing 10 pounds, that's only a net gain of 15 pounds. I'm not going to paint it. I might when it's Monstaliner time though...

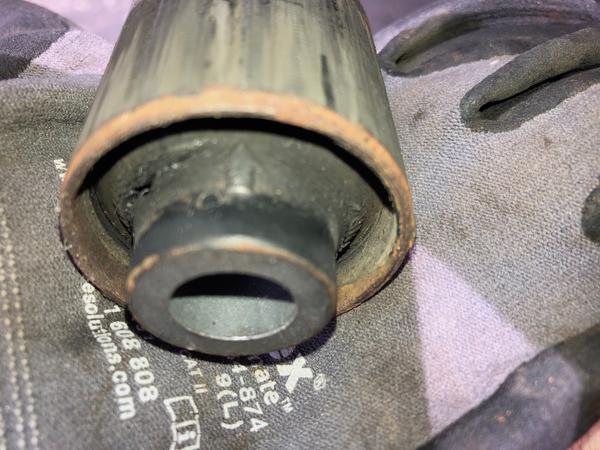
Just recently I did some rear bushing replacement:

Lower rear control arms (Whiteline)
Upper rear control arms (Whiteline)
Rear sway bar (Energy Suspension)

I'd be remiss to not mention that Tim (mtbtim) and Sean's (infamousRNR) videos were an inspiration and most certainly helpful...

The videos of relevance here:

https://www.youtube.com/watch?v=nq-lzK7CPKQ

https://www.youtube.com/watch?v=IvBid-kIdiI&t=24s

As we learned in another thread, and it's worth noting again, the lower control arm bushings are directional (note the arrow):

tonyb66-albums-maintenance-related-picture51436-img-5002.jpg


That said, I and others were able to press them out regardless. I used a 20-ton press that I had purchased from Harbor Freight quite a few years ago and had just re-assembled for this project...

tonyb66-albums-maintenance-related-picture51514-img-4999.jpg


With the correct sleeves, they came-out rather easily:

tonyb66-albums-maintenance-related-picture51504-img-5003.jpg


There was some light, mostly surface rust on the arms, upper & lower, so I took some time to clean them up:

tonyb66-albums-maintenance-related-picture51505-img-5004.jpg


After a few coats of paint, they came-out pretty nice:

tonyb66-albums-maintenance-related-picture51506-img-5006.jpg


tonyb66-albums-maintenance-related-picture51509-img-5010.jpg


tonyb66-albums-maintenance-related-picture51511-img-5013.jpg


tonyb66-albums-maintenance-related-picture51512-img-5017.jpg


I cleaned-up the fasteners too, by wire brushing them and also allowing them to sit in some vinegar for a while. Here the bolts for the lower control arms:

tonyb66-albums-maintenance-related-picture51510-img-5011.jpg


I also cleaned-up and painted the arm mount locations, here a photo of the lower ones:

tonyb66-albums-maintenance-related-picture51508-img-5009.jpg


tonyb66-albums-maintenance-related-picture51507-img-5008.jpg


Using ratchet straps as Tim recommends helps a great deal in order to get the arm holes to align. I also found my lifting jack stands to be very helpful. Think jack stand + bottle jack together...

tonyb66-albums-misc+photos-picture51440-img-5014.jpg


While the straps can pull the rear forward or back as needed, I found these jacks also help as raising or lowering each side effectively lengthens or shortens the arms, which allowed me to get the holes lines=up. Twice the ratcheting strap was not able to get me aligned as the desired tension was between two clicks. If I had a helper, I imagine that would not have been a problem though.

Torque specs (ft-lbs):

lower arms = 107 (19mm)
upper arms = 64 (17mm)
rear sway bar bushing brackets = 14 (12mm)

For the front, I already have bushings for the steering rack and the front sway bar. Given the torque needed on the steering rack, I'll need to wait until I have a helping hand...

Speaking of the front, I also have these waiting:

tonyb66-albums-misc+photos-picture50117-img-4624.jpg


Kings are currently being built, with 650 pound springs. I got what looks to be a pretty good deal ($869 delivered) too from Low Range Off-Road.

25001-151_1.jpg


1996-2004 Toyota Tacoma OEM Performance King Shocks Front Coil Overs Only - 0'-3" Lift by King (25001-151)

I should get them in a few weeks. Brian (BrianSD_42) was most helpful in addressing my questions. Not sure what I'll do for the rear suspension just yet...

I finally picked-up a Fumoto oil drain valve that I'll likely install before I mount the RCI skid plates (3):

tonyb66-albums-misc+photos-picture51226-img-4896.jpg


tonyb66-albums-misc+photos-picture51093-rci-skids-3.jpg


I pretty much decided to get Savage front and rear bumpers. I'll install this Cadillac horn kit (A, C, D & F) when the front bumper goes in...

tonyb66-albums-misc+photos-picture50803-cadillac-horns-c-d-f.jpg


So, plenty to keep me busy, once the house ceases to do so!

 
Last edited:
Looks like you've got your hands full with upcoming mods.

Btw can you post a link to where you bought the Cadillac horn kit? It's on my list. Until now I was looking at used on eBay.

Btw for the scanguage nice job with the professional mount. I mounted mine in the same spot just using mounting tape redneck way, doubled up to provide tilt
 
Looks like you've got your hands full with upcoming mods.

Btw can you post a link to where you bought the Cadillac horn kit? It's on my list. Until now I was looking at used on eBay.

Btw for the scanguage nice job with the professional mount. I mounted mine in the same spot just using mounting tape redneck way, doubled up to provide tilt

Not inexpensive, but by all accounts on the Tacoma forum, this guy does a really nice job...

https://www.tacomaworld.com/threads...-4-cadillac-horns-next-gb-summer-2k18.508390/
 

Members online

Forum statistics

Threads
278,316
Messages
3,554,120
Members
248,016
Latest member
Advally Service

Trending content

Back
Top