Toyota as a second language - Would you kindly interpret factory repair manual text

Status
Not open for further replies.
I suggest you do this with a friend who has done it before on another vehicle, any vehicle.

When I did it with my buddy, one of us had to stand on the brake rotor just to get the new strut to fit in. I am sure that unless you are installing straight stock you will have a similar complication.

the DIY you are looking for is "installing front struts" on a 4Runner (or any truck/car). BTW you have struts in the front vs shocks. You can find full pictures ect in most peoples build thread. I am sure if you read 10 build threads, 4 of them will cover this well (not mine though).
 
I had to read this thread from the beginning and i totally forgot that I had commented. It was like Déjà vu . Good advice.

FWIW- 4wd and 2wd use the same front suspension (different springs and struts values) so any DYI guide you might come across will be the same procedures for 4wd as to the 2wd - minus the cv axles of coarse.
 
any DYI guide you might come across will be the same procedures for 4wd as to the 2wd

The real problem is that there appear to be no decent DIY guides for either the 2WD or the 4WD 3rd-generation 4Runner front shocks (as far as anyone can point us to).

That's OK ... I'll write it ... but first I am stuck at the moment on these two lines:

My jackstands aren't tall enough to fit under the bolt for the crossmember. I wonder how important that step is, since the Toyota Service Manual doesn't even mention it.
 
The real problem is that there appear to be no decent DIY guides for either the 2WD or the 4WD 3rd-generation 4Runner front shocks (as far as anyone can point us to).

That's OK ... I'll write it ... but first I am stuck at the moment on these two lines:


My jackstands aren't tall enough to fit under the bolt for the crossmember. I wonder how important that step is, since the Toyota Service Manual doesn't even mention it.

2WD and 4WD shock installs are identical.

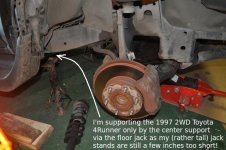
I had to put two large pieces of wood to give my jackstands a boost.

Obviously, the Toyota service manual is intended for service techs who have access to lifts. You can easily see what i did here:

photo42.jpg~original
 
I had to put two large pieces of wood to give my jackstands a boost

Thanks for that picture. It helps a lot!

My jack stands are really tall - but - even they are way too short for this 4Runner (Note to self: Buy taller jack stands, 17 to 19 inches!).

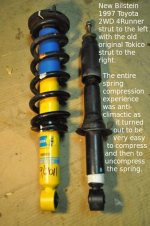
Right now, I have the shock out of the 4Runner; and I have the spring compressed.

I'm taking pictures but am rushing to beat the sundown (I started very late). I'll post the pictures later.

At the moment, I'm spinning the 17mm top nut around and around and the entire top portion of the shock is spinning. I tried immobilizing with a 7mm open-end wrench on the flat spot on the top shock bolt to no avail.

I'll try vise grips now.

Any hints as to how to immobilize the shock to spin the top 17mm nut off?

(Should I have loosened it before compressing the spring?)
 

Attachments

  • jackstands.JPG
    jackstands.JPG
    48.6 KB · Views: 9,134
Last edited:
This may help, even if it is for a 4th gen 4runner.

That's the best of the worst of the DIYs. Which is to say it's nearly useless; however, even so, since there aren't any DIYs, I've been using it anyway, all along (you'll see I've referenced it a few times already).

The problem with that DIY is not only that it's for the wrong vehicle, but, the entire approach they are using is non standard. They are NOT removing the springs with spring compressors. So, the entire approach is not what is in the factory manual which is what I'm attempting to follow.

Still, since there is nothing good out there, I've been referring to it all along. Sigh.


6 ton jack stands and a jack that goes up to at least 20 inches is an absolute must IMHO.

That's what I'll get (for the other side!).

Right now, I used vise grips to hold the top bolt flat still; and then an open-end wrench to spin the top nut off. I 'should' have counted how many turns it took, because the amount of threads is minimal ... so I want to put the new nut back in about the same place - but that's for the ideal DIY!

Anyway, I just realized I put it all back together without putting the bottom support through the new shock first ... heh heh ... newbie mistake ... but I will rectify that by taking it apart again.

I'll write back when I get the spring uncompressed. It's dark outside so the pictures aren't that good anyway at this point.

EDIT: OK. I got the spring uncompressed. The spring was actually the easiest part. No drama whatsoever.
 

Attachments

  • springison.JPG
    springison.JPG
    48 KB · Views: 1,423
Last edited:
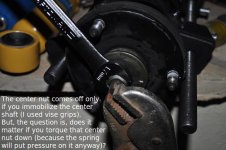
I don't understand the center nut.

The instructions say to put it on loosely and then torque it down later; but I don't see how it matters since the spring, when I let it loose from the compression, will keep the pressure on the nut.

So, may I ask:
While the spring is compressed, how tightly do you tighten the center nut?
(Note: It doesn't have a whole lot of threads before it bottoms out.)

EDIT: This thread says to torque the center nut BEFORE removing the compression from the spring!
- Long post, picky details on 3rd Gen front struts, KYB Monomax
After clocking the mounts so the lower coil end would be pointing outboard when installed on the truck, I torqued the strut center nut. Per KYB Tech Support, I torqued to the OE spec or until the upper bushing was compressed to the diameter of the upper washer. This left about three threads showing above the nut. After torquing the upper nut, I relaxed the spring compressor until I could remove it.

Double EDIT:
This thread also used vice grips on the center bolt flat to immobilize the center bolt:
- Article on changing front shocks

On the top of the shock itself, you will see a rod with a square end that has a nut on the threaded part. With the spring compressed, hold the square rod with vise grips or a bench vise and unscrew the big retaining nut. Mine was a 17mm.
 

Attachments

  • center_nut.JPG
    center_nut.JPG
    42.7 KB · Views: 1,304
Last edited:
Well, I'm making basic assumptions and moving along.

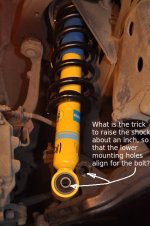
Now, I have the three nuts on top lightly secured, but, the bottom hole of the shock is about a half inch or so BELOW the lower mounting hole.

Hmm... I guess they skipped a step in "installation is the reverse of removal". :)

I need to raise the shock by about a half inch to align it with the center hole.

How 'do' people do that?

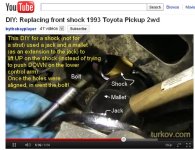
EDIT: This YouTube video used a jack and a mallet (as a jack extension) UNDER the bottom of the shock, to move the shock upward:
- DIY: Replacing front shock 1993 Toyota Pickup 2wd
Note: That's a different vehicle, and it's a shock, not a strut (I don't think you can get a jack under the 4Runner strut).

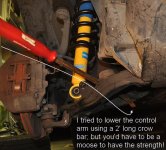
DOUBLE EDIT: This thread says to use a crow bar to force the lower support arm down an inch!
- Long post, picky details on 3rd Gen front struts, KYB Monomax

Instead of using the jack to drive the upper control arms down, I used a crow bar. I caught the tip of the crow bar under the fixed strut mount housing, then leaned the bar down on the upper control arm. By tucking the crow bar under my left arm, I could hold pressure down and use both hands to position the lower strut mount into the bracket and feed the bolt through from the back. I did have to use a hammer handle to tap the bolt all the way through.
TRIPLE EDIT: This thread suggests to remove the rotor to allow the lower control arm to move down that last inch.
- Article on changing front shocks

The four bolts on the bottom of the rotor assy coming from the lower a arm will make the job much simpler if your installing a lift of any sort use a floor jack to get it back up into place, ask brain2sun about it if you need more info he's the guy who showed me
This thread says to disconnect the sway bar to get the lower control arm to move down that last inch:
- Front shock replacement
if the strut is not seated on the spring correctly then you will have a big pain twisting the strut trying to get that lower bolt in because the hole dosnt line up, also disconnect the sway bar link, helps with lowering the lower A arm so you can put the bottom strut part in...
 

Attachments

  • raise_half_inch.JPG
    raise_half_inch.JPG
    41.8 KB · Views: 1,526
  • raise_shock.jpg
    raise_shock.jpg
    56.4 KB · Views: 1,419
  • crow_bar.jpg
    crow_bar.jpg
    65.5 KB · Views: 1,662
Last edited:
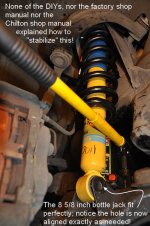
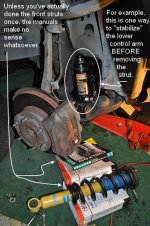
I found a solution for 'stabilizing' the lower control arm (i.e., moving it DOWN!)

Answer 1: Stabilizing means to hold steady. They want you to block the lower control arm from moving up or down while removing the lower strut bolt. Use a floor jack to stabilize the lower control arm.

I finally figured it out!

Note: The factory shop manual and the Chiltons were useless for this task!

What I used to "stabilize" the suspension (after the fact) was a Sears Craftsman hydraulic 6-ton bottle jack (P/N 950281, 8 inches to 15 3/8 inches), stuffed between the lower control arm and the frame of the 4Runner!

This allowed me to LOWER the control arm, the one inch I needed to easily align the lower shock absorber bolt!

There's no way, IMHO, you can use a floor jack because you have to prevent the lower control arm from moving UP (not down!). The only way (AFAIK) to prevent the lower control arm from moving UP, beforehand, is to block it from doing so. You can only block it by being ABOVE the lower control arm (like I did with the bottle jack), not below it (like a floor jack would have to be).

For others to benefit, the 8 inch tall bottle jack just about fits in between the lower control arm and the frame, leaving about a half inch (or so) to spare (so, you could probably use a smaller sized bottle jack). A suitably long block of wood may also work, in the future, depending on what you wedge it onto ... but bear in mind ... even after 'stabilizing' the suspension this way, I still had to do minor adjustments of the bottle jack in order to align the hole just perfectly for the lower bolt when it came time for reassembly.

Once I put the bottle jack in place, making sure that the shock wouldn't block the let-down screw, it was trivial to lower the control arm the one inch I needed to align the bolt easily in place.

BTW, following some of the other DIYs, I first tried a very long crow bar and a long pry bar; both failed miserably (I just didn't have the leverage force to lower the control arm the full inch that was necessary to align the bolt - and even then - you have to have three or four hands).

I contemplated removing the sway bar and/or the caliper four bolts so that I might lower the lower control arm an inch ... but this bottle jack idea didn't require the removal of any additional bolts and therefore, it was the easiest of all once the idea took root as I contemplated the unfinished job (and, AFAIK, this bottle-jack idea wasn't in any of the DIYs that I had found).
 

Attachments

  • the_trick_to_stabilize_the_suspension.jpg
    the_trick_to_stabilize_the_suspension.jpg
    53.2 KB · Views: 1,629
Last edited:
I finally figured it out!

Good news and bad news...

The good news is that I'm done with the second side - and - it only took about a half hour, from start to finish!

The trick is the mysterious instruction to 'stabilize' the suspension!

Of course, now I know that means to prevent the lower control arm from moving upward when the lower strut bolt is removed ... and ... it also means that there is a minor adjustment needed when it comes time to replace that lower strut bolt. (More importantly, it doesn't mean what everyone said it meant!)

Now ... for the bad news.

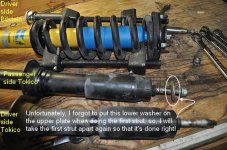
I realize I accidentally left a washer out of the first shock. :(

Apparently UNDER the upper plate is a washer (above the blue plastic cover but below the rubber on the bottom of the upper plate).

So, I'm getting my practice because I have to re-do the front passenger side to put that missing washer back in.
 

Attachments

  • oops_forgot.jpg
    oops_forgot.jpg
    65.5 KB · Views: 1,798
Last edited:
since there aren't any DIYs

Dude there are lots of DIY articles, I just don't think you know how to find them.

If you are not getting the search results you desire using the forums built in search function then use google to search the site live.

go to google.com and enter the following

Code:
site:toyota-4runner.org [I]searchword1[/I] [I]searchword2[/I]


OR try YotaTech

Code:
site:yotatech.com [I]searchword1[/I] [I]searchword2[/I]
 
DIY front struts, Tokico to Bilstein, 1997 2WD Toyota 4Runner (with pictures)

there are lots of DIY articles, I just don't think you know how to find them.

Not only have I read (and quoted in the OP) the cryptic factory & Chilton shop manuals, but, I ran a lot of searches and listed the supposed DIYs that were found in previous posts. If there 'are' decent DIYs, nobody here seems to have found them. Even if there were, they all seem to gloss over the part about 'stabilizing the suspension', which is a ridiculously obtuse way of saying you need to prevent the lower control arm from moving up ... and when they say "lower the suspension", that's another obtuse way of saying you need to adjust the lower control arm (typically in the downward direction) by placing a bottle jack in betwen the lower control arm and the frame.

With a single picture and/or a description ... and having done it once ... it all (now) makes sense.

But, I've seen those lousy DIYs where people removed the sway bars, the calipers, and even the ball joints (and some even used a crowbar on the lower suspension member), all of which are wrong wrong wrong (IMHO), since the easiest way, by far, is the method I came up with. There are even DIYs where people use the weight of the vehicle to compress the spring - which - after having done it the right way - I would deprecate simply due to the lack of necessity and the fact it's not the factory suggested method (although, for some, it may be perfectly feasible).

The trick, was learning how to 'stabilize' and 'lower' the 'suspension member'!

BTW, if anyone knows of an EASIER way to "stabilize & lower the front suspension", I'd be all ears because I searched and searched and searched and never found this trick that I had to come up with on my own, even after reading everything that could be found on this topic.

Before I forget, and, since it's not intuitive, here's the updated 1997 Toyota 4Runner 2WD front struts DIY which clarifies the steps glossed over in the Toyota & Chilton shop manuals.

In hindsight, once you know that single trick of "stabilizing & lowering the suspension", the job is almost trivial: one bottom bolt, three upper bolts, and a center bolt plus a spring compression which turns out to be a piece of cake. The whole job rates about a 3 on a scale of 1 to 10 in difficulty, once you figure out the obtuse language of the shop manuals & you skip the mistakes made in all the DIYs (in trying to get the bottom bolt aligned).

Setup:

  1. Spray penetrating oil on all bots & nuts the night before.
  2. Purchase new struts & hardware (the Bilsteins came with a cap nut and a bottom plate & a plastic upper cover)
  3. The job is infinitely easier if you have a bottle jack not larger than 8 5/8 inches tall
  4. Read section SA41 Front MacPherson Struts in the Toyota shop manual and in the Chilton reference guide.
  5. Paint a line on the side facing outward (toward you) on the coil, upper plate, and lower plate.
Jacking:

  1. Park the vehicle in gear, emergency brake on
  2. Chock the rear wheels
  3. Loosen the six 13/16ths inch lug bolts
  4. Using a floor jack, raise the front of the vehicle
  5. Place 16" to 19" tall jackstands (nominally 18") under the frame
  6. Lower the vehicle onto the jackstands and test for stability
Removal:

  1. To remove the front wheel
    • Remove the six 13/16ths inch wheel lug bolts
    • Lift the front wheel away from the vehicle
      • Torque: 110 N-m (1,150 kgf-cm, 83 ft lbf)
  2. To stabilize the suspension <=== this is a key step!
    • Place a bottle jack no larger than 8 5/8ths inch tall on the lower control arm (behind the strut) and tighten so that the lower control arm will not move upward when the strut lower bolt is removed.
    • Note: Stabilizing means to hold steady. The problem you're trying to prevent is the lower control arm wants to move up, about an inch, once you remove the strut lower bolt. If you allow the lower control arm to move up that inch, then, later on, when you're putting the strut back on the vehicle, you then need to force the strut down, manually, to get the bolt holes to align with the shock.
  3. To disconnect the shock absorber from lower suspension arm:
    • Loosen the lower bolt with a 19mm socket wrench
    • Remove the shock absorber lower nut and washer from the lower control arm
    • Punch out the bolt with a suitable punch & hammer
      • Torque: 135 N-m (1,400 kgf-cm, 101 ft-lbf)
  4. To remove the shock absorber and coil spring assembly:
    • Remove the three 14mm nuts from the top of the shock tower.
    • After removing the three 14mm nuts on the top plate, the strut can be gently removed from the vehicle.
      • Note: The strut consists of the shock, the spring, a plastic cover, an upper and lower plate, and assorted hardware
    • Remove the shock absorber and coil spring assembly from the wheel well.
      • Torque: 64 N-m (650 kgf-cm, 47 ft-lbf)
Disassembly:

  1. To remove the suspension support & the coil spring
    • Note: The suspension support is the strut assembly.
    • Measure the length before compressing so you know how much to compress when reassembling later!
  2. Using a spring compressor, compress the coil spring until there is noticeable clearance on both ends (and the shock feels loose):
    • Toyota uses this tool: SST 092727-00060, 09727-30021
    • You can rent an Autozone spring compressor for 90 days on a $50 deposit.
    • Notice: to avoid damage to the SST:
      • Set SST arms to allow clearance to hold a 8-roll coil between them
      • Do not compress the coil spring more than necessary
      • Do not use an impact wrench to spin the compressor bolts
  3. Remove suspension support center nut by placing vise grips on the flattened end and spinning the 17mm center nut off
  4. Remove these parts from the shock absorber.
    • 2 retainers
    • Cushion
    • Suspension support
    • Coil spring
Replacement:

  1. To remove the bushing if the new struts didn't come with them
    • Using SST and a press, remove the bushing
    • SST 09506-35010, 09632-36010
      • Note: Some use a vise and sockets to remove the bushing.
  2. Install new bushing
    • Using SST and a press, install a new bushing
    • SST 09506-35010, 09632-36010
    • Hint: Do not apply grease or oil to the bushing

  • Note: My new Bilstein struts included the lower bushing already installed.
Reassembly:

  1. Ensure that the factory springs are re-installed on the same side they were removed from.
    • Note the different paint marks on the coil spring for each side.
    • Also note the paint marks face the front of the vehicle.
  2. Install coil spring to shock absorber
    • Your coil spring should already be compressed
  3. Install suspension support
    • Install the 2 retainers, suspension support (i.e., shock), and cushion to the rod
    • Temporarily tighten a new suspension support center nut.
    • Align the suspension support with the shock absorber lower bushing, as shown.
      • Hint: Face the lower end of the coil spring to the outside of the vehicle.
    • Remove the SST
      • Hint: After removing the SST, recheck the direction of the suspension support.
    • Torque the suspension center nut.
      • Torque: 25 N-m (250 kgf-cm, 18 ft-lbf)
Installation:

  1. The remainder of installation is the reverse of removal.
  2. Place the top three bolts of the strut assembly in their holes and hand tighten the three 14 mm nuts
  3. Adjust the bottle jack so that the lower control arm bolt hole lines up with the bottom of the strut assembly
  4. Push the lower bolt into place and hand tighten the 19mm nut
    • Note: The old Tokico OEM center nut was 17mm but the new Bilstein nut is 19mm
  5. Please note the following torque specifications:
    • 3 upper mount to body nuts: 47 ft. lbs. (64 Nm)
    • Lower shock absorber mounting bolt: 101 ft. lbs. (135 Nm)
    • Wheel lug nuts: 83 ft. lbs. (110 Nm)
  6. Make sure the front strut spring seat is installed correctly: the rounded part faces upward.
  7. Confirm that the lower end of the coil spring is facing toward the outside of the vehicle.
  8. Tighten all bolts to the proper torque specification.
(to be cleaned up tomorrow ... I'm tired tonight)

 

Attachments

  • shock_diy.jpg
    shock_diy.jpg
    65.2 KB · Views: 1,842
Last edited:
@ your mom,

Nice update and great formatting BTW. Strongly suggest you put in its own new DIY thread or the information will never be found except via complex search which few ever use.

This thread is called "Toyota as a second language - Would you kindly interpret factory repair manual text" so few will ever see the great write up in its current form.


:thanks:
 
Last edited:
2X's on what he ^ said....I'd just copy and paste your posts, and put them in a properly named thread.....Great R&D man!
 
The above procedure wouldn't work on 4wd because of the half shafts.

Most people just use their spare tire bottle jack and push the upper control arm down from the inner fender.

bottle_jack.jpg
 
Last edited:
May be some more bad news.

49884d1315282624-toyota-second-language-would-you-kindly-interpret-factory-repair-manual-text-jackstands.jpg


It looks like you have a rear main or an oil pump seal leak.

Another DIY project for you to complete. :thumb3:
 
you have a rear main or an oil pump seal leak

You are quite astute, as I didn't attempt at all to highlight the copious oil drips while I park (which is the reason for the cardboard and astroturf under the 4Runner n the garage).

Long ago, I had asked about what the most likely source of that oil leak might be:
- The most likely culprit in a 4-cylinder manual 2wd Toyota 4Runner leaking motor oil?

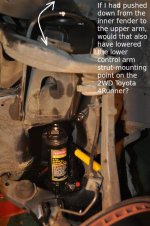
Most people just use their spare tire bottle jack and push the upper control arm down from the inner fender.

Thanks for that information and for that illustrative picture!

I had been wondering if pushing down on the upper control arm would have worked for the 2WD 4Runner before I hit upon the idea of pushing down on the lower control arm. Do they both work together in the same direction?

I didn't know if they would work in tandem (plus the inner fender didn't look all that strong either, at least not in comparison to the frame point just above the lower control arm). I'd hate to have a bottle jack punch its way up through the fender!

I wonder ...

If, perchance, I had pushed down on the upper control arm, as you did in your excellent picture above, would that "also" have worked on the 2WD 4Runner to bring the lower control arm down to the shock bolt opening? Or would it have lowered the shock to bring it down to the lower control arm opening?
 

Attachments

  • control_arms.JPG
    control_arms.JPG
    48.5 KB · Views: 1,380
Last edited:
I like this thread. You are making me feel like a genius. I thought I was not adequately prepared when I started this but it was easy. Thanks for the confidence boost.
 
Status
Not open for further replies.

Members online

Forum statistics

Threads
278,317
Messages
3,554,129
Members
248,016
Latest member
Advally Service

Trending content

Back
Top