Toyota as a second language - Would you kindly interpret factory repair manual text

Status
Not open for further replies.

mom

Banned
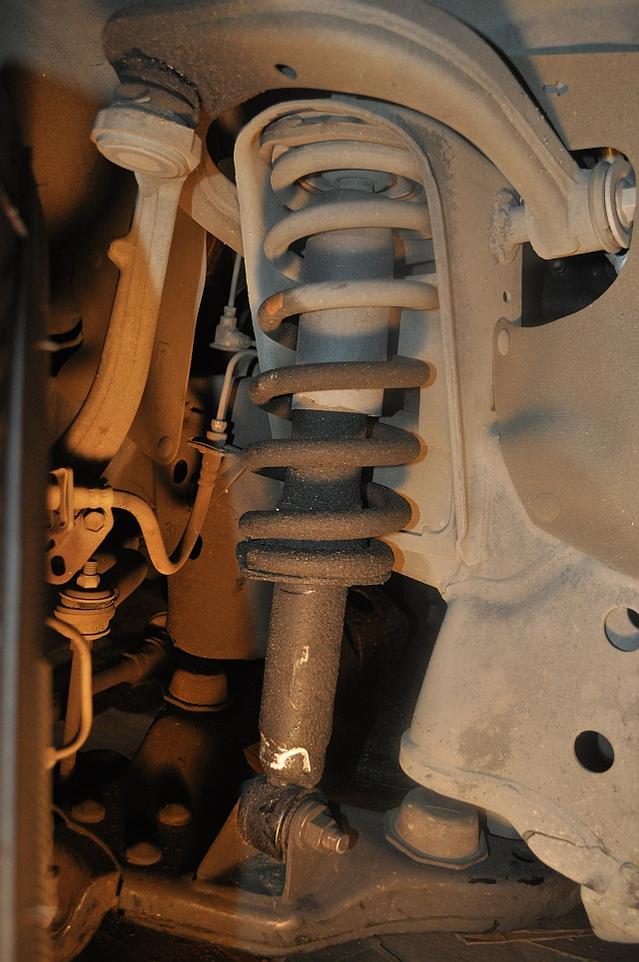
Faced with a busted shock, and assuming the proper tools, I'm trying to understand the stated procedure in the Toyota Factory Repair Manual.

Since handling springs is a safety issue, would you kindly help 'interpret' the Toyota-speak for me?

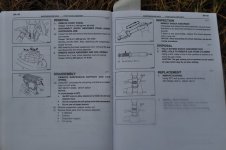
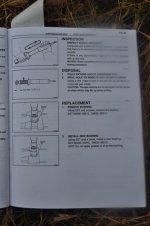
Toyota "1997 4Runner Repair Manual", Pub. No. RM 509U, pages SA-42 to SA-44 (Suspension and Axle - Front Shock Absorber).

Removal:

  1. Remove front wheel
    • Torque: 110 N-m (1,150 kgf-cm, 83 ft lbf)
  2. Disconnect shock absorber from lower suspension arm
    • Loosen the bolt and remove the shock absorber lower nut and washer
      • Torque: 135 N-m (1,400 kgf-cm, 101 ft-lbf)
      • Installation hint: After stabilizing the suspension, torque the bolt.
    • With lowering the lower suspension arm, remove the bolt and disconnect the shock absorber
  3. Remove shock absorber and coil spring
    • Remove the 3 nuts, shock absorber and coil spring.
    • Torque: 64 N-m (650 kgf-cm, 47 ft-lbf)
Code:
[COLOR=Navy]QUESTION 1: What does "stabilizing the suspension" actually mean in terms of actions to perform?

QUESTION 2: What does "with lowering the lower suspension arm" equate to in actions to perform (i.e., how do you lower the suspension arm)?[/COLOR]
Disassembly:

  1. Remove suspension support and coil spring
  2. Using SST, compress the coil spring until there is a clearance on both ends.
    • SST 092727-00060, 09727-30021
    • Notice: to avoid damage to SST:
      • Set SST arms to allow clearance to hold a 8-roll coil between them
      • Do not compress the coil spring more than necessary
      • Do not use an impact wrench
  3. Remove suspension support center nut.
  4. Remove these parts from the shock absorber.
    • 2 retainers
    • Cushion
    • Suspension support
    • Coil spring
Code:
[COLOR=DarkSlateBlue]QUESTION 3: Is the "suspension support" the same as the strut?[/COLOR]
Replacement:

  1. Remove bushing
    • Using SST and a press, remove the bushing
    • SST 09506-35010, 09632-36010
  2. Install new bushing
    • Using SST and a press, install a new bushing
    • SST 09506-35010, 09632-36010
    • Hint: Do not apply grease or oil to the bushing
Code:
[COLOR=DarkSlateBlue]QUESTION 4: How do you remove the bushing without the special service tool?[/COLOR]
Reassembly:

  1. Install coil spring to shock absorber
    • Using SST, compress the coil spring
    • SST 092727-00060, 09727-30021
    • Notice: to avoid damage to SST:
      • Set SST arms to allow clearance to hold a 8-roll coil between them
      • Do not compress the coil spring more than necessary
      • Do not use an impact wrench
    • Install the coil spring to the shock absorber
      • Hint: Fit the lower end of the coil spring into the gap of the spring seat of the shock absorber.
  2. Install suspension support
    • Install the 2 retainers, suspension support, and cushion to the rod
    • Temporarily tighten a new suspension support center nut.
    • Align the suspension support with the shock absorber lower bushing, as shown.
      • Hint: Face the lower end of the coil spring to the outside of the vehicle.
    • Remove the SST
      • Hint: After removing the SST, recheck the direction of the suspension support.
    • Torque the suspension center nut.
      • Torque: 25 N-m (250 kgf-cm, 18 ft-lbf)
Installation:

  1. Installation is in the reverse order of removal.
Code:
[COLOR=DarkSlateBlue]QUESTION 5: Didn't they already cover installation above, in detail?[/COLOR]
 

Attachments

  • toyota_shop_manual.jpg
    toyota_shop_manual.jpg
    90.7 KB · Views: 2,677
Last edited:
Register to hide this ad
QUESTION 1: What does "stabilizing the suspension" actually mean in terms of actions to perform?

QUESTION 2: What does "with lowering the lower suspension arm" equate to in actions to perform (i.e., how do you lower the suspension arm)?
QUESTION 3: Is the "suspension support" the same as the strut?
QUESTION: How do you remove the bushing without the special service tool?QUESTION: Didn't they already cover installation above, in detail?

Answer 1: Stabilizing means to hold steady. They want you to block the lower control arm from moving up or down while removing the lower strut bolt. Use a floor jack to stabilize the lower control arm.

Answer 2: Lowering the suspension arm means to remove the block or floor jack that you used to stabilize the lower control arm, and push down.

Answer 3: Yes, the suspension support is the strut assembly

Answer 4: The new strut will include the lower busing already installed. But, if you want to really know, I use a vise and the appropriate sockets. Comes right out.

Answer 5: Yes, they did but they have to put an ending to the story. :zoom:
 
Answer 1: Use a floor jack to block the lower control arm from moving up or down while removing the lower strut bolt.

Answer 2: Remove the block or floor jack that you used to stabilize the lower control arm, and push down to lower the suspension arm.

Answer 3: The suspension support is the strut assembly

Answer 4: Use a vise and the appropriate sockets. Comes right out.

Thank you very much for that helpful interpretation of Toyota-speak!

I just couldn't figure out what "stabilizing the suspension" meant in the Toyota factory repair manual.

I guess if I had ever done the job before, the missing pieces would make sense. Unfortunately, the Chilton shop manual wasn't any better than the Toyota factory shop manual, as the explanation is different.

For example, here is what my Chilton says ...

#68604 Chilton Toyota Pick-ups/Land Cruiser/4Runner 1997-00 Repair Manual, section 8, Suspension and Steering:

Tacoma, Tundra, 4 Runner, and Pre Runner:

  1. Raise and properly support the vehicle
  2. Remove the front wheel
  3. Remove the shock absorber nut and washer from the lower control arm
  4. While slowly lowering the front suspension, remove the lower bolt from the shock absorber assembly.
  5. Support the shock
  6. Remove the three nuts from the top of the shock tower.
  7. Lower the assembly out of the wheel well.
Code:
[COLOR=Navy]QUESTION 6: Since the strut is a part of the suspension, does "[I]properly support the vehicle[/I]" mean anything more than simply lowering the 'frame' onto jack stands after jacking up the front at the engine?

QUESTION 7: How are you supposed to "lower the front suspension" at the same time that you are removing the bolt from the bottom of the shock absorber assembly?[/COLOR] (You only have two hands.)

[COLOR=Navy]QUESTION 8: What does "support the shock" mean?[/COLOR]
To install:

  1. The remainder of installation is the reverse of removal.
    • Please note the following torque specifications:
      • 3 upper mount to body nuts: 47 ft. lbs. (64 Nm)
      • Lower shock absorber mounting bolt: 101 ft. lbs. (135 Nm)
      • Wheel lug nuts: 83 ft. lbs. (110 Nm)
45370d1306812841-1997-2wd-4runner-front-shock-blown-need-parts-suppliers-2wd-diy-steps-advice-leaking_strut_1997_toyota.jpg
 
Last edited:
QUESTION 6: Since the strut is a part of the suspension, does "properly support the vehicle" mean anything more than simply lowering the 'frame' onto jack stands after jacking up the front at the engine?

QUESTION 7: How are you supposed to "lower the front suspension" at the same time that you are removing the bolt from the bottom of the shock absorber assembly? (You only have two hands.)

QUESTION 8: What does "support the shock" mean?

Question 6: yes
Question 7: Get a buddy or use your left hand to push down the control arm and your right hand to pull the bolt out.
Question 8: Hold the strut from falling out of the frame member.


Some of these questions are quite elementary in the world of Automotive repair. Your reading from two service manuals which contradict each other and still asking advice from the online community.

Not to be unsupporting or to insult your intelligence but this job is way over your head. You should take your truck to a shop to repair. You will get hurt or cause more damage to your 4runner more then that already has been done.
 
Not to be unsupporting or to insult your intelligence but this job is way over your head. You should take your truck to a shop to repair. You will get hurt or cause more damage to your 4runner more then that already has been done.

x2. It's a simple job, and if you're having to do this much research to see if you can do it, you shouldn't risk your truck and your safety. If you were as good as working on a truck as you are at making over-the-top thread complexity... well you'd have built the best rig on here.

Good luck.
 
Not at all helpful to you but..... Is it just me or does the picture at the top of page SA-43 look dirty? Especially with the up, twist, down, twist arrows. :boink:
 
Not at all helpful to you but..... Is it just me or does the picture at the top of page SA-43 look dirty? Especially with the up, twist, down, twist arrows.

I'm not sure I understand that question any better than I do the Toyota factory speak ...

If I 'assume' you're asking about the blurry part of the picture, it's probably because the lens was smudged, as the other pictures show a corner smudged.

Is 'that' what you were asking about?
 

Attachments

  • page_sa-43_toyota.jpg
    page_sa-43_toyota.jpg
    60.2 KB · Views: 1,922
I'm not sure I understand that question any better than I do the Toyota factory speak ...

If I 'assume' you're asking about the blurry part of the picture, it's probably because the lens was smudged, as the other pictures show a corner smudged.

Is 'that' what you were asking about?

No, no, the other side.. Where the dude is "inspecting" his shock.

**"No Honey, I swear... This isn't what it looks like, I was just inspecting my shock absorber!"**
 
Last edited:
No, no, the other side.. Where the dude is "inspecting" his shock.

**"No Honey, I swear... This isn't what it looks like, I was just inspecting my shock absorber!"**

Lol... seriously... how did anyone not get that? I lol'd at the pic after you mentioned it. Hope that worked out for him, ahah
 
That could be a new workout device

Oh. Now I get it. Sorry. It was the furthest thing from my mind for this thread.

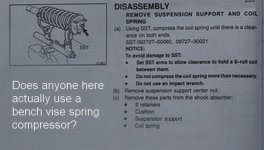
The diagram I found interesting was the one at the bottom left (zoomed in below).

I find it strange that Toyota suggests a bench vise style spring compressor.

Am I the only one who finds that strange? Or do some of you actually use the bench vise spring compression method?
 

Attachments

  • toyota_spring_compressor.jpg
    toyota_spring_compressor.jpg
    30 KB · Views: 6,839
Oh. Now I get it. Sorry. It was the furthest thing from my mind for this thread.

The diagram I found interesting was the one at the bottom left (zoomed in below).

I find it strange that Toyota suggests a bench vise style spring compressor.

Am I the only one who finds that strange? Or do some of you actually use the bench vise spring compression method?

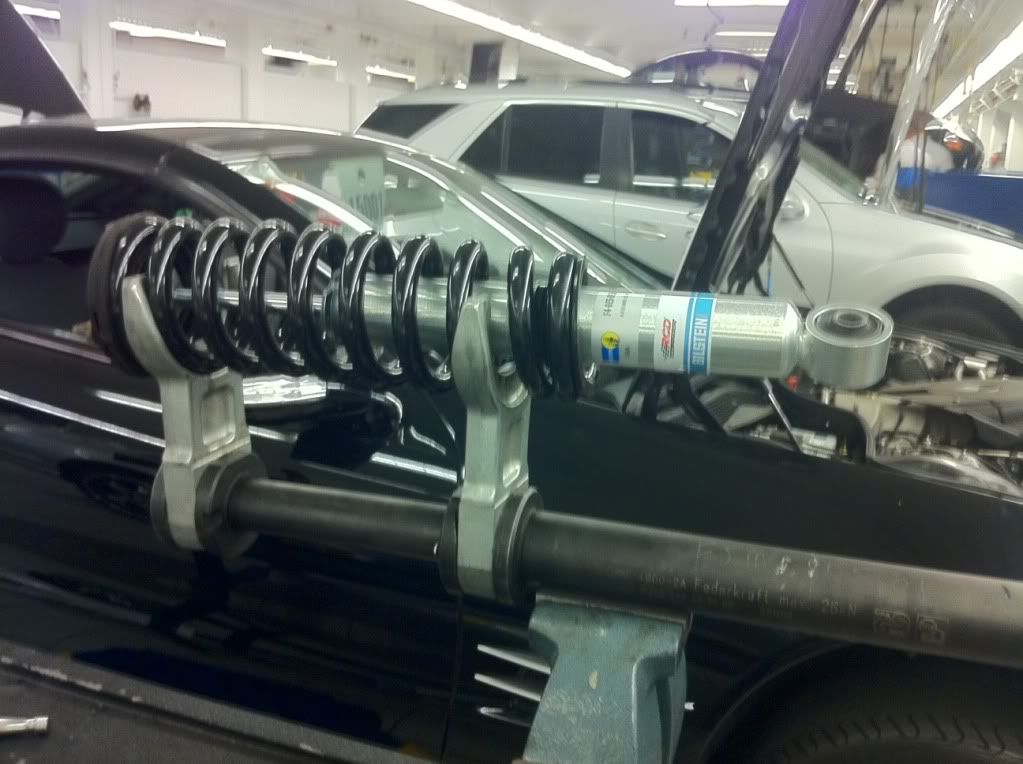
We use them at Mercedes-Benz as well. I used one for my springs.

photo22.jpg~original
 
If you were as good as working on a truck as you are at making over-the-top thread complexity... well you'd have built the best rig on here

I understand your point - which is - that this job may be too much for me.

It may be ... I don't know ... but that's why I'm asking the questions and looking up the procedures and trying to understand them.

Tentatively, I 'think' I can do it ... and ... if I do ... I'll try to write up a DIY like I did for the clock repair:

Apparently, the only tasks I have left are to:

  1. Choose the shock at a good price for a good supplier (Tokico)
  2. Rent the spring-compression tools
  3. Replace the shocks
  4. Test the ball joints and tie rods and tie rod ends
  5. Check my alignment in the garage using hand tools
  6. If alignment is vastly off, then have it professionally aligned
  7. Write up the DIY! :)
Did I miss anything important?
 
I understand your point - which is - that this job may be too much for me.

It may be ... I don't know ... but that's why I'm asking the questions and looking up the procedures and trying to understand them.

Tentatively, I 'think' I can do it ... and ... if I do ... I'll try to write up a DIY like I did for the clock repair:

Apparently, the only tasks I have left are to:

  1. Choose the shock at a good price for a good supplier (Tokico)
  2. Rent the spring-compression tools
  3. Replace the shocks
  4. Test the ball joints and tie rods and tie rod ends
  5. Check my alignment in the garage using hand tools
  6. If alignment is vastly off, then have it professionally aligned
  7. Write up the DIY! :)
Did I miss anything important?

I see your point, and that while it may seem easy on paper, it's no walk in the park for most beginners. No offense to you, but this isn't something ridiculously simple like fixing a clock.

You could try, but if I were you, I would have someone else do it. Spring compressors are no fun and dangerous.

Of course, everyone has to learn somehow. Go for it if you're confident... I'm not sure if the amount of detail you put into your DIY's is necessary. I feel you take simple tasks way too far. Fancy bullet points, extra text boxes... it's a lot to take in for a simple do-it-yourself. That's just me.

Again, no offense. Good luck with your shock install.
 
I agree with what others have said that you might be biting off more then you can chew. I give you props for taking the time to make your posts as long and as thorough as they are.

The job you are trying to do is actually really easy and very strait forward. Its the the preparation that is the hard and dangerous part. You have to take your time and make sure you get the truck properly on jack stands in a safe manner and getting the front struts assembled. Once you do that its literally almost a unbolt, remove, install, rebolt job.

I'm very mechanically inclined and im studying to be a mechatronic engineer (ME, EE and CS all slapped together) so i am very comfortable with mechanical machines and how everything works. That being said, i did not want to touch front springs. i believe the stock front coils are around 550lb-in springs, and when installed they are compressed 2-3 inches. Call it 3, that upwards of 1650lbs of force waiting to be released, way to much for me to risk. I took mine in to midias, they assembled the front struts for me for all of $20.

So i give you props for going out there and attempting to do everything yourself and are willing to ask questions. This job is really simple and you need to remember KISS, Keep It Simple Stupid. No need to over complicate it the way you are.

Best of luck to you. And there are plenty of write ups on how to do this.
 
Any final hints before I tackle my very first shock absorber replacement in my life?

I finally bought the Bilstein shocks and rented the spring compressor tool from Autozone.

While everyone said the DIY is apparently ubiquitous, I couldn't find a good 2wd DIY (nor even a good 4WD front shock DIY).
It looks like I'm not the only one who couldn't find a good 97 Toyota front shock DIY - neither could these folks:
* front shock replacement
* Front and Rear SHock Replacement
* Article on changing front shocks

Googling, I found a video DIY but for the wrong year and which doesn't seem to have a coil spring wrapped around it:
* DIY: Replacing front shock 1993 Toyota Pickup 2wd - YouTube

Googling some more, I found a 3rd-generation installation hint section (but no DIY):
- Bilstein shocks

This 4th-Gen DIY is for a no-spring-compressor method - but for my first 3rd-Gen DIY - I'd rather do it by the book:
* OME Install - no spring compressor

This also isn't a DIY, but it has hints for the 3rd-Gen front shock replacement:
* Long post, picky details on 3rd Gen front struts, KYB Monomax

The closest I found for a 97 2WD 4Runner DIY is this 2001 suspension lift kit DIY:
* Old Man Runner Lift Kit DIY

I will try to tackle this job tomorrow, labor day. Since I can't seem to locate the elusive DIY, hopefully I can post a nice DIY for other newbies to follow.

To re-write the Toyota & Chilton instructions, adding all your clarifications, I propose this as a combined procedure that I intend to follow.

Removal:

  1. Spray penetrating oil on all bots & nuts the night before you perform the DIY.
  2. Loosen the front wheel lug bolts
  3. Jack the Toyota 4Runner from under the engine
  4. Support the frame placing jackstands under the bolts for the crossmember supports.
  5. Also place a jackstand under the opposite rear corner, to stabilize the frame.
    • Note: If you dont do this, the action of jacking up the suspension, will compress the opposite rear suspension, and not allow the shocks to compress enough to be assembled.
  6. Remove the front wheel
    • Torque: 110 N-m (1,150 kgf-cm, 83 ft lbf)
  7. To disconnect the shock absorber from lower suspension arm:
    • Loosen the lower bolt and remove the shock absorber lower nut and washer from the lower control arm
      • Torque: 135 N-m (1,400 kgf-cm, 101 ft-lbf)
      • Installation hint: After stabilizing the suspension, torque the bolt.
        • Note: Stabilizing means to hold steady. The problem you're trying to prevent is the lower control arm wants to move up, about an inch, once you remove the strut lower bolt. If you allow the lower control arm to move up that inch, then, later on, when you're putting the shock back, you then need to force the strut down, manually, to get the bolt holes to align with the shock. Use anything you can to block the lower control arm from moving up that one inch. Stabilize the lower control arm before you remove the lower bolt.
    • While slowly lowering the front suspension, remove the lower bolt from the shock absorber assembly and disconnect the shock absorber
      • Note: Lowering the suspension arm means to remove the block or floor jack that you used to stabilize the lower control arm, and push down.
  8. To remove the shock absorber and coil spring assembly:
Disassembly:

  1. Remove suspension support and coil spring
    • Note: The suspension support is the strut assembly.
    • Measure the length before compressing so you know how much to compress when reassembling later!
  2. Using a spring compressor, compress the coil spring until there is a clearance on both ends.
    • SST 092727-00060, 09727-30021
    • Notice: to avoid damage to SST:
      • Set SST arms to allow clearance to hold a 8-roll coil between them
      • Do not compress the coil spring more than necessary
      • Do not use an impact wrench
  3. Remove suspension support center nut.
  4. Remove these parts from the shock absorber.
    • 2 retainers
    • Cushion
    • Suspension support
    • Coil spring
Replacement:

  1. Remove bushing
    • Using SST and a press, remove the bushing
    • SST 09506-35010, 09632-36010
      • Note: Some use a vise and sockets to remove the bushing.
  2. Install new bushing
    • Using SST and a press, install a new bushing
    • SST 09506-35010, 09632-36010
    • Hint: Do not apply grease or oil to the bushing

  • Note: The new strut should include the lower bushing already installed.
Reassembly:

  1. Ensure that the factory springs are re-installed on the same side they were removed from.
    • Note the different paint marks on the coil spring for each side.
    • Also note the paint marks face the front of the vehicle.
  2. Install coil spring to shock absorber
    • Using SST, compress the coil spring
    • SST 092727-00060, 09727-30021
    • Notice: to avoid damage to SST:
      • Set SST arms to allow clearance to hold a 8-roll coil between them
      • Do not compress the coil spring more than necessary
      • Do not use an impact wrench
    • Install the coil spring to the shock absorber
      • Hint: Fit the lower end of the coil spring into the gap of the spring seat of the shock absorber.
  3. Install suspension support
    • Install the 2 retainers, suspension support, and cushion to the rod
    • Temporarily tighten a new suspension support center nut.
    • Align the suspension support with the shock absorber lower bushing, as shown.
      • Hint: Face the lower end of the coil spring to the outside of the vehicle.
    • Remove the SST
      • Hint: After removing the SST, recheck the direction of the suspension support.
    • Torque the suspension center nut.
      • Torque: 25 N-m (250 kgf-cm, 18 ft-lbf)
Installation:

  1. The remainder of installation is the reverse of removal.
  2. Please note the following torque specifications:
    • 3 upper mount to body nuts: 47 ft. lbs. (64 Nm)
    • Lower shock absorber mounting bolt: 101 ft. lbs. (135 Nm)
    • Wheel lug nuts: 83 ft. lbs. (110 Nm)
  3. Make sure the front strut spring seat is installed correctly: the rounded part faces upward.
  4. Confirm that the lower end of the coil spring is facing toward the outside of the vehicle.
 
Last edited:
Choose the shock at a good price for a good supplier (Tokico)

FYI one of my front Tokico struts started to LEAK after about 40,000 miles. I am now running the adjustable Bilstiens like many others here.
 
FYI one of my front Tokico struts started to LEAK after about 40,000 miles. I am now running the adjustable Bilstiens like many others here.

I bought a set of yellow non-adjustable Bilsteins.

It's disheartening to note there are apparently no decent pictorial DIYs for a 3rd-generation Toyota 4-Runner.

Generally, the dearth of DIYs would either indicate nobody does it themselves, or, that it's so easy, that it doesn't require a DIY.

For example, this person below asked for a DIY:
- Front shock replacement

And, what they got was simply the following(which merely parotted the information in the shop manual).
79342318

Remove the front wheel. NOTE: when installing the front wheel, tighten it to 110 Nm (83 ft. lbs.) .
Disconnect the shock absorber from the lower suspension arm by doing the following.
Loosen the bolt and remove the shock absorber lower nut and washer. Installation Hint: After stabilizing the suspension, tighten the bolt to 135 Nm (101 ft. lbs.) .
With lowering the lower suspension arm, remove the bolt and disconnect the shock absorber.

79342475
Remove the shock absorber and the coil spring after removing the three nuts, shock absorber and coil spring. NOTE: when installing the shock and the coil spring, tighten the three bolts to 64 Nm (47 ft. lbs.) .
INSTALLATION
Install in the reverse order of removal.

It should take about 1.4 hours

45372d1306814097-1997-2wd-4runner-front-shock-blown-need-parts-suppliers-2wd-diy-steps-advice-right_front_strut.jpg
 
Last edited:
That quote from shootmymime is literally exactly what's required.

It's not hard, that's why we're worried that you'll have trouble. Seems simple mechanical skills don't come as easy for you. Strut replacement takes nothing but common sense. If you can't figure it out just by examining the assembly, noticing the 3 obvious bolts on top and one on bottom, I am not sure that you should be working on your own car.

Reading up on it was a good idea, but you actually own the shop manual that guides you through step by step, what do you need a write up for? Confirmation that the manual isn't lying? You'll get the best (and clearly, the most thorough) instruction from that book.

You're in way over your head, and if you do complete it, I hope it doesn't take you 5 hours.

Good luck, don't kill yourself with specifics. Just go out there and do it already. You could have done the install in the time it took you to write up these fancy, unnecessarily detailed, posts.
 
Status
Not open for further replies.

Members online

Forum statistics

Threads
278,317
Messages
3,554,128
Members
248,016
Latest member
Advally Service

Trending content

Back
Top