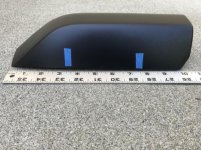
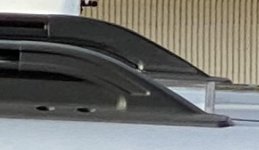
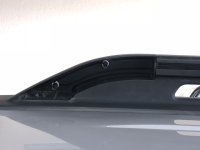
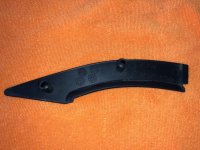
Trail edition factory roof rack

looking to buy a set of these TE rails if anybody is selling..... located in nor cal (sacramento)

I will be removing mine in the next few weeks. I currently have 4 LFD ruggedize crossbars (10-13 Trail specific) installed but will also include the 2 factory crossbars. I am in SoCal but drive up to the bay (El Sobrante area) every so often.
 
I will be removing mine in the next few weeks. I currently have 4 LFD ruggedize crossbars (10-13 Trail specific) installed but will also include the 2 factory crossbars. I am in SoCal but drive up to the bay (El Sobrante area) every so often.

Hey, just sent you a pm!
 
Looking for Trail Edition Roof Rack

If anyone has or knows where to pick up a 2010-2013 Trail Edition Roof Rack I'm interested, thanks!
 
I may have missed it in this thread, but how does one go about removing the crossbars (including the items in the channel)? Best I can tell it seems like there is a panel on the front of the side rails (on the inside) that maybe pops off. Can anyone confirm?

Basically the side rails are going to stay on the car but I'm looking to remove the crossbars completely and possibly slide something else in instead. So I can't have all the old hardware left behind in the channels and I need the ability to put new hardware in the channels.
 
I may have missed it in this thread, but how does one go about removing the crossbars (including the items in the channel)? Best I can tell it seems like there is a panel on the front of the side rails (on the inside) that maybe pops off. Can anyone confirm?

Basically the side rails are going to stay on the car but I'm looking to remove the crossbars completely and possibly slide something else in instead. So I can't have all the old hardware left behind in the channels and I need the ability to put new hardware in the channels.
Reply to Mike5's question
On my 2012 TE, I got a set of Toyota tie downs that slide into the rail channels, and I installed them according the instructions by popping up/off the plastic ends at the BACK of my 4Runner. As I recall, there is a small space for a screwdriver or other pry tool at the bottom, then the plastic end (slanty thing that covers the end of the rails) pops up/off and you will have access to the rail channels.

Amazon help, this is what I bought, maybe you can look up the part online & see the install instructions? TOYOTA Genuine Accessories PT278-89100-TD Tie Down

Hope this helps, I didn't see someone more knowledgeable jumping in with a reply.
--
Dave
 
Hey Dave,

Thanks so much for your explanation! I took another look at the back pieces, and sure enough it appears like it is a two piece design. I'll try and put a tool in there and see if I can pop off that end cap at some point. One more question if I may, with respect to that gap where a tool can be fitted, do I basically put a tool in there and try to split that cover from the rail or try and get a tool underneath the cap and pop it off? In other words, pop backwards or pop up?
 
Hey Dave,

Thanks so much for your explanation! I took another look at the back pieces, and sure enough it appears like it is a two piece design. I'll try and put a tool in there and see if I can pop off that end cap at some point. One more question if I may, with respect to that gap where a tool can be fitted, do I basically put a tool in there and try to split that cover from the rail or try and get a tool underneath the cap and pop it off? In other words, pop backwards or pop up?

Get a plastic panel popper and insert in the rear between the rubber seal and the plastic cover. Pull up and release the spring clip. Once free'd you should be able to slide the cover off (rearward). You may want to loosen the bolts holding the side rails to the roof (T40 i believe) as the front and rear cross bars are different lengths. I removed my rack last week...
 
Last edited:
Get a plastic panel popper and insert in the rear between the rubber seal and the plastic cover. Pull up and release the spring clip. Once free'd you should be able to slide the cover off (rearward). You may want to loosen the bolts holding the side rails to the roof (T40 i believe) as the front and rear cross bars are different lengths. I removed my rack last week...

Perfect, appreciate it!

Once my little project is done I'll post up my results.
 
Hey Dave,

Thanks so much for your explanation! I took another look at the back pieces, and sure enough it appears like it is a two piece design. I'll try and put a tool in there and see if I can pop off that end cap at some point. One more question if I may, with respect to that gap where a tool can be fitted, do I basically put a tool in there and try to split that cover from the rail or try and get a tool underneath the cap and pop it off? In other words, pop backwards or pop up?

I think it's a pop up, from the bottom of the plastic piece. It's been awhile since I did this, last fall. So, don't break anything on my advice, I'd feel bad.

Google search found this, maybe helps? http://toyotaparts.sparkstoyota.com/install/PT278-89100inst.pdf
 
I think it's a pop up, from the bottom of the plastic piece. It's been awhile since I did this, last fall. So, don't break anything on my advice, I'd feel bad.

Google search found this, maybe helps? http://toyotaparts.sparkstoyota.com/install/PT278-89100inst.pdf

Thanks. I had looked at that document, but the part numbers don't correspond to the trail rack best I can tell. However I will use a plastic pry bar to see if I can pop them off. Now that I those parts remove, I should be able to make it work.
 
Thanks. I had looked at that document, but the part numbers don't correspond to the trail rack best I can tell. However I will use a plastic pry bar to see if I can pop them off. Now that I those parts remove, I should be able to make it work.

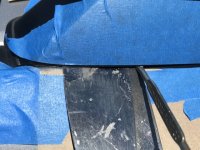
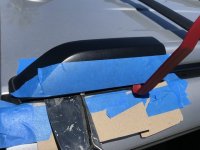
I have an 18 ORP but I believe the side rail end covers are almost the same. Here’s how I removed my rear covers.

Put masking tape over your roof area to protect it in case you slip with your tools. I also taped down a layer of thin cardboard. Don’t pry against the roof metal. I used a thin putty knife to open a small gap between the cover and it’s base plate at the rearmost clip location. (See the photo with blue tape at the clip locations). I actually used two putty knives, one on top of the other. Then inserted a paint can lid removal tool between putty knife and cover to lever up on the putty knife and pop the clip up. With a large gap opened up I then used a plastic trim tool to slide and locate the other clip and pull up to remove the other clip and the cover came right off. See the photos for reference.
 

Attachments

  • 4F2B0BE9-F324-449B-B5EF-ACA170ECD84E.jpg
    4F2B0BE9-F324-449B-B5EF-ACA170ECD84E.jpg
    58.3 KB · Views: 769
  • 294D4BFA-AA23-4164-91DC-C7BE279204BC.jpg
    294D4BFA-AA23-4164-91DC-C7BE279204BC.jpg
    79.7 KB · Views: 777
  • 894C785A-5D31-48EE-83BD-EE31BD61B4C3.jpeg
    894C785A-5D31-48EE-83BD-EE31BD61B4C3.jpeg
    130.2 KB · Views: 791
  • 37363AED-9173-423C-9067-54673434DE30.jpeg
    37363AED-9173-423C-9067-54673434DE30.jpeg
    90.6 KB · Views: 781
Thank you for the pictures. You’re probably right on the methodology, my concern is over the fact that these covers are shaped different and the entire rack is different too. So not sure if there was a difference in methodology.
 
I have an 18 ORP but I believe the side rail end covers are almost the same. Here’s how I removed my rear covers.

Put masking tape over your roof area to protect it in case you slip with your tools. I also taped down a layer of thin cardboard. Don’t pry against the roof metal. I used a thin putty knife to open a small gap between the cover and it’s base plate at the rearmost clip location. (See the photo with blue tape at the clip locations). I actually used two putty knives, one on top of the other. Then inserted a paint can lid removal tool between putty knife and cover to lever up on the putty knife and pop the clip up. With a large gap opened up I then used a plastic trim tool to slide and locate the other clip and pull up to remove the other clip and the cover came right off. See the photos for reference.

Nope. They are completely different. Only the inside of the 10-13 Trail rack end cap is removable. The good part is you don't have to pry it off down next to the sheet metal.
 

Attachments

  • Screen Shot 2020-07-07 at 8.44.50 PM.jpg
    Screen Shot 2020-07-07 at 8.44.50 PM.jpg
    64.5 KB · Views: 799
  • IMG_2172.jpeg
    IMG_2172.jpeg
    124.3 KB · Views: 758
  • IMG_2169.jpg
    IMG_2169.jpg
    138.1 KB · Views: 751
Mark!

I think you're pointing out exactly what I was seeing when I originally asked the question. Your pictures indicate the front inside of each rail. When visually inspecting it seemed to me like those might pop off. Your pictures confirm it! Couple of questions if I may:

- It appears that these front inside covers basically pull back straight (towards the center of the roof). Is that correct?
- Once these inside covers are removed, does that expose the inside channel (in order to slide an item in or out) or is there a stopper or some other object?
- To confirm, the back is not a two piece design (with pop off covers)? I'm attaching pictures from the back that seem to indicate a two piece design.

Again, thanks a million!

Rack1.JPG

Rack2.JPG
 
Mark!

I think you're pointing out exactly what I was seeing when I originally asked the question. Your pictures indicate the front inside of each rail. When visually inspecting it seemed to me like those might pop off. Your pictures confirm it! Couple of questions if I may:

- It appears that these front inside covers basically pull back straight (towards the center of the roof). Is that correct?
- Once these inside covers are removed, does that expose the inside channel (in order to slide an item in or out) or is there a stopper or some other object?
- To confirm, the back is not a two piece design (with pop off covers)? I'm attaching pictures from the back that seem to indicate a two piece design.

Again, thanks a million!
As for popping them out, you are correct. They pull straight out, not up. I used a plastic spudger to get behind and pry them. But it looks like you have to remove the back covers to slide bars in and out. Back caps are removed vertically.

This video is the info you are looking for.
 
As for popping them out, you are correct. They pull straight out, not up. I used a plastic spudger to get behind and pry them. But it looks like you have to remove the back covers to slide bars in and out. Back caps are removed vertically.

This video is the info you are looking for.

PERFECT...that video was definitely what I was looking for. Thanks a million...again!
 
Thread revival

Reviving this...

I am in western NC and looking for a 10-13 Trail edition roof rack. I am willing to pay shipping if needed also. PM me if you have one for sale in good condition with all hardware.
 
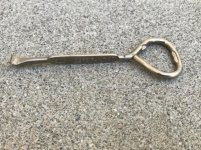
Hooped Thumb Screw

Does anyone know where to get the hooped thumb screws that provide a tie down point, in addition to providing the ability to adjust the crossbars front to back? I lost one and am having one hell of a time tracking down the part. Even Toyota Parts of Dallas is stumped...

YiWIWmC.png

I'm certain more of us are going to lose these screws in time so I thought to post that I verified with the dealer that this part is NOT identified or sold separately. It is considered part of the overall assembly of the rack.
 
Last edited:
I'm certain more of us are going to loose these screws in time so I thought to post that I verified with the dealer that this part is NOT identified or sold separately. It is considered part of the overall assembly of the rack.
If you have one good bolt, run it up to Ace hardware and find out the thread size. Get a stainless bolt long enough to tac on your own tie down point, dip it black and your set... I think
 

Members online

Forum statistics

Threads
278,317
Messages
3,554,125
Members
248,016
Latest member
Advally Service

Trending content

Back
Top