Warthog Build and Adventure Thread

FrontBumper9.jpg
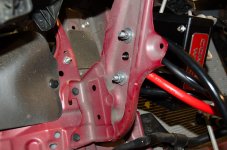
On the back side, I added a couple of larger washers for a more secure mount.
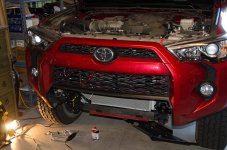

FrontBumper10.jpg
Bumper cover back on! Looking a bit less like a wrecked vehicle...

Installing bumper:

Tip: This is from [MENTION=105481]3wbdriver[/MENTION]. There are several threaded holes that may have paint or powder coat in them making threading bolts into them difficult. If you have a 3/8 16 tap, run it through the threaded holes to clear the threads before mounting the bumper. (Two on each side of the bumper and two on each of the bumper cover brackets that came with it)

I didn't get any pictures of this part because it took both people to do the work. I put a 1x6x12 in board on top of my floor jack, then a towel over that. Then we lifted the bumper onto it. Because the bumper is so front heavy, I straddled the jack and held it up while my buddy jacked it up high enough to slip the two mounting plate hooks over the frames mounting plate then lowered the jack just enough to hook them on (THANK YOU SO MUCH FOR THOSE HOOKS SSS!) Two people might even be able to manhandle the bumper onto the hooks without a jack, but the jack made nice easy going...

I then tightened down all the bolts. Just a couple problems. I mounted the light bar too far back and it was pressing in on the grill a LOT. So had to take it off and re-drill :(


FrontBumper11.jpg
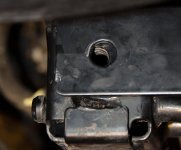
This was the second problem... ALL of the other holes aligned perfectly, but not this one. The quality and alignment of the bumper is excellent, but not all truck frames are perfectly identical. In the future, these mounting points should have slotted and slightly wider holes to account for frame irregularities.
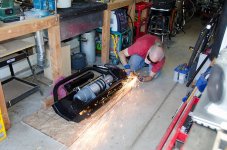

FrontBumper12.jpg
No bother, other than taking the bumper off for a second time. But any excuse to get out the plasma cutter is welcome :)

After looking at the picture I can see I kind of dodged an expensive bullet. I should have covered the winch spool, I could easily have ruined a $300 winch line. Looked at it closely and nothing burned thank goodness.
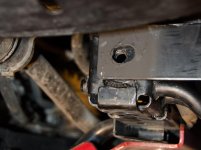

FrontBumper13.jpg
NOW it's aligned!!!


FrontBumper14.jpg
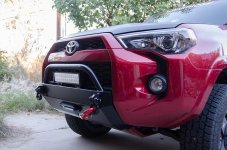
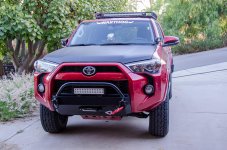
Viola! Looks freaking awesome :D


FrontBumper15.jpg
An upper skid plate, winch mount, light mount and tow points all in one little package.
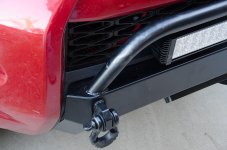

FrontBumper16.jpg
Close-up of the cutout. The black on black hides it nicely thanks to my previously dipping that part of the bumper. (Pardon the copious smudges of anti-seize on the bar :/)

Now should I dip the upper bar too like the pro?

I got the light hooked up but some finish work on the bumper cover, the entire winch electrical hook up, remount the stupid license plate (looks so clean without it) and massive garage cleanup wait me tomorrow...
 

Attachments

  • FrontBumper9.jpg
    FrontBumper9.jpg
    105.6 KB · Views: 4,191
  • FrontBumper10.jpg
    FrontBumper10.jpg
    132.1 KB · Views: 4,243
  • FrontBumper11.jpg
    FrontBumper11.jpg
    81.3 KB · Views: 4,248
  • FrontBumper12.jpg
    FrontBumper12.jpg
    138.7 KB · Views: 4,257
  • FrontBumper13.jpg
    FrontBumper13.jpg
    79.1 KB · Views: 4,175
  • FrontBumper14.jpg
    FrontBumper14.jpg
    127.9 KB · Views: 4,191
  • FrontBumper15.jpg
    FrontBumper15.jpg
    138.7 KB · Views: 7,412
  • FrontBumper16.jpg
    FrontBumper16.jpg
    85.5 KB · Views: 4,212
Last edited:
Nice job...I am still freaking out about removing the bumper and cutting the factory bodywork when mine gets here...lol.
 
Nice job...I am still freaking out about removing the bumper and cutting the factory bodywork when mine gets here...lol.

I know what you mean... This car isn't even a year old and I'm cutting the hell out of it! Not sure why but cutting the front was harder than when I cut the rear. But I've spent too much of my life worring about that things like resale value that never means anything in the end and never doing what I really wanted while I had the chance.

So nuts to that :D Cut the bumper!
 
It's looking good. I'm somewhat copying about 3 different builds out there when it comes to my tire/wheel/suspension choices, and my front bumper/skid/rear bumper choices. Anyway, it looks good and it helped me ultimately decide what to do on my front bumper choice for now.

So along those lines, how do you like the CBI rear bumper without a tire swing? I wasn't sure what to do for the rear bumper if I went with the SSS front. Don't know if I'll leave it stock for now, but the CBI looks nice. Do you think without the swing the side tubes are needed? Any changes you would make with the setup? Do you find it actually adds any clearance and improved departure angle as well as real protection?

Thanks and keep sharing.
 
Last edited:
It's looking good. I'm somewhat copying about 3 different builds out there when it comes to my tire/wheel/suspension choices, and my front bumper/skid/rear bumper choices. Anyway, it looks good and it helped me ultimately decide what to do on my front bumper choice for now.

So along those lines, how do you like the CBI rear bumper without a tire swing? I wasn't sure what to do for the rear bumper if I went with the SSS front. Don't know if I'll leave it stock for now, but the CBI looks nice. Do you think without the swing the side tubes are needed? Any changes you would make with the setup? Do you find it actually adds any clearance and improved departure angle as well as real protection?

Thanks and keep sharing.

Neither bumper increases approach/departure angles. In back you would need to cut off and relocate the cross member at the rear of the frame I think to get a bumper that helped at all there. Yeah I drag the CBI a lot, but that's what it's there for :D

In front, there are bumpers that sit a lot higher and might give you more clearance there. This one is very close to normal but might actually be slightly less. Need to sit next to an unmodified one and measure to tell...

As far as the side hoops on the rear, yeah I think they're handy. I've not hit anything with them yet but I have hit the side of the bumper trying to clear a narrow rock gap. The rear end is the hardest to see what's going on, especially on the pass side and I think you are more likely to bash up the rear quarter panel than anything else. So the more protection the better :)

I mainly went without the swing out just because I knew I would get hella tired of having to open it EVERY time I wanted in the back. Plus the loss of rear view, etc. It's perfectly fine to run a 31.6 in emergency spare with up to at least 33 inch tires as long as you aren't using a locker on solid ground, so the spare underneath was fine IMHO.
 
OMFG! (Bumper install adendum)

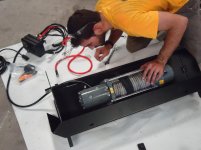
ARG! I somehow knew that wiring up the winch was going to be the near death of me somehow...

First, trying to get the ground cables attached to the bottom of the motor housing after being installed is.. impossible. But you can "clock" the motor, turning the threaded socket towards the radiator and get the two ground wires strapped on easily enough.

BUT, watch out. Instructions say to pull the housing out 5mm and you really need to make sure it's not any more than that! When I was moving the motor housing back to it's normal position, the weight and stiffness of the large ground cable caused the housing to move off the rotor entirely causing all the brushes to pop out of their holders making it impossible to get it back in place.

There was NO WAY with the bumper cover on to fix this. I wasn't even sure if I could fix it without taking the bumper back off. NOT HAPPY.

So I took the entire bumper cover back off and thankfully there was plenty of room to work on the motor. Using some zip ties I compressed two of the 4 brushes back into their holders, then using two fingers I could press the others in and get the motor housing back on the rotor. WHEW.

When I went to put the cap back on the back of the motor though I couldn't see the little wire with the white connector that was supposed to be coming out of the bottom of the motor. It was just GONE. Did I accidentally shear it off turning the motor? Where was it? ARG #2.

I looked all over and finally got out a flashlight to look inside the narrow space under the winch mount plate and sure enough there it was, doing it's best to hide from me. And thankfully nothing sheared of. It's just a little temp sensor on 2 inches of wire and a connector. Completely self contained. It fits into a rubber grommet in the motor cap.

Well with the motor all put back together, having the bumper cover off made it REALLY EASY to finish up the wiring!!! In fact I have an install modification to suggest:

TL:DR - Do not install the bumper cover until you are completely done with the bumper, winch and light bar install! Install EVERYTHING and then put the bumper cover in last. It just takes a little careful wedging and it slips right in behind the bumper and all other installation steps are 10x easier that way.

Edit: The above will probably only work with bumpers with forward slanting hoops or no hoop at all. Talking with [MENTION=105481]3wbdriver[/MENTION] below, another option is to mount the thick black and thin white ground cables to the motor before mounting the winch to the bumper. Possibly mount the motor power cables too. THen you will have to tape or otherwise temporarily secure the relay box to the bumper for the install...
 
Last edited:
Well with the motor all put back together, having the bumper cover off made it REALLY EASY to finish up the wiring!!! In fact I have an install modification to suggest:

TL:DR - Do not install the bumper cover until you are completely done with the bumper, winch and light bar install! Install EVERYTHING and then put the bumper cover in last. It just takes a little careful wedging and it slips right in behind the bumper and all other installation steps are 10x easier that way.

Wow! We wired everything right up from the top with the dust cover off, but I am directly wired to the battery for the moment. I was going to suggest doing it all with the bumper cover off, but I wasn't sure it would clear with the hoop. Good to know that works now. That would remove a major headache for a lot of people. You need to post that in the SSS thread.
 
Wow! We wired everything right up from the top with the dust cover off, but I am directly wired to the battery for the moment. I was going to suggest doing it all with the bumper cover off, but I wasn't sure it would clear with the hoop. Good to know that works now. That would remove a major headache for a lot of people. You need to post that in the SSS thread.

Hmm I wonder if that only works with the forward bent hoop or none at all... Did your rotate the motor to get the ground straps attached? If not... how on earth did you get those attached?
 
Hmm I wonder if that only works with the forward bent hoop or none at all... Did your rotate the motor to get the ground straps attached? If not... how on earth did you get those attached?

It would definitely be easier with the forward leaned hoop instead of the more vertical one Kevin had on his. I think he defaulted all of the production hoops to a 17 degree forward lean.

I guess Kevin must have run the ground wire (white?) when he was mounting the winch to the bumper. Because once I got in there to help all we had left was the wiring to the top of the winch motor. I can't see where the white wire is routed to with everything closed up, so I'm guessing it's under the winch motor?
 

Attachments

  • DSC00471.jpg
    DSC00471.jpg
    128 KB · Views: 2,573
Last edited:
It would definitely be easier with the forward leaned hoop instead of the more vertical one Kevin had on his. I think he faulted all of the production hoops to a 17 degree forward lean.

I guess Kevin must have run the ground wire (white?) when he was mounting the winch to the bumper. Because once I got in there to help all we had left was the writing to the top of the winch motor. I can't see where the white wire is routed to with everything closed up, so I'm guessing it's under the winch motor?

I guess there's no reason not to just wire up the entire solinoid right there. That's probably the best way. Yeah the white wire attaches to the bottom with the main ground cable.
 
Methinks it's time to update your signature picture. :confused:

Yeah :D

In a week or so I'm meeting someone to head to sand canyon through Split Mountain I'm assuming, or at minimum we'll have to come out that way so I'll be able to get an updated picture in the same spot :D
 
ARB on board air

I bought the high capacity plenemed ARB air compressor for airing up tires and a rear locker. Not planning on running tools so the twin seemed a bit excessive :)

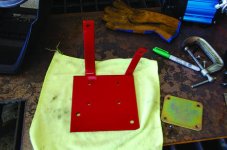
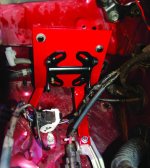
Had to fab up a bracket and was able to use 100% stock mount points in the engine compartment.

Bracket cut, welded, drilled and painted:
ARB-Air1.jpg

Installed:
ARB-Air2.jpg

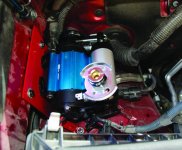
And with the compressor:
ARB-Air3.jpg

Astute viewers will notice I haven't hooked it up yet :D Will have that done after lunch. Also, in the future when I'm looking for another little project, I'm going to run the air line out to a socket mounted on the rear bumper or somewhere so I don't have to even open the hood any more...
 

Attachments

  • ARB-Air1.jpg
    ARB-Air1.jpg
    572.2 KB · Views: 2,629
  • ARB-Air2.jpg
    ARB-Air2.jpg
    579.1 KB · Views: 2,658
  • ARB-Air3.jpg
    ARB-Air3.jpg
    581.8 KB · Views: 2,652
Last edited:
Looks good. I like it. Thanks for sharing the picture.


I bought the high capacity plenemed ARB air compressor for airing up tires and a rear locker. Not planning on running tools so the twin seemed a bit excessive :)

Had to fab up a bracket and was able to use 100% stock mount points in the engine compartment.

Bracket cut, welded, drilled and painted:
View attachment 136638

Installed:
View attachment 136639

And with the compressor:
View attachment 136642

Astute viewers will notice I haven't hooked it up yet :D Will have that done after lunch. Also, in the future when I'm looking for another little project, I'm going to run the air line out to a socket mounted on the rear bumper or somewhere so I don't have to even open the hood any more...
 
Just finished up the wiring, Whew! :clap2:

Took about 2.5 hours including having to remove the airbox completely. ARB includes an amazing wiring harness which is awesome, but while the spot I chose to put the compressor made it easy for me to make a bracket and mount it, it was as far from the battery as possible and the ARB harness was just /barely/ long enough with some really careful threading from one corner to the other. Under the air box, through the front and along the top of the radiator cross mount and out to the battery. I followed a bit wire bundle that was already there so that should be perfect.

Then I ran the switch wire to my POD across the big wire bundle on the firewall and used the POD to ARB wiring harness I got to control the compressor and eventually the rear locker.

Worked first try and seems to be relatively leak free. It stopped running after a couple seconds due to the plenem being full. 10 minutes later I turned it on again and the pump did not turn on, it was still under pressure. Hope it's ok to leave it like that. :suspicious:
 
Last edited:
I bought the high capacity plenemed ARB air compressor for airing up tires and a rear locker. Not planning on running tools so the twin seemed a bit excessive :)

Had to fab up a bracket and was able to use 100% stock mount points in the engine compartment.

Bracket cut, welded, drilled and painted:
View attachment 136638

Installed:
View attachment 136639

And with the compressor:
View attachment 136642

Astute viewers will notice I haven't hooked it up yet :D Will have that done after lunch. Also, in the future when I'm looking for another little project, I'm going to run the air line out to a socket mounted on the rear bumper or somewhere so I don't have to even open the hood any more...

Nice. I should be getting my compressor soon. Trying to see what kind of brackets everyone is coming up with. Good job sir.
 

Members online

No members online now.

Forum statistics

Threads
278,312
Messages
3,554,083
Members
248,016
Latest member
Advally Service

Trending content

Back
Top