
You are using an out of date browser. It may not display this or other websites correctly.
You should upgrade or use an alternative browser.
You should upgrade or use an alternative browser.
Warthog Build and Adventure Thread
- Thread starter 2014 Warthog
- Start date


2014 Warthog
New member
Good post. You parked next to me Saturday morning around 9am near the vendor area but didn't see you around.
Thanks
 I did try parking next to a runner if i saw one
  Sat morning i was probably using the porta john just before joining the safari traffic jam
2014 Warthog
New member
Vacuumed and wet toweled the entire inside of the Warthog this afternoon. Looking fine again, outside will have to wait till the weekend maybe.
So far I haven't had much complaints about anything on the runner, but the one thing that has disappointed me is the quality of the interior surface finishings.
The silver sputtered metal coatings on the center console are terrible. They scratch if you look at them wrong, besides shining the sun in your face now and then.
And then there all the black plastic in the back. Unfortunately the actual plastic is some kind of dark bluish grey or something with some sort of surface coating that is black. ANY scuffing on the plastic makes it turn that bluish grey color and so far I can't find anything that'll fix it. The back of the Warthog it starting to look like hell already from things rubbing against the sides. Almost doesn't matter what it is. Plastic, cloth, smooth metal, smooth wood. Everything mars it badly.
At some point I might have to take it all out and plastidip or rhino coat it or something
So far I haven't had much complaints about anything on the runner, but the one thing that has disappointed me is the quality of the interior surface finishings.
The silver sputtered metal coatings on the center console are terrible. They scratch if you look at them wrong, besides shining the sun in your face now and then.
And then there all the black plastic in the back. Unfortunately the actual plastic is some kind of dark bluish grey or something with some sort of surface coating that is black. ANY scuffing on the plastic makes it turn that bluish grey color and so far I can't find anything that'll fix it. The back of the Warthog it starting to look like hell already from things rubbing against the sides. Almost doesn't matter what it is. Plastic, cloth, smooth metal, smooth wood. Everything mars it badly.
At some point I might have to take it all out and plastidip or rhino coat it or something

Antman
Elite Member
Vacuumed and wet toweled the entire inside of the Warthog this afternoon. Looking fine again, outside will have to wait till the weekend maybe.
So far I haven't had much complaints about anything on the runner, but the one thing that has disappointed me is the quality of the interior surface finishings.
The silver sputtered metal coatings on the center console are terrible. They scratch if you look at them wrong, besides shining the sun in your face now and then.
And then there all the black plastic in the back. Unfortunately the actual plastic is some kind of dark bluish grey or something with some sort of surface coating that is black. ANY scuffing on the plastic makes it turn that bluish grey color and so far I can't find anything that'll fix it. The back of the Warthog it starting to look like hell already from things rubbing against the sides. Almost doesn't matter what it is. Plastic, cloth, smooth metal, smooth wood. Everything mars it badly.
At some point I might have to take it all out and plastidip or rhino coat it or something
Got balls?
You could try this- should do the same for mild scratches/discoloration...
BTW - My biggest gripe is the velcro carpet. What a great idea; NOT.
.
.
.
2014 Warthog
New member
Got balls?
BTW - My biggest gripe is the velcro carpet. What a great idea; NOT.
.
.
.
Interesting...
I think i have that exact heat gun too. I might actually try it on a part of the slide out deck and see what happens. Ill take pics!
And yeah the carpet
dirt comes out with vacuuming but any amount of grass like material requires extraction by tweezer Heh sure. Some others have asked the same thing. Maybe I should arrange a beginners trip.
A south-south-Cal (San Diego) T4R.org outing needs to be in the work!!! Maybe after all my Group Buy activities and if members still have gas money....

E-ROCKER
New member
Tons and tons of fun build machines at the main camp, makes me think about getting some old beat up something and getting out the torch and welder and going to town on it
Next year maybe we should plan better and put togeather a T4R camp!
Till then...
Wish I would've known you were going to be out there and met up with ya. I joined All Pro for their run Sat which they do every year with a small group of Toyota's (no Jeeps). Great pictures and story, I would have loved to see your 4R in action since I was missing mine. Let me know if you want to plan a day trip somewhere soon!
I couldn't agree more with your comment above!
A few weeks after our Gold Mountain run I was planning to put in a front ARB and regear to 4:56's in the 4R. But I came across a 84' pickup that was already built (5:29 gears, F&R lockers, 4.7 Tcase with twin sticks on 35's) for just a little bit more $ than the regear and front locker would've been. So I jumped on the great deal and decided to stop pouring all my $ into the 4R and not wheel it so hard. Only thing I've done to it is a $100 rattle can paint job.

E-ROCKER
New member
Interesting...
I think i have that exact heat gun too. I might actually try it on a part of the slide out deck and see what happens. Ill take pics!
And yeah the carpet
Don't forget to mention dog hair. Every time a friend brings their dog along it takes a lot more than a vaccuum to get it all out.
2014 Warthog
New member
Wish I would've known you were going to be out there and met up with ya. I joined All Pro for their run Sat which they do every year with a small group of Toyota's (no Jeeps). Great pictures and story, I would have loved to see your 4R in action since I was missing mine. Let me know if you want to plan a day trip somewhere soon!
I couldn't agree more with your comment above!
A few weeks after our Gold Mountain run I was planning to put in a front ARB and regear to 4:56's in the 4R. But I came across a 84' pickup that was already built (5:29 gears, F&R lockers, 4.7 Tcase with twin sticks on 35's) for just a little bit more $ than the regear and front locker would've been. So I jumped on the great deal and decided to stop pouring all my $ into the 4R and not wheel it so hard. Only thing I've done to it is a $100 rattle can paint job.
QUOTE]
Would have loved to go on the all pro trip
That's a sweet looking truck. Nice and light!
I actually gave away an 86 Toyota 4x4 to a friend of mine that needed a vehicle when I bout a new Tacoma about 15 years ago. He still drives it. I should make him give it back and turn it into a trashable offroader
E-ROCKER
New member
Would have loved to go on the all pro trip
That's a sweet looking truck. Nice and light!
I actually gave away an 86 Toyota 4x4 to a friend of mine that needed a vehicle when I bout a new Tacoma about 15 years ago. He still drives it. I should make him give it back and turn it into a trashable offroader
Tell him you just let him barrow it all this time. It probably still runs great too.
Thanks, it's about half the weight as the 4R

N/A
New member
I had initially mounted my ditch lights on the rack up top. That was an ok place for them, though they lit up my mirror some, and they kind of stuck out and I was afraid they might be taking off more mileage up there. So I bought a set of CBI ditch light brackets to mount them to the hood.
View attachment 133298
View attachment 133299
View attachment 133300
Clearance with hood open
View attachment 133302
Problem: The brackets actually hit the plastic drainage system when the hood closes. And that plastic is strong enough that it actually bends the hood hinge up when closed, exposing about 1/8 inch more gap between the hood and the quarter panel
So... out came a loose hacksaw blade to trim down the plastic in order to make it fit...
View attachment 133303
Trimming on the passenger side
View attachment 133301
Here is the bracket in profile. It seems like it could have followed the hood line a little more closely and prevented the need for cutting the plastic. Though maybe this is only a 5th gen problem?
Overall I like them in this position a lot and would still recommend them as long as you don't mind possibly having to trim some plastic to get them to fit.
If there is that much gap, could you not have bent the mound up to follow the hood contour more?
2014 Warthog
New member
If there is that much gap, could you not have bent the mound up to follow the hood contour more?
If I had had a nice press brake (which I would love to have) maybe
The metal is pretty thick, a vice and a rubber mallet wouldn't have worked well I don;t think :/It was pointed out to me later that I could have used a hot air gun and done a much cleaner job by heating the plastic then closing the hood to push it down though!
N/A
New member
If I had had a nice press brake (which I would love to have) maybe
It was pointed out to me later that I could have used a hot air gun and done a much cleaner job by heating the plastic then closing the hood to push it down though!
how doable is the heat gun method. I am not too excited to trim it, I want the mount for a cb antenna
2014 Warthog
New member
how doable is the heat gun method. I am not too excited to trim it, I want the mount for a cb antenna
Not sure... the plastic is tough but someone suggested it or claimed they did it on the forums here. I didn't try :/
2014 Warthog
New member
New running lights!
Spent the week installing some new running lights on the Warthog.
On the front I added some Navigation lights for fun And no they aren't backwards. They ARE opposite to how they would be mounted on a boat but people pass on the "port" side when you're in a car so...
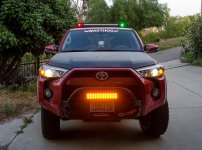
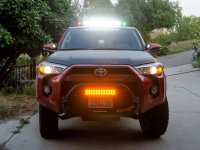
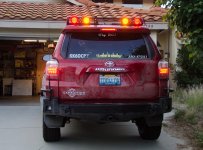
And on the back, I had some nice bright amber lights which worked GREAT during the day. Really cut through the dust and were sometimes the only visible thing about the car according to others. I tried to find some red lights to match for brake lights but couldn't :/ I found these new LED buggy lights at ORW that came in red/yellow and blue. So I got a matched set of red and yellow and spend a day making brackets for them. Then another couple days wiring them up.
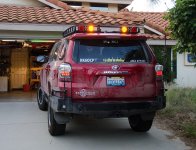
The upper brake lights are wired to a relay and the relay wired to the driver side brake light cable in the back. Sadly the red is not quite as bright as the yellow but I think they'll work out fine.
Spent the week installing some new running lights on the Warthog.
On the front I added some Navigation lights for fun
And no they aren't backwards. They ARE opposite to how they would be mounted on a boat but people pass on the "port" side when you're in a car so...And on the back, I had some nice bright amber lights which worked GREAT during the day. Really cut through the dust and were sometimes the only visible thing about the car according to others. I tried to find some red lights to match for brake lights but couldn't :/ I found these new LED buggy lights at ORW that came in red/yellow and blue. So I got a matched set of red and yellow and spend a day making brackets for them. Then another couple days wiring them up.
The upper brake lights are wired to a relay and the relay wired to the driver side brake light cable in the back. Sadly the red is not quite as bright as the yellow but I think they'll work out fine.
Attachments




Well after installing it and uninstalling it 3 times I'm an expert now
If I am getting this bumper, you are probably who inspired me to do that.
I AM coming to your house for the installation.......
2014 Warthog
New member
If I am getting this bumper, you are probably who inspired me to do that.
I AM coming to your house for the installation.......
I guess we could do that. We could probably get it done in one long day. It is a lot of work! And hopefully not when it's 90 deg out


mikey's2010SR5
New member
Which wire is the brake light in the harness? I want to do brake lights up top on the rack also.
2014 Warthog
New member
Which wire is the brake light in the harness? I want to do brake lights up top on the rack also.
What i did was attach a relay to the driver side brake light harness as it attaches to the light assrmbly itself. There were only a small number of wires there and only one pair that had voltage when the brakes were on.
I then used the relay to switch on/off the power going to the rack mounted running lights. So the upper brake lights only work when i have my off road running lights switched on.
Ill see if i can get a picture later today.

my14runner
New member
Great looking build brother, quick question I know you used a 30" single row light bar on the Baja rack, do you think there's enough room to squeeze a 40" in that opening where the fairing is ?
Similar threads
- Replies
- 2
- Views
- 4K

- Replies
- 0
- Views
- 191


- Replies
- 1
- Views
- 973
- Replies
- 4
- Views
- 598

