What about a Daystar 1" front and 1.5" Rear?

Daystar 2" actual front lift (1" spacer) part # KT09117BK $39.95
Daystar 1.5 " actual rear lift (1:1ratio) part # KT09127BK $39.95


If you just want the front lift, 1" spacer, resulting in ~2" of lift, it would be
KT09117BK

I have not received the kit yet, but they show the new bolts and nylock nuts in the picture. This is the new easy install design, top out spacer from Daystar.

I have stock coils, no change there just spacers.

Best regards,
Doug
 
Last edited:
kai920 thanks for posting the link to my page. Your truck looks good.

Doug you are going to love the lift. It's the perfect amount for a everyday truck. Have you considered wheel spacers? I put mine on at the same time as the lift and it make it much more aggressive looking IMHO. Good luck on the install. I used the install writeup on toyota120 It really is straight forward.
 
That the exact set up I have on mine. I put the 1" spacer lift on the front and then decided I wanted to get the back up a little so I put on the 1.5 Rear Spacer. I love the lift and still have a tiny little rake to it. Maybe a 1/2" or less.

Here is mine
IMAG0465-1.jpg~original

Ryangab,
Lift looks pretty good. Seems like your 1" front spacer lift looks more like a 2" or 3" lift in the front. And it looks like you have less rake than stock. Did you measure before and after to get the actual change? I lifted my front 1.5" (measured), but yours looks higher.
 
kai920 thanks for posting the link to my page. Your truck looks good.

Doug you are going to love the lift. It's the perfect amount for a everyday truck. Have you considered wheel spacers? I put mine on at the same time as the lift and it make it much more aggressive looking IMHO. Good luck on the install. I used the install writeup on toyota120 It really is straight forward.

No prob. Least I could do since you helped me so much and all.

I agree with you, I liked the 1/1.5. I think it looks so much better than stock, and while I like something with more lift and bigger tires, since its really my DD and gas mileage is important this was perfect. Wheel Spacers are probably next.
 
I think the total lift I got out of the 1" lift was just barely shy of 2". The rake on it as it sits now is a little less than 1/2 inch. I'm pretty happy with it. I have Spidertrax wheel spacers on it too which was much needed. Now I just have to get bigger tires. I was thinking BF's 265/70/17.
 
I just ordered the Daystar kit for the front, no rear.

I'll be putting on Front/ Rear FJ coils, with the daystar kit in the front, and the firestone airbags in the rear.

Hopefully it'll sit level or a very slight rake. I'm a little worried now that the spacers may lift it too much, but I guess it'll depend on how FJ coils lift it.
 
Daystar 2" actual front lift (1" spacer) part # KT09117BK $39.95
Daystar 1.5 " actual rear lift (1:1ratio) part # KT09127BK $39.95


If you just want the front lift, 1" spacer, resulting in ~2" of lift, it would be
KT09117BK

I have not received the kit yet, but they show the new bolts and nylock nuts in the picture. This is the new easy install design, top out spacer from Daystar.

I have stock coils, no change there just spacers.

Best regards,
Doug

THIS IS NOT THE NEW EASY INSTALL DESIGN!

Unfortunately, got everything apart today and this is the design that requires a Spring Compressor, ugh!
Not sure whether to go rent a spring compressor or re-order the new design.
I don't have any 1/2" Rackets, but was able to get everything broken loose with a cheater bar on the end of a wrench or 3/8 inch rachet.
I loosened the sway bar, but didn't actually take it all the way out. Seems like there is some difficult to get to nuts on the backside that you have to access from a hole in the frame.
I marked the lower control arm at the frame and dropped it, so the shock and spring assembly came out fine. I am a little disappointed that I don't have the part that I thought I was buying. Decisions :-)

We'll I learned a lot today and took a bunch of pictures for the newbies amongst us. I'll update this post when I figure this out. Back to the garage.
 
How To Take Strut Aprt

Well, I went and got a spring compressor. Using it carefully and it has the safety pins. I am not having any luck taking the top nut off to get the top mount plate off. The shaft has a flats on 2 sides, so I put that in the vise while I tried to get the nut to break loose. Haven't had any luck yet. I put some rust buster on it ans was trying to find out if I am doing it correctly. Any help would be appreciated. Best regards, Doug
 
Well, I went and got a spring compressor. Using it carefully and it has the safety pins. I am not having any luck taking the top nut off to get the top mount plate off. The shaft has a flats on 2 sides, so I put that in the vise while I tried to get the nut to break loose. Haven't had any luck yet. I put some rust buster on it ans was trying to find out if I am doing it correctly. Any help would be appreciated. Best regards, Doug

All it took for mine was a pair of vise grips on the flat part, and a wrench on the nut. But mine was clean as a whistle, no corrosion at all. Good luck.
 
I finally got it, I think it was just rusted on a little. I finally put the arm to it and it broke loose. I got 1 side done in 6 hours lol. Although, the other side is all broke loose et. It should go much faster.
I wish I didn't have to screw with the springs, but hey I am learning a lot. Not in a hurry.
When I went to get the spring compressor, I wanted to check out the Fog Lights you guys been installing as back-up lights. They had listed for $39.99 on the website. I had the guy show me, they were next to a price tag $19.99. He said yep, $19.99. I took them up to the counter, they rang up $39.99. He just corrected it to $19.99! That's as cheap as I have seen them. So, I have parts for another small mod :-).

Thanks much, on to the next side.
Best regards,
Doug
 
I got 1 side done in 6 hours lol. Although, the other side is all broke loose et. It should go much faster.


Thanks much, on to the next side.
Best regards,
Doug

You'll be good at it once you're done. To bad you weren't closer, you could come help with mine! Though, I have a really bad itch for a gen5.
 
Don't feel bad. The first side took longer than that for me. Once I figured it out, the second side was a breeze. The rear is even easier. Look forward to pics!
 
Status

Well, 12 midnight and both sides of the front are done. You can do it without 1/2 sockets and the 14mm/17mm rachet wrenches, but you'll only do it once without them :-).
Rebulding the 1st strut sucked, 2nd strut was much faster. If they make these 1" spacers with the stud extenders, worth it unless your a mechanic.
I'll recheck everything in the morning, rust proof some areas that I can get to now and button her up.
Do you only get the front aligned? Meaning, is there even alignment adjustments in the rear? I may tackle the rear next weekend, and I wondered if I could go ahead and get the alignment done on the front.

Pics and dimensional data gathered, too tuckered out to post it right now :-)

Thanks for all the on-line and off-line help. Best regards, Doug

PS: If your 55 or older, get a buddy to help. It would have been nice to have a 2nd pair of hands lol
 
Last edited:
Glad you finally got it done. A second set of hands is recommended regardless of age, makes the process much easier. It seems that you guys further north have more issues with things like this due to rust. I know I've never ran into that much trouble. They do make some that don't require disassembly of the strut. I thought Daystar had switched to a design like this, but looking back I don't think they have, at least for the 1" Budget Boost. The rear *should* be much easier, if it weren't for stuck/rusted bolts I'd say it'll be a snap.
 
Hi ASR,
Vert true, I feel good once I get everything apart knowing if I have to go back in will be better. Also good to see what kind of condition everything is in.
I double checked everything and got the tires back on. Had to jack the rig up another 2" to get the tires on. They're heavier than what I am used too :-)Good thing I had that much left in my little OEM jack. I have to get a new floor jack, mine must only be 18".
I am going to touch up underneath where the skid plate was and then let her all the way down a take a test drive. Check the dimensions of the lift and clean up. I'll probably do the rear next week.
Your also correct that the easy install with the stud extenders only come once you get to the 2" spacer. That was a little more lift than what I wanted, so it all worked out.
Pictures and some notes for the novice should be posted today or tomorrow.
Best regards,
Doug
 
Do you only get the front aligned? Meaning, is there even alignment adjustments in the rear?

No alignment in the rear is needed, or should I say no alignment in the rear can be done with a solid axle. On front wheel drive vehicles a four wheel drive alignment should be done, or on rear wheel drive vehicles with independent suspension.

Technically, the rear wheels on a solid axle can be referenced though, to check thrust angle, but no adjustments can be made on the rear axle.
 
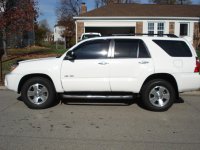
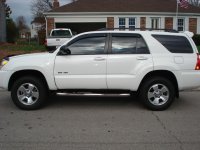
Finished Side Pics Before After

Well, took it for a test ride. Everything seems to sounds and ride correctly. Whe I first let it off the jack, I had about 3" of lift. After driving a few miles, I am right at 2 1/4". I started off at 18 3/4 front center of wheel to fender. Now I am at 22 even on both sides. Doesn't look bad as is, but seems to be sitting a little higher in the front. The rear measures 22 1/2", but visually I can notice it. I'll send notes and other pictures later. I still have to police (military term for clean) the garage and get ready for the football game today. Pittsburg Steelers vs The Bengals, big rivalry and for 1st place.
Best regards, Doug
 

Attachments

  • Before Lift Front Side.jpg
    Before Lift Front Side.jpg
    132.6 KB · Views: 609
  • Afrer Front Lift Side.jpg
    Afrer Front Lift Side.jpg
    137.3 KB · Views: 593

Members online

Forum statistics

Threads
278,317
Messages
3,554,129
Members
248,016
Latest member
Advally Service

Trending content

Back
Top