What about a Daystar 1" front and 1.5" Rear?

Well, took it for a test ride. Everything seems to sounds and ride correctly. Whe I first let it off the jack, I had about 3" of lift. After driving a few miles, I am right at 2 1/4". I started off at 18 3/4 front center of wheel to fender. Now I am at 22 even on both sides. Doesn't look bad as is, but seems to be sitting a little higher in the front. The rear measures 22 1/2", but visually I can notice it. I'll send notes and other pictures later. I still have to police (military term for clean) the garage and get ready for the football game today. Pittsburg Steelers vs The Bengals, big rivalry and for 1st place.
Best regards, Doug


Looks good! Looks like the tube step is lower in the rear, and the roof rack as well. Still plan on doing the rear? Congrats!!!
 
"Looks like the tube step is lower in the rear, and the roof rack as well. Still plan on doing the rear? Congrats!!!"

Yes Kai, I will do the 1.5 spacer lift in the rear next weekend. That should give me the final look I am after and will be beneficial when I tow. (1500 lb pop-up, no WDH)

On a 2nd note: Fog lights for back-up light Mod became free. I took the srping compressor back. The kid scanned my receipt, then the compressor kit. The kit wouldn't scan. He fumbed around and said sign the electronic signature and gave me a receipt. It gave me credit back for everything including the lights. I brought it to his attention, so he said I'd have to see the manager. The manager said once it was returned on my MC there was nothing she could do. I offered to pay again, be she said no she'd write it up. I made sure the kid wouldn't get a demerit or have to pay. Bank error in my favor.

Scojo, lift and rig looks very nice. Hopefully my final will be as good.

I'll have my procedure, dimensional data and pics loaded tonight.

Best regards,
Doug
 
Last edited:
Final Write Up With Pics - For Novice Audience

This is the install method I used because I was alone, did not have air tools and thought it was the simplest.
1, Remove skid plates and swaybar
2, loosen the lower shock nut/bolt, take off the 3 bolts on top of shock
3, remove 2 bolts holding lower control arm to spindle/hub
4, loosen LCA bolts that connect LCA to frame, you need an alignment anyway! lol
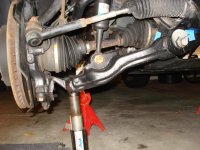
5, BINGO! drop LCA all the way down and add daystar (or whatever company) spacer, even new spring install is easy squeezy this way.
NOTE: following this method you will not have to remove any brackets for ABS/Speedsensor/Xreas, or support the hub/spindle...etc
6, wiggle shock/strut assembly back into it housing and close everything back up!

A few notes from a newbie perspective:
Starting measurement from Center of Wheel to Fender = 18.75
Finish measurement from Center of Wheel to Fender = 21.0

When you first let it down, it will measure about 3". Drive it a few miles and it will settle, re-measure.

- I only removed front skid plate and did not remove sway bar
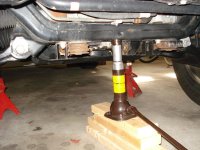
- If using OEM jack, you will need (4) 2x4's under neath it (~7"). Especially when putting the tires back on. The hubs will be lower, you'll need to raise it. (pic-1)
- If using a floor jack, make sure it goes that high.
- Once you jack the vehicle up, put your jack stand behind front wheels on side frame, lower jack until weight is resting on jack stands. Make sure everything is stable, you should be able to push around on the car without any movement.
- If you have a small bottle jack from another vehicle, you'll need it to push the Lower Control Arm (LCA) back into position. (pic-5)
- The inside bolt on the top of the shock mount is a pain. I flipped my box end wrench over depending on which way gave me most movement.
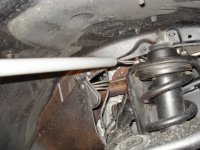
- If you're using 3/8" rachets, you'll need a helper pipe to go over rachet handle or apply to end of wrenches to break bolts loose. I used an old metal chair leg from my bike shop. 1/2 conduit could work, maybe 18" long. (pic-2)
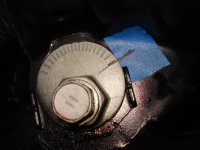
- Mark each washer behind the bolts that attach LCA to frame. Mine did not move, but better to know. (pic-3)
- If you need to diassemble shock and coil spring (strut) you can borrow a spring compressor from Autozone. Just be sure to get the one with safety pins that work with the clamps to capture springs. After you have compressed the spring until the top mount plate has no pressure, you can disassemble. When handling or working on the compressed spring assembly, always keep it pointed so the the direction of energy is away from you or away from your face and body.
- I marked the front of the spring, top plate etc. The top rubber gasket will have an impression from the spring. Once you put it back together, make sure everything is same as when you took it off.
- If you have a shaft at the end that is flat on two sides, you'll need to hold that while loosening nut. Remember, compressed spring warning.
- I put the flats in a vise and wrenched off the nut, don't be afraid to put some muscle into it. Mine was tough.
- You'll have to press out short studs. A long socket works fine 3/8 x 17mm.
- Pressing the longer studs in, I used a short piece of 3/4 conduit or similar. They seem too long unless you have a 1/2 deep well socket, then you should be ok.
- Don't be surprised how hard they are to press in. I used my cheater pipe on the vise handle.
- Getting the bottom shock bolt back into the LCA can be a little tricky. Use the bolt or a punch if it's slightly off. Mine was maybe 1-2mm off. Fiddle with it, then all of a sudden you have it.
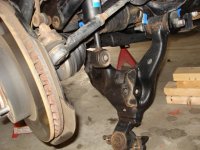
Picture 4 = LCA swung down after loosening bolds about ~2-3 turns. Don't loosen more than enough to move it.

I took more pictures, but these should be sufficient. PM me if you want others. (I did not take pics of using spring compressor. See youtube)

Take your time, use common sense, come to the forum if you get stuck.
 

Attachments

  • OEM Jack.jpg
    OEM Jack.jpg
    133.4 KB · Views: 571
  • Helper Bar Back Shock Bolt.jpg
    Helper Bar Back Shock Bolt.jpg
    133.5 KB · Views: 593
  • Marking Align Washers2.jpg
    Marking Align Washers2.jpg
    135.5 KB · Views: 589
  • LCA Down Pos.jpg
    LCA Down Pos.jpg
    132.3 KB · Views: 586
  • Bottle Jack LCA up.jpg
    Bottle Jack LCA up.jpg
    135.6 KB · Views: 602
Last edited:
Thanks Clock. Couldn't have done it without the guys on here like you and A_S_R. Thanks much for all the technical information. Best regards, Doug
 
Very good details on your install. I know it can be a pain, but for me it's well worth it in the end, makes you really appreciate it in the end. When i did mine, it took about 3-4 hours for the first side, 1 for the second. Ended up we put the springs on the wrong side, had to redo everything the next day. Not fun, but felt good knowing I did it myself. That's the first I've seen where you loosen the eccentric (alignment) bolts. I've heard of it, never saw a pic. Didn't realize it gave you that much drop, definitely makes the job easier.
 
Keep an eye on you cv boots. I had a inside outer leak the day after I put my lift on. If they are leaking just carefully snip the old clamp off and use a zip tie or two.. (if they are the skinny or smaller ones)to reclamp it ...fyi
 
Last edited:
Just did the front on my new to me (had it for two weeks) 07 limited with Xreas.
Damn my old 3rd gen was a lot easier to deal with. I got a good workout. That sway bar is in the way getting the strut out far enough. Having to compress the springs while on the vehicle was a pain. Not having a vice to put the longer studs in wasn't fun either. I spent much longer doing this that I thought I would. I'm happy with the finished product. First mod done! May or may not install the rear spacers or have a shop doing (in 15 min!), I will drive it a bit a see how it looks.
Now new tires and alignment
 
A_S_R,
Yep, feel good getting to know the 4Runner. Now I know I can do shocks, brakes and most anything else with the suspension.
Dropping thay LCA was really a easy method. The original thread I read said his alignment washer never even moved, so I figured I'd try it. Pretty slick. Thanks for all you PM responses along the way.

Scojoe, what tends to make the CV Boots leak? Don't they have to be torn or something?

Roadtrip, sounds like you had a harder job than mine. I am not sure I could have struggled through all that.

My rears are suppose to be a lot easier than the front, so I am definitely going to give it a whirl. I had to touch base by PM to a couple guys here on the forum, but they came through pretty fast.

On to the rear lift and back-up light mod now :-)
Best regards,
Doug
 
Last edited:
No tears on the cv,s just the work out on the seal (or clamps) seams to loosen those metal clamps . That and your changing the angle of the cv,s just enough to work them loose. You may or may not have this problem. Just some thing to keep an eye on. Good luck. I only had the one leak. 2 skinny zip ties no problems since ....sorry about he miss spelling I was on my phone.
Scott
 
Last edited:
Man, next time those eccentric bolts are being loosened. I didn't realize it would drop so much either. If I wold have done that the first time, it would have gone so much quicker and easier. Good job!

I also had the CV boots leak. It seems like its usually its the small end of the inner boot, but could happen to any of them.
 
Installing Rear Spacers

Hey Guys,
Getting ready to put the rear spacers in.
I have these notes:
REAR:
1, Jack up rear end, jackstands in front of rear wheels on frame, wheels off. Place jack under center of rear axle
2, Disconnect lower shock bolts, pry off shock, don't be scared
3, Disconnect pan-hard bar (not sure why its called that), I only disconnected the bolt attached to the axle
4, Drop rear axle, take out springs and inverted cone bump stop thing, put rear spacer on spring, pry back in, tighten everything back up.
DONE!
Questions:
1.The lower shock bolt is taken out while rear axle is in the up position with floor jack under bell housing?
2. Lower the floor jack. What about the break line? In the manual, it says to disconnect the break lines. .pdf is a little too big to attach reference.
4. What is the pan-hard bar?
5. Does the bump go back on top of the spacer?

Thanks,
Best regards, Doug
 
Hey all,

Brand new to the forum. Bought mine a week ago... and ready for a little modding. So, I was going to get the Daystar 2.5/1.5, but I was a little nervous that maybe it would be too much? This sounds like you can get basically a Daystar 2/1.5 for much cheaper am I right? Sounds like a great idea... So the front is a preload and topout spacer, and the rear is just a topout?

The other question I had... Would this setup or even a 2.5/1.5 definitely require trimming the fenders if spidertrax and 265/70/17s were installed?

Thanks for any answers.
 
Last edited:
Hey Guys,
Getting ready to put the rear spacers in.
I have these notes:
REAR:
1, Jack up rear end, jackstands in front of rear wheels on frame, wheels off. Place jack under center of rear axle
2, Disconnect lower shock bolts, pry off shock, don't be scared
3, Disconnect pan-hard bar (not sure why its called that), I only disconnected the bolt attached to the axle
4, Drop rear axle, take out springs and inverted cone bump stop thing, put rear spacer on spring, pry back in, tighten everything back up.
DONE!
Questions:
1.The lower shock bolt is taken out while rear axle is in the up position with floor jack under bell housing?
2. Lower the floor jack. What about the break line? In the manual, it says to disconnect the break lines. .pdf is a little too big to attach reference.
4. What is the pan-hard bar?
5. Does the bump go back on top of the spacer?

Thanks,
Best regards, Doug

Lift the vehicle with a jack under the rear differential. Place jack stands under rail frames on left and right side and disconnect the lower shock bolts. Then lower the jack and the axle will drop down without the shocks(you might have to pry a little).

No, the rear does not have struts, the shocks are NOT inside the spring as the fronts are. The springs are not "attached" to anything. They are compressed between the body and the axle. When the axle is dropped, they can just be pulled out.

The pan hard bar is a bar that runs from left to right, connects to the axle. Here is a pic, from a different gen, but same idea.

http://www.toyota-4runner.org/3rd-gen-t4rs/71702-need-help-putting-panhard-bar-back.html

I only removed the left bolt on the pan hard bar. If I had extra hands, I might have been able to get away with not removing it, but I didn't, and couldn't provide enough compression on my own and pry into place at the same time without removing the pan hard bar. It gives you more movement of the axle if you remove the bolt. Getting the bolt back in was the hardest part of the whole install, for me. For some reason it didn't want to line up.

I also disconnected the sway bar links to give more movement of the axle since I did it alone.

Have fun!
 
Ben,
These are both top out spacers. Daystar just doesn't make the front 1" spacer (2" lift) with the stud extenders (east install), so you have to compress the spring and change the stock ones to longer ones. Then the spacer goes on top still, not a pre-load design. You may see if Toytech makes an easy install design at this lift. They will be more exspesive.

Someone else will have to answer the tire question.
Best regards,
Doug


Hey all,

Brand new to the forum. Bought mine a week ago... and ready for a little modding. So, I was going to get the Daystar 2.5/1.5, but I was a little nervous that maybe it would be too much? This sounds like you can get basically a Daystar 2/1.5 for much cheaper am I right? Sounds like a great idea... So the front is a preload and topout spacer, and the rear is just a topout?

The other question I had... Would this setup or even a 2.5/1.5 definitely require trimming the fenders if spidertrax and 265/70/17s were installed?

Thanks for any answers.
 
Pan Hard Bar or Sway Bar Links

Hello,
I have the shocks disconnected, one thread says to disconnect pan hard bar, Daystar instructions say Sway bar links. I tried lowering the anxel without doing one or the other and the coils are still tight.
Any reco's. Kai said the pan hard bar was a bear to get back in. Pondering, I'll wait and see if anyones on-line today. So, I should be looking for enough droop in the axel that the springs come out easily? Once I put the 1.5" spacer in, am I going to hand to pry the spring assembly back in there? There are break lines running very close across there, hope this isn't the case. Best regards, Doug
 
I did not remove any other bolts other than the bottom shock bolt. Then I took the bottle jack and placed it upside down on the bump stop in the wheel well/frame and the on the top of the axle. I slowly raised the bottle jack and it pushed the axle down just enough to get the springs out. I went very slow and kept an eye on the break lines. I think it took mi 45 min on one side and 5 min on the other. HA. Once you see how far you have to push the axle down with the jack the other side is a breeeeez. It was super easy and i didn't harm a thing.
 
I did not remove any other bolts other than the bottom shock bolt. Then I took the bottle jack and placed it upside down on the bump stop in the wheel well/frame and the on the top of the axle. I slowly raised the bottle jack and it pushed the axle down just enough to get the springs out. I went very slow and kept an eye on the break lines. I think it took mi 45 min on one side and 5 min on the other. HA. Once you see how far you have to push the axle down with the jack the other side is a breeeeez. It was super easy and i didn't harm a thing.

Or if you have a floor jack, do the same thing, but under the axle to lower the opposite side.
 

Members online

Forum statistics

Threads
278,317
Messages
3,554,129
Members
248,016
Latest member
Advally Service

Trending content

Back
Top