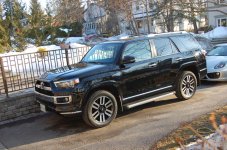
What did you do to/in your 5th Gen today?!

Got my icons!

After an eternity, I finally got icons installed up front...

2014+warthog-albums-+warthog-picture25191-icon-coilovers.jpg


Ok, maybe yet another picture of a set of coilovers wasn't strickly necessary :D

I now have an amusingly large reverse rake. Will remain that way for a while till they settle and I figure out what I'm going to do for springs in the rear.

Short story is... they totally rock! ... on pavement anyway :D which is good! The potholes I purposely ran over felt awesome, no jarring stiffness at all. Will test them out in Borrego next saturday.

Check out the build thread in my sig for pictures of the rake and other details...
 
Details please.

Unfortunately I didn't take any photo's as I was doing it.

Before I took my bumper off, I taped off where I was planning to cut the bumper. Starting at horizontal cutoff on the fenders, and straight around the front to about 1.25 inches below the centre of the grill.

Then I removed the grill, and prepared it for mounting with the parts shrockworks supplies. Then I cut my bumper across, under the headlights, and then up along the vertical crease that meets the grill to create two "wings" that would reattach to the grill, and under the headlight. I removed all the black trail edition trim on the bumper to make cutting easier.

Then Similar to [MENTION=68685]Ducmonsta[/MENTION]s I removed and cut the black clips in post 306 of http://www.toyota-4runner.org/5th-gen-t4rs/100058-ducmonstas-build-thread-very-pic-heavy-21.html down, so that they were flush with where I was planning to cut the bumper. Again I used painters tape to mark where I was planing to cut as I was taking everything apart.

I then reattached the clips to the fenders. I then reattached the wings I cut out of my bumper to the grill again, and put them back on the truck, clipping them in with the clips under the headlights (which I obviously didn't remove).

I then redid the painters tape on the bumper, to even out the line from the fender, around to the bottom of shrockworks grill bracket.

I removed everything once again, and cut along my new line, trying to keep the cut as clean as possible.

Then I put the tidied up pieces back on the grill, and remounted everything on the truck, and continued on with the usual install. Which is when I took the first picture above.


Unlike the ARB bumper that covers the cut, the stock bumper needs to be cut above the shrockworks bumper so their is a space between the wings and the bumper, so the cut is visible.


You can see how I had to cut the bumper under the grill, and now the corner of the wing is missing on both sides. I suspect that if I had just cut the bumper straight across under the grill here, and left the original grill mounting point rather than replacing it with the shrockworks one, it would have still worked, but I didn't want the strip of red between the bumper and the grill, so I removed it.


Here is the side. The black retaining clip attached to the fender is cut only a 1-2 mm above where the bumper is cut. It is because of this point that I don't think I will use that black rubber trim to line my cuts. Seeing this now though, makes it look kind of messy. I thought I had done a better job cutting than this. . .

Anyhow. I hope that helps. It's not really difficult, it's just time consuming, and I spent a lot of time adjusting the line where I was going to cut along. Hope this satisfies your request.
 
[MENTION=77842]EasylyConfused[/MENTION] You did a great job. I've been thinking about doing this myself. [MENTION=74569]SOcalTRAIL[/MENTION] was in the process of doing this as well. I wanted to see what his out come was gonna be like. What you did is doable and not so complicated.
 
Took off the 17" Michelin X-Ice Xi 2's and put the OEM 20's back on now that winter is (should) be behind us! It feels good to have them back on and looks much much better.

I personally find it hard to tell the difference between the 20s and 17s, but it would say it's most noticeable in cornering and a slightly firmer/tighter ride with the 20s.
 
Easy Gen 5 Constant On Lighter sockets

Today I made a little fuse harness to jumper the secondary fuse on a fuse expander to the P/Outlet fuse socket to give all my 12v sockets constant power.

Was a simple/cheap mod, though not as seemless as it could be, but the P/Outpet relay is deeply embedded in the Gen 5 and this was way easier to do...

This is the entire contraption. One end plugged into the lift gate socket and the other into the P/Outlet socket.

2014+warthog-albums-+warthog-picture25211-12v-mod-photo-wiring-diagram.jpg


Details on how I made the P/Outlet socket, and more photos in my build thread:
http://www.toyota-4runner.org/5th-gen-t4rs/165542-warthog-build-adventure-thread-2.html#post1671397
 
mounted cbi ditch light brackets


Still waiting on grill and wiring harness for led lights. hoping andrew has a quick turn around on my retrofit bc im stuck driving a nissan in the mean time lol


1199uo6.jpg

So I'm guessing these are the 4th Gen brackets and they fit the 5th or did you special order them?
 
Realized how Mothers three-stage wax got its name: that's one Mother fkr of a job, applying, polishing the many acres that make up a 4R six times! Philsey is right about love/hate black: beauty when clean, but it shows every off-road pin stripe I've ever made. Won't be this clean again, maybe ever in its life. Winter wheels coming off later this week for summer Michelin LTX.
 

Attachments

  • DSC_0037.jpg
    DSC_0037.jpg
    143.4 KB · Views: 1,367
Realized how Mothers three-stage wax got its name: that's one Mother fkr of a job, applying, polishing the many acres that make up a 4R six times! Philsey is right about love/hate black: beauty when clean, but it shows every off-road pin stripe I've ever made. Won't be this clean again, maybe ever in its life. Winter wheels coming off later this week for summer Michelin LTX.

Looks great! Now you know one reason I traded my black SR5 for a silver TE. (hint: it wasn't all for the KDSS or the hood scoop lol)
 
Overdue Updates...

Man! Colorado has been keeping me busy. Consequently there has been little time to update, but I have been able to squeeze in a few projects.

Truck has been a beast getting up to the mountains this year. Currently at 112% snow pack with more snow still due this season. Numerous resorts are extending their ski / snowboard seasons. We really need the water after some dry years recently.

Keystone, Colorado sometime near the Superbowl...

IMG_8799_zps9f8f1ea4.jpg~original


IMG_8794_zps0f81c73d.jpg~original


My buddy (red jkt) literally had to be dug out of the deep powder... Snowboarder to the rescue haha

IMG_8798_zps820f9bb2.jpg~original


At any rate finally had some clear weather and had to work quickly.

Late winter sunsets

IMG_8697_zps66a54a34.jpg~original


First up was a rocker panel trim for an impending Budbuilt slider install. I used the standard [MENTION=65614]Antman[/MENTION] build thread for reference, so thanks in advance big guy! :cheers:
[MENTION=65614]Antman[/MENTION] recommends a 1 3/4" cut for his n-fab step install. I started there then trimmed as necessary to get a closer fit. In fact I have a bit more trimming / smoothing to finish up... I am using a Dremmel with a plastic cutting wheel and small accessory handle with great success.
While having the rocker panel off I went ahead and Plastidipped the chrome stripes while the parts were off of the truck.

subwoofer install, and [MENTION=55815]Okki[/MENTION] 's Aux. Fuse box install I ended up using an extra tent pole to push through the rubber gasket. This allowed me to push the wires through the pole easily and ultimately into the cab of the truck.

Thanks again @audio3x for the Satoshi grill install... You rock!

Lower grill was a PITA to remove, but using the [MENTION=57963]TOYSTRY[/MENTION] How to Grillcraft install instructions I was able to man handle it out!

Pic shows two 3x3 led's used as fog lights. I went ahead and purchased the yellow covers for additional protection, but to see how traditional yellow fog lights perform in Colorado conditions. They easily pull on and off, but seem to dim the light output quite a bit. We'll see...

IMG_8900_zps3817b6b0.jpg~original


IMG_8901_zps117762a3.jpg~original


While the fog lights are awesome and I believe they will perform at or above expectations, I thought I should still increase the lumens on the front end of the rig.

Went with the [MENTION=74569]SOcalTRAIL[/MENTION] overbuilt bada$$ limited edition custom light plate. If you haven't checked out his build thread you are missing out. This thing looks like it was forged from a meteor using other world materials from outside of our galaxy. Front of the truck is 117% stronger. haha

I went with a 30" combo pattern Aurora light bar. The fit was bit snug and I had to trim the outermost plastic air deflectors from behind the grill. These things were super easy to cut, and really only the light bar mounting points were interfering with the close quarters.

IMG_8905_zps2cf12fc8.jpg~original


This thing is unreal....so so bright!

IMG_8903_zps4b6bde1f.jpg~original


Living in downtown Denver as you can imagine it is a bit hard to find a truly "dark" area to check out the lights and do some work getting them aimed properly. I drove around the Wash Park area for a bit and found a dark alley that might have had a burned out street light. These led's really perform well!

IMG_8915_zpsd21ecd0f.jpg~original


Apologies if you were "making out" in Wash park in a small white compact car... haha

IMG_8909_zpsd11254ab.jpg~original


99% buttoned up and installed. I used the stock switches that came with the lights for now, but might upgrade those in the future.

IMG_8941_zpsa738ce65.jpg~original


That's it for now...thanks to all on the forum for some really great advice, and fortunately / unfortunately really really great ideas! So much to do and dream about on this forum.
 
Got this idea from those headrest grab handles I've seen people install on this forum...but I made it out of paracord. It's pretty simple really, just tedious and repetitive to braid it over and over again until you get to the end; and then realize you need to make another one for the other side :(

Here's how it looks installed to the headrest posts:


Here's a picture of it next to a ruler in case any of you want to make one:


All you need is ~12 feet paracord (preferably the USA made variant :usa2:), a lighter and some patience :)

Will grab some pictures of it installed to the seat later when I have a chance and do a super detailed how to write up on the installation procedure, lol.
 
Got this idea from those headrest grab handles I've seen people install on this forum...but I made it out of paracord. It's pretty simple really, just tedious and repetitive to braid it over and over again until you get to the end; and then realize you need to make another one for the other side :(

All you need is ~12 feet paracord (preferably the USA made variant :usa2:), a lighter and some patience :)

Will grab some pictures of it installed to the seat later when I have a chance and do a super detailed how to write up on the installation procedure, lol.

Pure genius Eddie! I love it.

How the hell do you make the braid?
 
Got this idea from those headrest grab handles I've seen people install on this forum...but I made it out of paracord. It's pretty simple really, just tedious and repetitive to braid it over and over again until you get to the end; and then realize you need to make another one for the other side :(

Here's how it looks installed to the headrest posts:

All you need is ~12 feet paracord (preferably the USA made variant :usa2:), a lighter and some patience :)

Will grab some pictures of it installed to the seat later when I have a chance and do a super detailed how to write up on the installation procedure, lol.

Is that just a cobra braid?
 
Pure genius Eddie! I love it.

How the hell do you make the braid?

Is that just a cobra braid?

Yes, just a standard cobra weave that most paracord bracelets are made of. Basically I made a long loop out of a piece of paracord by melting the ends together, then I started braiding the cobra weave while one end of the loop is around the headrest post. Repeat it over and over again till you get close to the other end and throw that loop around the headrest post and braid until the loop is taut.

Jeff (or anyone else), if you want me to throw together a quick how to with videos I used from youtube showing the steps of working with the paracord, I'd be happy to. I was just kind of kidding about making up a super detailed write up because you always make fun of me for it :tape:

Anyway, here is the picture of them installed as promised:


IMO it looks more discrete and less in your face as compared to the ones you can buy pre-made (that are made out of flat nylon straps and a plastic grip handle). Should be able to handle the stress since the break strength of the paracord is ~550 lbs (I think the headrest will snap off before that, lol).
 
Yes, just a standard cobra weave that most paracord bracelets are made of. Basically I made a long loop out of a piece of paracord by melting the ends together, then I started braiding the cobra weave while one end of the loop is around the headrest post. Repeat it over and over again till you get close to the other end and throw that loop around the headrest post and braid until the loop is taut.

Nice idea! A friendly suggestion for more strength, instead of melting the ends together, keep it all one string by having one end like in the following picture:
20140407_232415_zps1117bb91.jpg~original

Then finish up the other end like so:
20140407_232825_zps90b0e0e6.jpg~original


I'm sure for it's application, melting it together will be plenty strong, but when you're making love in the back seat and she's pulling on the strap with all her force, well you don't want it to snap :)
 
Nice idea! A friendly suggestion for more strength, instead of melting the ends together, keep it all one string by having one end like in the following picture:

I'm sure for it's application, melting it together will be plenty strong, but when you're making love in the back seat and she's pulling on the strap with all her force, well you don't want it to snap :)

So that's how you do it! I was too lazy to search youtube any longer and figure out the logistics behind keeping it one solid strand so I gave up. But thanks very much for the pictorial, I'll be sure to try it out on my next project :)

Now I didn't determine this scientifically by any means, but I think melting the center loop together is more for aesthetics than anything...I think the friction from the cobra weave holding the two center piece side by side keeps the joint from pulling apart? I made sure to keep the joint smack in the middle of the loop for maximum cobra weaving gripping strength.

I tested this by make an open ended loop with a short piece and braiding ~3" of cobra weave down it, then hanging from the loop with all my weight...nothing gave out, lol.
 

Members online

Forum statistics

Threads
278,317
Messages
3,554,128
Members
248,016
Latest member
Advally Service

Trending content

Back
Top