What Did You Do To Your 3rd Gen Today?

Status
Not open for further replies.
How did that work? Did you have to remove the pieces?

To do the badges no removal necessary. Just tape up around them and spray. After 3 or 4 coats of plasti dip, and once dry, remove tape and peel off overspray. Plasti dip will peel right off the paint and not leave any residue...but it will stick to the badges. Easy peasy. Just get a toothpick to get inside the little letters.

To remove the film from the flares...no removal of flares necessary. Just a blow dryer to heat up the film and some elbow grease to peel it off with your fingers. Then hit with a clay bar and buff out the flares where the adhesive was.

Hope this helps.
 
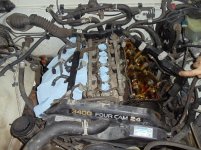
Went for the valve cover gaskets. Didn't finish today, but everything is apart and clean, just need to install and rebuild the rest.

DSC03598.jpg

DSC03628.jpg
 

Attachments

  • DSC03598.jpg
    DSC03598.jpg
    114.7 KB · Views: 877
  • DSC03628.jpg
    DSC03628.jpg
    119.9 KB · Views: 944
Went for the valve cover gaskets. Didn't finish today, but everything is apart and clean, just need to install and rebuild the rest.

View attachment 93257

View attachment 93258

Nice. How long did it take you? Mine only barely weep since I tightened them down. But always wanted to do them when I do the TB/WP in about 10k, and replace everything else along the way and paint my covers as well.

Oh I see you have a FR-S. How you like it?
 
Nice. How long did it take you? Mine only barely weep since I tightened them down. But always wanted to do them when I do the TB/WP in about 10k, and replace everything else along the way and paint my covers as well.

Oh I see you have a FR-S. How you like it?

Thanks, I'm actually not done with it yet. Spent about 6 hours on it today, but I also did the belts before I started, and it rained on and off so there was several delays. I'm going to finish them tomorrow so I can let you know the total time put into it. I have all the gasket faces cleaned and prepped for a new seal. I'm expecting tomorrow to go fairly quick since it will be all just installing.

Mine were weeping too, never lost oil from them or had to add oil, but it was wet so I thought it would be best since it's a fairly inexpensive job if done DIY. If yours are barely weeping I would say you are good for the 10k. Mine were wet all the way around for quite awhile. As long as there isn't oil loss it's not serious problem.

Yes spotted the FR-S, it is a great car. It's super fun for a daily drive, for the price, fun and the mpg I get (30-33mpg w/6-speed) you just can't beat it. Have about 1,500 mi. on it and so far solid car.
 
busy day!!! got the front brake lines finished, rebuilt my locking hubs with bobby longs chromo hub gears, slapped on new 02 sensors and finished putting the exhaust back together, checked/topped off all the fluids, charged up the battery and brought her back to life! i was about to throw the wheels and tires on but forgot i still have a bunch of welding to do underneath. back at it tomorrow. hopefully have her sitting on rubber before days end.
<a href="http://s25.photobucket.com/user/maloa/media/IMG_2778.jpg.html" target="_blank"><img src="http://i25.photobucket.com/albums/c82/maloa/IMG_2778.jpg" border="0" alt=" photo IMG_2778.jpg"/></a>
<a href="http://s25.photobucket.com/user/maloa/media/IMG_2779.jpg.html" target="_blank"><img src="http://i25.photobucket.com/albums/c82/maloa/IMG_2779.jpg" border="0" alt=" photo IMG_2779.jpg"/></a>
 
The kick board lights put in. Wired up to the door switches. Will have a full write up in my build thread :)

null_zps2ef13ce1.jpg~original

Do you have a pic of the correct wire to splice into to power the floor lighting so they come on with the dome lights? I've been looking to do this for a while, just not sure how to do that part.
 
Do you have a pic of the correct wire to splice into to power the floor lighting so they come on with the dome lights? I've been looking to do this for a while, just not sure how to do that part.

I will get the tutorial up tomorrow for you bud. Just check my build thread tomorrow night. There are several wires you can tap for it. I will list all of them for you. The way that I set it up they are independent of the actual dome switch. They will always come on but are only activated by the doors. You can either wire and ON/OFF switch for manual operation too. I am going to track down the wire to make them work "functionally" with the dome light tomorrow. Basically give some options. I have a decent sized interior lighting project coming up as well.
 
To do the badges no removal necessary. Just tape up around them and spray. After 3 or 4 coats of plasti dip, and once dry, remove tape and peel off overspray. Plasti dip will peel right off the paint and not leave any residue...but it will stick to the badges. Easy peasy. Just get a toothpick to get inside the little letters.

To remove the film from the flares...no removal of flares necessary. Just a blow dryer to heat up the film and some elbow grease to peel it off with your fingers. Then hit with a clay bar and buff out the flares where the adhesive was.

Hope this helps.

THANKS!

I love the look...
 
head gasket time

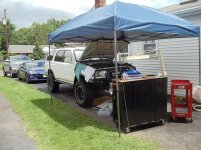
I just bought a 97 limited a couple weeks ago that has a blown head gasket. Well, started the tear down today. Almost there, just a little ways to go. Hope to have it on the road pretty soon


I will get the tutorial up tomorrow for you bud. Just check my build thread tomorrow night. There are several wires you can tap for it. I will list all of them for you. The way that I set it up they are independent of the actual dome switch. They will always come on but are only activated by the doors. You can either wire and ON/OFF switch for manual operation too. I am going to track down the wire to make them work "functionally" with the dome light tomorrow. Basically give some options. I have a decent sized interior lighting project coming up as well.

Thanks brother. That's my next little project I think, I want the floor to be well lit. Thinking of going red on the floor.
 
Mounted my Scangauge

Used the Tacoma World thread and used a tape measure clip to mount my scangauge. I'll tuck the wires in tomorrow along with a possible relocation of my GPS.

 
Pulled the engine. Bought a 96 limited with a blown head gasket. Didn't have to pull it, but why not give it a good once over and clean it up while we're at it. :boink:

runner_engine_pull.jpg
 
cleaned throttle body and MAF today, as well as removed those crappy stone/chip guards from rear doors/flares.
runs great and looks great too.
 
got the front end completely finished! bled the brakes and threw the wheels and tires on. she sits kinda tall for my taste. frame height is t 29.5" but thats on new springs and i still have a bumper and winch to put on. the rear is about the same but thats minus my full size spare, tire carrier and gear. i'm hoping it settles to around 25-26ish. this is on 5" springs. i also have a set of 4" leafs so i might throw them on if it doesn't come down to where i want it but we'll see.
<a href="http://s25.photobucket.com/user/maloa/media/IMG_2808.jpg.html" target="_blank"><img src="http://i25.photobucket.com/albums/c82/maloa/IMG_2808.jpg" border="0" alt=" photo IMG_2808.jpg"/></a>
 
Status
Not open for further replies.

Members online

Forum statistics

Threads
278,316
Messages
3,554,120
Members
248,016
Latest member
Advally Service

Trending content

Back
Top