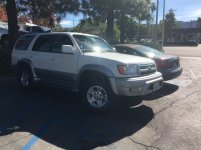
What Did You Do To Your 3rd Gen Today?

Status
Not open for further replies.
Interesting wheel color. Can you post a pic without a shadow?

Graphite color?

Sent from my LGMS428 using Tapatalk


I wish but no. I want to dip the same as I did my f150
75f51c74800275af09bde83d7888029b.jpg
wheels


Sent from my iPhone using Tapatalk
 
Not today technically, but over the weekend:

-OEM Alt/PS/AC Belts, thermostat and gasket. Original thermostat was dated January 2000. Temps used to fluctuate 188-195, now I'm consistently at 188.
-Accidentally grounded the alternator via crappy electrical connection, blew my 120amp fusible link.
-Replaced fusible link.
-Soldered factory battery->alternator connections, restored idle voltage to where it needs to be. Prior, I would idle around 11.9. Now, I'm idling at 13.7 or higher volts, jumps to 14.5 with the slightest touch of the pedal.
-Soldered new wiring for the Big 3, but didn't have the time for those just yet.

Everybody should check their battery->alternator connections, specifically the end at the alternator. My stock wiring looked to be in great shape, but when I removed the alternator to replace the belts, the factory crimp literally disintegrated and the lug fell off on the ground. The heat shrink and factory electrical tape looked good, but somehow the crimp on the lug just opened up over time and wasn't really attached to the wiring by anything other than the tape. PSA over.

164560
 
OME 880/906 - Bilstein 5100 4R Specific - Procomp 7069 - Duratrac 265/75r16

I installed my suspension this weekend. Wanted to share some observations and answer some questions that I had prior to install and wasn't able to have addressed.

A little about the truck:

Picked it up in August, 122K, 1 owner and recent timing belt job. It's in fair condition cosmetically and the rust is mostly on the hardware, not the frame.

Over the past few months I've replaced the radiator and rad hoses, would have done the thermostat but one of the nuts is rounded. I'll address it if it ever craps out. Also replaced the lower ball joints and a few other items. I'm working my through all of the maint - fuel filter, etc.

On to the lift etc:

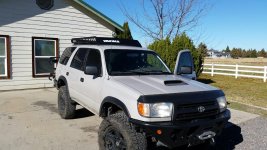
I went with OME 880/906 springs and the 4runner specific Bilstein 5100's.

Notes on the install:

- Front 5100's on the 1st perch - stock height. The lift comes from the springs.
- There's no need to disconnect the tie rods or the lower ball joint for this install. You may need to if you're really lifting the front, but I think even at a 2.5 inch lift, you'd be fine leaving them connected as long as you disconnect the sway bar end links.
- The bottle jack method for pushing the UCA down is definitely the easiest method for getting that lower shock bolt lined up.

NAiyyOV.jpg


- Rusty hardware - All of my front strut mount bolts were completely rusted and seized. When I really tried to turn them, the bolts embedded in the strut mount bushings broke free and turned freely. I ended up having to use a dremel and a metal abrasive disc to cut the nuts off. Pic below:

8LjZHMJ.jpg


17XyhGV.jpg


- Rear shock mount bolts. I've seen a bunch of different suggestions on these. Mine were completely seized. I tried a sawzall as I've seen mentioned. I wasn't sure where to cut as I didn't know the diameter of the shock mount hole. You can cut below the last bushing and mount and it'll fit through. I didn't know and attempted to cut through the bushing. That didn't work very well. In the end, I bent them back and forth and broke them off. This is really the easiest method. It took 2 minutes a side. Just break them off.

- Front spring / strut assembly - you have to orient the strut mount correctly so that when mounted, the lower shock bolt lines up and the spring perch is also oriented correctly. There are various suggestions for doing this. What worked for me was to mark the assembly that I had removed with (red) paint, on the strut mount. I then assembled the new strut/shock and used the original as a reference to mark the new shock mount. This let me eyeball everything to keep it lined up as I released the tension on the spring. Pic:

kpr37zd.jpg


- Also - I've watched the videos here and I want to make clear for anyone else doing this: When you assemble the strut and strut mount, you need to compress the spring enough that there's no tension on the strut mount when you're torquing it down. If the spring is pushing back, you're not accurately torquing that top nut. With these springs, that required an air impact wrench. I don't think it's possible by hand or with an 18V impact.

Bad pic of how it sits:

bCV0Yr9.jpg


- Ride and handling - It rides great. I was worried that it would be harsh but it's not. It soaks up everything really well and is also very controlled. The spring and dampening combination is really spot on. I think it'll get even better as the springs break in. I don't know about how it would be over rutted dirt roads at speed, but it's great over terrible northern Virginia roads.

I went to have it aligned today and the Goodyear wanted to charge me $300 extra to work on the eccentric bolts in the front. I'm going to spray them down with PB tonight and take it to Toyota tomorrow to hopefully avoid having to pay that much to get the camber and caster in spec.
 
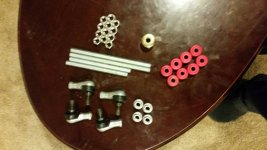
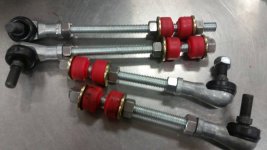
Built custom sway bar links. 20161108_170359.jpg20161108_122023.jpg

Sent from my SM-G900T using Tapatalk
 

Attachments

  • 20161108_170359.jpg
    20161108_170359.jpg
    99.4 KB · Views: 530
  • 20161108_122023.jpg
    20161108_122023.jpg
    77.4 KB · Views: 559
I installed my suspension this weekend. Wanted to share some observations and answer some questions that I had prior to install and wasn't able to have addressed.

A little about the truck:

Picked it up in August, 122K, 1 owner and recent timing belt job. It's in fair condition cosmetically and the rust is mostly on the hardware, not the frame.

Over the past few months I've replaced the radiator and rad hoses, would have done the thermostat but one of the nuts is rounded. I'll address it if it ever craps out. Also replaced the lower ball joints and a few other items. I'm working my through all of the maint - fuel filter, etc.

On to the lift etc:

I went with OME 880/906 springs and the 4runner specific Bilstein 5100's.

Notes on the install:

- Front 5100's on the 1st perch - stock height. The lift comes from the springs.
- There's no need to disconnect the tie rods or the lower ball joint for this install. You may need to if you're really lifting the front, but I think even at a 2.5 inch lift, you'd be fine leaving them connected as long as you disconnect the sway bar end links.
- The bottle jack method for pushing the UCA down is definitely the easiest method for getting that lower shock bolt lined up.

NAiyyOV.jpg


- Rusty hardware - All of my front strut mount bolts were completely rusted and seized. When I really tried to turn them, the bolts embedded in the strut mount bushings broke free and turned freely. I ended up having to use a dremel and a metal abrasive disc to cut the nuts off. Pic below:

8LjZHMJ.jpg


17XyhGV.jpg


- Rear shock mount bolts. I've seen a bunch of different suggestions on these. Mine were completely seized. I tried a sawzall as I've seen mentioned. I wasn't sure where to cut as I didn't know the diameter of the shock mount hole. You can cut below the last bushing and mount and it'll fit through. I didn't know and attempted to cut through the bushing. That didn't work very well. In the end, I bent them back and forth and broke them off. This is really the easiest method. It took 2 minutes a side. Just break them off.

- Front spring / strut assembly - you have to orient the strut mount correctly so that when mounted, the lower shock bolt lines up and the spring perch is also oriented correctly. There are various suggestions for doing this. What worked for me was to mark the assembly that I had removed with (red) paint, on the strut mount. I then assembled the new strut/shock and used the original as a reference to mark the new shock mount. This let me eyeball everything to keep it lined up as I released the tension on the spring. Pic:

kpr37zd.jpg


- Also - I've watched the videos here and I want to make clear for anyone else doing this: When you assemble the strut and strut mount, you need to compress the spring enough that there's no tension on the strut mount when you're torquing it down. If the spring is pushing back, you're not accurately torquing that top nut. With these springs, that required an air impact wrench. I don't think it's possible by hand or with an 18V impact.

Bad pic of how it sits:

bCV0Yr9.jpg


- Ride and handling - It rides great. I was worried that it would be harsh but it's not. It soaks up everything really well and is also very controlled. The spring and dampening combination is really spot on. I think it'll get even better as the springs break in. I don't know about how it would be over rutted dirt roads at speed, but it's great over terrible northern Virginia roads.

I went to have it aligned today and the Goodyear wanted to charge me $300 extra to work on the eccentric bolts in the front. I'm going to spray them down with PB tonight and take it to Toyota tomorrow to hopefully avoid having to pay that much to get the camber and caster in spec.

That looks excellent! It looks like it only netted a minor lift over stock, is that correct? What are the Bilstein part #'s if you don't mind checking?
 
Got a flat today on the set of old tires that came with the truck, so it's time to finally buy some new tires and wheels.

Here is what I have picked out. Can anyone confirm that these will fit? I have a stock suspension. I'm going to get the set shipped to my house and do the install myself, with the road force balancing that Tire Rack offers, I shouldn't experience any vibrations at all, right?

1vau0h7.jpg
 
Can anyone confirm that these will fit? I have a stock suspension.

QUOTE]

That's the tire size I have on the 2000 with no lift and they look/fit great. The fact that the computer order form says the wheels are for your truck implies they fit. I am totally ignorant of back spacing but they look like a good fit. Who did you get these from because the tires seem to be a great deal?
 
Can anyone confirm that these will fit? I have a stock suspension.

QUOTE]

That's the tire size I have on the 2000 with no lift and they look/fit great. The fact that the computer order form says the wheels are for your truck implies they fit. I am totally ignorant of back spacing but they look like a good fit. Who did you get these from because the tires seem to be a great deal?


The Tirerack. I was going to go with Firestone Destination A/T's but these are a great price and I don't do much offroading, maybe in the future.
 
Genius. I've been thinking of how to "scrub" the inside of the frame before rust treating. I never thought to use a dryer vent cleaning kit. I didn't even know those existed. I always cleaned my dryer vents with a leaf blower. Well done sir! [emoji41]

Thanks! One note: Do not reverse the drill rotation or else the kit pieces could unscrew up inside the frame!!!

Trust me on the Zep 505 cleaner too. That stuff dissolved the mud/grease/oil combo better than else I've tried, including Gunk Foamy Engine Degreaser. The fumes are harsh, so set up a fan to keep the fumes blowing away from you.

Also, the long pex pipe sprayer I fabricated did a great job of knocking out the clumps of mud out from inside the frame, would highly recommend getting as much of the loose stuff out first as you can.

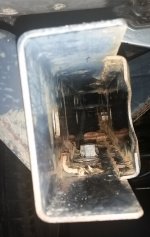
My 4runner frame used to have > 1/2" of mud resting inside of it on the bottom. In the attached pic below, if you look way up in the frame where it runs up over the rear axle you can see how well that Zep 505 + dryer vent cleaner brush cleaned it out:
 

Attachments

  • 20161108_195929.jpg
    20161108_195929.jpg
    114.4 KB · Views: 585
Thanks! One note: Do not reverse the drill rotation or else the kit pieces could unscrew up inside the frame!!!:

Thats looks really nice. I was thinking that the brush might not clean the corners well enough but it looks great. Now if only one could paint the inside of the frame.

Sent from my SM-G930T using Tapatalk
 
Finally installed my RAT products skid plates. Instead of using the self-taping screws that came with them, I installed nutserts in the frame so they're easier to remove when needed.

E93AEE89-9E62-4CFA-97C8-DCFA253051E7_zpsxk4n9ytc.jpg~original


9BB5E3BC-3F36-43B3-B83E-1F4FAA9107F5_zpsmyy34qrg.jpg~original
 
Fair enough man. I am not usually the type to add any stop leaks to my rigs. The only thing I've ever added was some Alumi-Seal to the rad on my 88 Toyo van when it had an 1/8 round hole in it. That product was recommended to me by a mechanic friend. It not only sealed the leak but it's still in the cooling system 50,000 miles later with zero issues. That same buddy told me to try this stuff. I did a lot of research about the product before putting it in. I found a lot of "it worked" and very, very few "it blew up my car posts". For 15 bucks it's worth a shot. I'll keep you posted on my experience with it.

[MENTION=84643]JBurt[/MENTION] So it's been five days and a little less than 200 miles since I put that can of Blue Devil in. I'm amazed to report that it has completely stopped the rear main seal leak. I'll eventually get in there and do it right but for now I am completely stoked.

Not having to do it now means I can free up time to get my rear locked. Arb or factory e-locker? I've got a line on a factory third with a working e-locker and the gears match my current rig. Looks like some plasma cutting, a little welding to build up the housing where 4 new bolts need to be tapped to make it work with my current housing. So, what says the crowd? Air or E? And yes I know there are tons of threads on it. lol
 
Finally installed my RAT products skid plates. Instead of using the self-taping screws that came with them, I installed nutserts in the frame so they're easier to remove when needed.

E93AEE89-9E62-4CFA-97C8-DCFA253051E7_zpsxk4n9ytc.jpg~original


9BB5E3BC-3F36-43B3-B83E-1F4FAA9107F5_zpsmyy34qrg.jpg~original

Exposed bolt heads? No thanks. I've seen where rocks have hit the protection welded on around the heads of the bolts on my Savage skids, and the round carriage bolt heads. I could see those getting destroyed.
 
I finally addressed my grille today. I'm happy with the way that it turned out and need to figure out what I want to put on it now. Kind of thinking about doing a TEQ logo.
55e2c30f2a5fed1625b2438a5ff335a5.jpg


Sent from my iPhone using Tapatalk
 
Exposed bolt heads? No thanks. I've seen where rocks have hit the protection welded on around the heads of the bolts on my Savage skids, and the round carriage bolt heads. I could see those getting destroyed.
Suggestions to fix that? Counter sink them?

Sent from my SM-S765C using Tapatalk
 
Status
Not open for further replies.

Members online

No members online now.

Forum statistics

Threads
278,316
Messages
3,554,120
Members
248,016
Latest member
Advally Service

Trending content

Back
Top