What Did You Do To Your 3rd Gen Today?

Status
Not open for further replies.
11225262_10101415680573572_6043151547448291847_n.jpg


Plastidipped my wheels today... turned out great for a first time
 
Was getting CEl for bank 1 O2 sensor. Was experiencing odd idle and poor acceleration as well. I will assume the old O2 is 15 years old.
31f760ee68febbb9bf454d2ea1ebc3ad.jpg
 
Last edited:
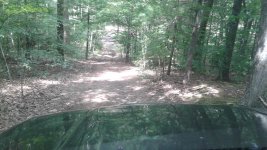
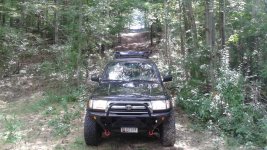
Did some exploring on the trails at Bald Eagle State Forest in Pa.
 

Attachments

  • Bald eagle 4runner, bicycle & Buttercup 008.jpg
    Bald eagle 4runner, bicycle & Buttercup 008.jpg
    145.2 KB · Views: 556
  • Bald eagle 4runner, bicycle & Buttercup 012.jpg
    Bald eagle 4runner, bicycle & Buttercup 012.jpg
    149.9 KB · Views: 803
Change plugs and wire.....and a good under hood clean, over heating problem solve...(rad was half full of mud, from last trail 3 months ago)......:party:
 
While I had the back tore apart I added my Rattle Trap and ensolite foam to the hatch and just Rattle Trap to the interior panel. Decided to run my wires for my additional lights from the rear dome light through the protective rubber boot on through the rear hatch. Wires are in a clamp just waiting for me to decide which lights I'm going to install - Eagle eyes or my marine quality Lumitec Mirage at 260 lumens (or something different). I'm concerned about the clearance and the aesthetics.

I was thinking of adding one or 2 of the OEM lights in that panel. Like the one in the roof in back. How much space is there between the plastic panel and the steel panel?

Did the sound dampening back there have a noticeable affect?
 
Little bit o' stuff...
Left some Moab in the driveway (and did a wash and wax too)
004_zpsf97jinjs.jpg~original


and painted the KC light covers black.
010_zpsnwsjuyqw.jpg~original


It won't be as easy to find in the parking lots but I think it looks better. I've just got to get new OTA and GORC stickers for them and all will be as it should.
 
Did quite a bit of wheeling at the Boggs and Boulders off-road park in Andalusia, AL with a couple forum members this weekend. While going through some deep water Saturday morning, I managed to get a stick I'm guessing, between the fan and radiator, which then put a hole in it. Thinking the weekend was shot, I went up to the gift shop and bought some jb weld...worked like a charm. Managed to finish the weekend with no other major damage. Time to figure out what radiator to buy.
 
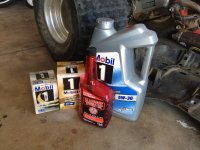
Oil change. Trains drain 'n fill. Drive shaft lube. Rotate tires.

Bonus points if you can guess what the M1-301 is for.
 

Attachments

  • image.jpg
    image.jpg
    133.7 KB · Views: 494
I am going to say for a remote transmission filter. I use a FL-1A for mine.

Why the need for MMO?

I usually use 1/2 quart of MMO just to top off the crank case.

What interval do you change your FL-1A, [MENTION=69868]LittleCaesar[/MENTION]?

Mobil1's EP filters advertise 15k mile interval, but that's working with dirty ol' engine oil. Filtering clean transmission fluid they can last much longer.
 
I usually use 1/2 quart of MMO just to top off the crank case.

What interval do you change your FL-1A, [MENTION=69868]LittleCaesar[/MENTION]?

Mobil1's EP filters advertise 15k mile interval, but that's working with dirty ol' engine oil. Filtering clean transmission fluid they can last much longer.

My rule of thumb has been every three years or 30,000 miles. The seal on the filter IMHO just can't go for much longer than that. I mounted mine behind the passenger headlight, but had to lower the washer fluid reservoir just a bit. Mine comes out hot straight out of the converter to the filter.

I was using a Magnefine, and it was doing well, but both of them began to leak after about 18 months at the barbs so I went for the remote set-up. Have been very pleased since.

I knew someone who ran MMO to eradicate a lifter tick in a Ford some time back. It seemed to work well for the car had over 300,000 miles when it was totaled by a taxi.
 
I was thinking of adding one or 2 of the OEM lights in that panel. Like the one in the roof in back. How much space is there between the plastic panel and the steel panel?

Did the sound dampening back there have a noticeable affect?

Great question. There's a not a ton of room between the panel and the hatch. The lower part of the interior panel has about 1/2 to 3/4". You need to go flush mounted or as I've seen some folks on here do, go with the eagle-eyes. There's more room up to an 1" as you gradually go up on the panel.

However, I looked at my light this morning (it's still removed) and it might actually fit. BTW - Not a bad idea! I would throw stronger LED's in there, perhaps a 4" or CREE. Anyway, you can take that panel off your self and put it right back on. There's one bolt attached to the small pull down strap and the panel just snaps off and slides up with the rubber window seal for the window.

As for the sound deadener. Mine isn't a DD and I've been working on my bumper and lift this weekend. Couldn't tell you. The way I see it, it can't hurt and it's really easy as long as you don't interfere with any of the close tolerances between the wiper motor and the window. I still half a roll left to do the doors and possibly the roof. (still undecided)
 
Last edited:
diff breather mod
according to my local yota parts man, the majority of rear seal failures is plugged breathers n the oil under pressure looking for the path of least resistance...the seals
luckily I don't have an issue, and maybe just beat it, cause when I took the old breather out, the diff hissed like a snake
and the mouth blow test showed it took more air to open the old breather then the new one

otherwise, nothing else, all my suspension parts are not here yet, had one part back ordered, so next week will be suspension week
couldn't do my spectre intake as one of the gaskets is in the back order suspension shipment from camel back
boring
should have gone kayaking and fishing again
 
Last edited:
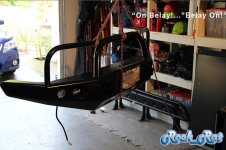
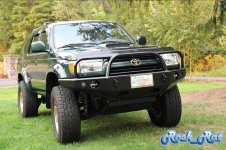
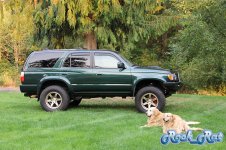
Installed 1" ToyTec Lift and Shrockworks bumper

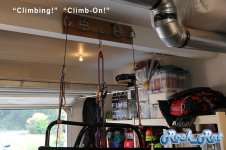
Finally got around to installing my 1" ToyTec lift this weekend and my Shrockworks bumper. I used my trainer I use for mountaineering in my garage as a winch. Had to pull out my Yosemite big wall Jumars to hoist the damn thing. Gawd that's one heavy son-of-a-beech.

It worked fantastic having it suspended in my garage installing the lights and finally installing it on the rig. Drove it to work today just to get a feel for the additional weight. I'm so glad I did the Tundra brake upgrade first. Stopping distance is much greater with the additional weight.

Funny thing is...now I'm taking it to Broadway Toyota to have them do the oil...haha. I just bring them Mobil 1 and a filter and they do the change. Don't feel like messing with it this week. Next are the sliders and rear bud built skid.
 

Attachments

  • Bumper_2.jpg
    Bumper_2.jpg
    81.6 KB · Views: 656
  • Bumper_1.jpg
    Bumper_1.jpg
    84.1 KB · Views: 651
  • Bumper Lift Finished_1.jpg
    Bumper Lift Finished_1.jpg
    115.9 KB · Views: 724
  • Bumper Finished _2.jpg
    Bumper Finished _2.jpg
    136.6 KB · Views: 687
  • Lift_Before.jpg
    Lift_Before.jpg
    129 KB · Views: 642
  • Lift After.jpg
    Lift After.jpg
    116.6 KB · Views: 633
Finally got around to replacing my broken rear wiper motor. Ran it through Elephant Car Wash up in Maple Valley Wa. while I was on a road trip. I had a ton of time so decided to clay bar it. Heard a snap (Clunk) going through the wash and low and behold my wiper arm was tore right off. Snapped the bolt off just below the threaded portion of the nut. The owner was great. He normally doesn't replace anything on cars older than 7-10 years but he made an exception as it was the first he had ever seen this happen, plus he saw how well taken care of my 4runner was after 14 years.

Bottom line is I made a deal with him. Told him to just order the part from Toyota of Dallas and have it shipped to me. I will do all the work. Broadway Toyota wanted $500 plus for the part and labor. Total cost for part -$238.99, and it took me about an hour. There's a small trick to replacing it. If you ever need to know just give me shout.

While I had the back tore apart I added my Rattle Trap and ensolite foam to the hatch and just Rattle Trap to the interior panel. Decided to run my wires for my additional lights from the rear dome light through the protective rubber boot on through the rear hatch. Wires are in a clamp just waiting for me to decide which lights I'm going to install - Eagle eyes or my marine quality Lumitec Mirage at 260 lumens (or something different). I'm concerned about the clearance and the aesthetics.

so what gauge wire did you run for your lights, any installed pics

like the idea of going off your current rear dome as that was a question I have had, how to power and turn on and off,
going junk yarding today or tomorrow, maybe ill tear into some old ones and find out how easy to get to dome and the rubber boot
 
so what gauge wire did you run for your lights, any installed pics

like the idea of going off your current rear dome as that was a question I have had, how to power and turn on and off,
going junk yarding today or tomorrow, maybe ill tear into some old ones and find out how easy to get to dome and the rubber boot

I was too busy with the bumper install this weekend. I ran 14AWG but I plan on installing a 5 circuit dual bus bar in the event I want to add anything else later on.

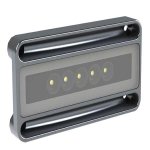
  • Sitting in my garage are five Lumitec Lite-Accent EchoLED lights for the interior panel (brushed aluminum) They are extremely low profile flush mounted and closely match my grey interior.
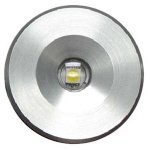
  • One low-profile Engine Room LED "Nevis2" White/Red to replace the dome light.


Nevis2 - Engine Room & Ultility Light, Brushed Finish, White & Red, CRI 70-75, CCT 5000, 10-30vDC, 900mA (Pretty damn spendy $169)

I want the additional bright white lights when needed for landing airplaanes but I also want to be able to switch between White and Red for camping when you don't want to wake up sasquatch and his buds. So I will need a DPDT which is what the Auto/On feature of the dome light essentially is and perhaps an SPDT for the five interior hatch lights.

Using the philosophy "Measure twice cut once" I'm still planning it all out. I want to do it right the first time. The idea of adding two more dome lights isn't that far fetched. Look at the post from [MENTION=99874]7echo[/MENTION] It's doable and with a little work I think you can expand the dome light to accept a larger CREE light and still have the auto/On feature. It would look 100% OEM.
 

Attachments

  • Lumitec Recessed lites.jpg
    Lumitec Recessed lites.jpg
    12.9 KB · Views: 611
  • Engine room light.jpg
    Engine room light.jpg
    20.6 KB · Views: 628
Status
Not open for further replies.

Members online

Forum statistics

Threads
278,316
Messages
3,554,120
Members
248,016
Latest member
Advally Service

Trending content

Back
Top