What Did You Do To Your 3rd Gen Today?

Status
Not open for further replies.
Used it to haul this gigantic, super heavy, built in lit, antique, display case thing my wife wanted from her grandparents.. :wow:

23836310865_a8de917dbe_z.jpg


23468378249_c0092cb155_z.jpg
 
I just bought my first Gen 3 4runner 2 weeks ago. It is a '99 SR5 with 155,000 miles. Condition is pretty good. I had some issues with the 4WD(previous owner had tried to convert 4WD from vacuum operated to electrical). Reconnecting the vacuum lines to the VSV solved the problem.

The previous owner had also installed Depo headlights which were pointed up at the sky.(DOH) This will be my work vehicle for a part time job, since I am retired.

We bought a Gen 4 new in 2006, and it now has 200,000 miles with only oil and tire changes. It is still on the original set of brakes.
 
Added LED turn signals/ marker lights to my TJM front bumper. Also added an LED friendly flasher to eliminate the hyper flashing.

<iframe width="560" height="315" src="https://www.youtube.com/embed/q4kX9xuYOc0" frameborder="0" allowfullscreen></iframe>

Did you saw a Tacoma in half and super glue the front to a Runners ass?
 
It was actually in incredibly simple swap. All I needed was the core support, fenders, hood, hinges, headlights and grille. 100% bolt on. Only a couple hundred bucks. My runner had been crashed so I figured that since I was replacing all this stuff anyway why not order the taco parts.

I don't want the misalignment to scare anyone off from doing the mod. This thing has taken a beating over the last decade so a lot of the mounting locations for the panels were bent or gone.

Oh and always check your hood latch. The girl checked the radiator and forgot to latch it. Bought a new windshield and going to need a new hood now.
 
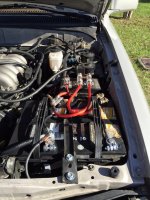
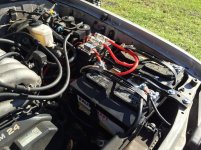
Just finished my dual battery set up. After reading a several random threads about it I decided to do it. First I moved the "charcoal" box and fuse box back about an inch or two toward the firewall utilizing other bolt holes and some creative mounting. Then I removed old battery tray, cut the original battery tie down and old fuse box mount ears off of the fender, and then beat the fender that was under the fuse box flatter. Then I added an eyebolt setup through the fender to replace the battery tie down ear, cut a 1x1x12 inch chunk out of the radiator plastic cover next to the battery location, replaced old tray with a marine dual battery tray, modded the old battery strap with some muffler hanger rubber strap to fit, added an 80 amp isolator just below the fuse box mounted to the fender, ran the 100 amp fused wires to split all my add-on (stereo, amps, inverter, lights, ect) accessories to one side and the rest of the truck to the other. All works great. Waiting for a dual battery switch that fits the dash panel to get here, then I will add a couple more wires to the system so it can self jumpstart from one to the other in emergency. Pretty stoked with the finished product.
 

Attachments

  • IMG_5255.jpg
    IMG_5255.jpg
    142 KB · Views: 376
  • IMG_5256.jpg
    IMG_5256.jpg
    141.4 KB · Views: 414
Just finished my dual battery set up. After reading a several random threads about it I decided to do it. .

I see you're in FL. Just for future reference, I was in West Marine (I assume you have those over there) today, and they have a HUGE selection of battery cable and crimp connectors, and the one I was in even had a crimping station where you could cut the cable and crimp the connectors down right in the store. Like anything else in that place it wasn't cheap, but at least they're there in a pinch.
 
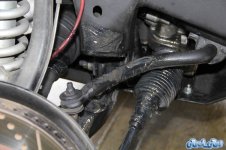
Changed my Oil and....my sweet little Jade decided to become a member of the "Torn CV Boot Club." You guys did not have to let her in you know! Being turned away at the door would have been fine with me.

It was bound to happen; 15 year old rubber CV boot - check, one year after the lift - check, 285's on 17 inch wheels - check, throwing some miles on it both on and off road - check. Yup, the "Members Only" club just dragged her right on in.

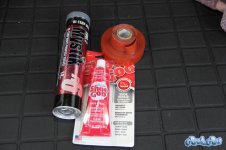
So now for the fun. First comes the band aid fix, some shoe goo, self adhesive rubber tape and lady luck. Done Next comes the suspension upgrade:

  • PRIORITY ONE - Keep my OEM axles if they're still OK, or have someone rebuild my OEM axles.
  • LCA's with poly bushings
  • New and improved spindles either going all out or TC reinforced
  • Extended inner and outer boots - Just Ordered!
  • New bump stops
  • New links

Isn't it funny how priorities change...BTW I'm not laughing.

Hmmmm to uniball or not to uniball? That is the question.
 

Attachments

  • CV Boot Torn_2.jpg
    CV Boot Torn_2.jpg
    91.1 KB · Views: 603
  • CV Boot Torn_1 .jpg
    CV Boot Torn_1 .jpg
    96 KB · Views: 818
Last edited:
Put some 265 km2s, repainted my center caps, trimmed the rear mudflap, changed out one of the marker lights up front
 
Got her oil sprayed before the salt hits. Also found out that I had a brake light burned out while I watched, so I changed that out when I got home.

7d1c20f8e68458d8243962fbc01b4d21.jpg
 
[MENTION=116467]Rock_Rat[/MENTION] if you go with poly bushings spend the extra and get whitelines. I bought energy and coudn't install them since they don't come with new inner sleeves and my old sleeves were destroyed. I had to have napa installed since I didn't have another choice
 
Status
Not open for further replies.

Members online

Forum statistics

Threads
278,316
Messages
3,554,120
Members
248,016
Latest member
Advally Service

Trending content

Back
Top