What Did You Do To Your 3rd Gen Today?

Status
Not open for further replies.
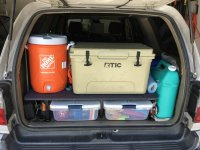
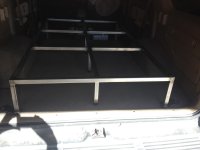
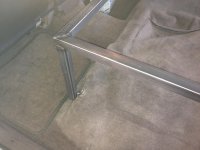
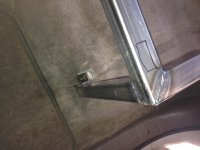
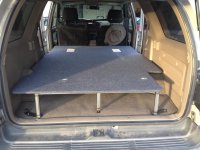
Camping/sleeping/storage platform

I've been working on this for months and finally built something that works for my needs. Thanks to the T4R community for the wealth of information and ideas. I'm not much of a poster, it thought I'd share my platform build just in case someone else out there is looking for ideas.

Materials used were 1" square steel tube, 1/2" plywood, piano hinge, speaker carpet and lots of time at the drawing board. The whole thing weighs less than the seats that were taken out and nothing was altered with the vehicle.
 

Attachments

  • IMG_0256.jpg
    IMG_0256.jpg
    130.7 KB · Views: 425
  • IMG_0251.jpg
    IMG_0251.jpg
    133.1 KB · Views: 422
  • IMG_0254.jpg
    IMG_0254.jpg
    136.2 KB · Views: 426
  • IMG_0253.jpg
    IMG_0253.jpg
    132.8 KB · Views: 422
  • IMG_0255.jpg
    IMG_0255.jpg
    134.5 KB · Views: 470
Last edited:
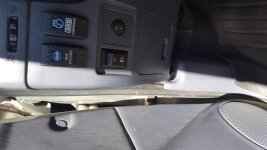
Thanks [MENTION=74071]Brilliant[/MENTION] For Cupholder Switch Mod idea... I didn't execute as well as you but it is totally functional! I could have used more body filler and sanding...settled for good enough :cool:

Looks good. I have to do these type things over weeks because it takes me so many passes to get it looking decent.
 
Thanks for posting these... I've been debating on these or just the clear ones.

These look nice!


But......

We need to get you a "Timmy the Toolman" decal & put t next to that Chris fix sticker!!!

I'm not opposed to a 'Timmy the Toolman' sticker. :P

I think the tailights would look a bit better with some smoke on them. Nothing too dark. Maybe?
 
That is the air intake sensor. If you look down the chamber of the MAF housing you will see the little wires that need a cleaning. They look like those filaments found in an incandescent light bulb.


I thought the whole thing was the sensor, but I clean those little wires too. I am a complete newbie to all this.


Sent from my iPhone using Tapatalk
 
Tested the locker on the 4.3 axle I got from a wrecked 97 Limited. It works!!! :rockon:

Learned from [MENTION=116470]Tyler James Inc[/MENTION] to test the wire continuity BEFORE hooking it up!!! :doh:

I ordered a locker switch from Low Range Off Road.

This is such a nice axle, look at those brakes! I thought I might have to replace them, being a 97 but they are pristine.

I was thinking I should replace the bearings and seals before it goes on but that can also be done on the car, but then it will be outta commission while I do that. Not sure...

Just gotta clean up the superficial rust and repaint. Best $350 CDN I've spent in a while!!

IMG_7721_tn_zpsoogiesr4.jpg~original


IMG_7722_tn_zpshg8fgn4v.jpg~original


IMG_7724_tn_zpsxx8fedl3.jpg~original
 
3X radiator flush and fill with Toyota red coolant. Previous owner had run Prestone after replacing the radiator and water pump. Coolant was in good condition but was ready for change after 2 years. Replaced worm clamps with OEM constant pressure coolant hose clamps. Tested leak free and ready for 2 more years of adventures. I also replaced the air/fuel sensor after a CEL. Codes clear and problem resolved.
 
Finally did the rear differential oil change. I didn't have any maintenance records when I bought the truck which is a real pain because you then have to go through and do everything. But it seems that it was maintained.....

I'm always amazed how bad this is when i actually get to see pictures. I personally haven't ever gotten a chance to experience this as they don't use anything but gravel and on rare occasion that de-icer they spray (but its rare where i'm at). I was under neath mine and I thought the paint was thick :(

I did do some work over the weekend on the 4Runner before packing it and I did some primer + bed liner. The bed liner does better than most rattle cans but we have a industrial shop downtown where I've actually bought paint that goes on so neat, almost un-scratchable. It does some weird stuff and its super expensive. The only thing I dislike about this paint is its like 70 USD for half a gallon and drys in 45 seconds.
 
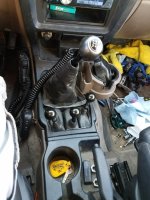
Installed ARB switches and wiring... Installing locker next weekend.

Still not sure where to mount the compressor. Any suggestions?
 

Attachments

  • 20170604_163955.jpg
    20170604_163955.jpg
    137.2 KB · Views: 498
Here's a post with a photo of where I mounted mine. If you want a step by step let me know and I'll write up a quick one.

http://www.toyota-4runner.org/2708892-post21111.html

Could you please give me a few pointers and parts I need to buy to mount the compressor. I have the CKSA12 compressor, which is smaller than what you have. I am guessing I would have to make a metal bracket and mount the compressor on it. Thanks!
 
Status
Not open for further replies.

Members online

Forum statistics

Threads
278,316
Messages
3,554,121
Members
248,016
Latest member
Advally Service

Trending content

Back
Top