What Did You Do To Your 3rd Gen Today?

Status
Not open for further replies.
Welded up my front bumper

Well actually did this yesterday, but close enough right?

8zWyRHuh.jpg


gOy81dRh.jpg


BaMNs5fh.jpg


qS14Pyyh.jpg
 
Finished my drawer.
Overall very happy considering I built it on my apt fire escape, with no level surfaces or clamps.
I still have some small thing I want to and will eventually change but I'll cover that in a build thread. I really like the look
adc7c7632ee285a1d68f5d76052304cf.jpg


Sent from my iPhone using Tapatalk
 
Replaced the Rear bleeders....

zionxix-albums-my+4runner+stuff-picture47139-20170729-095622-600x800.jpg


Attempted to replace the rear brake hose above the differential. That metal clip holding the upper portion in place is fighting me tooth and nail. I tried prying at it with a screwdriver and some leverage and the lip just bends. I had to stop for the rain, might start back at it again tomorrow.

This thing.... This picture stolen from google image search has a different clip but you get the idea.

zionxix-albums-my+4runner+stuff-picture47140-4runnerrearbrakehose.jpg
 
Did a simple fab up for a restraining plate to go under the battery. This plate with the factory battery hold down will keep the battery firmly in place for now. Also installed an iBolt tablet mount for navigation/ camera use later.


Replaced the Rear bleeders....

zionxix-albums-my+4runner+stuff-picture47139-20170729-095622-600x800.jpg


Attempted to replace the rear brake hose above the differential. That metal clip holding the upper portion in place is fighting me tooth and nail. I tried prying at it with a screwdriver and some leverage and the lip just bends. I had to stop for the rain, might start back at it again tomorrow.

This thing.... This picture stolen from google image search has a different clip but you get the idea.

zionxix-albums-my+4runner+stuff-picture47140-4runnerrearbrakehose.jpg

That clip is a son of a ***** it took me a while, but I cant remember exactly how I did it. Pretty sure it involved finding the perfect length screwdriver.
 
That clip is a son of a ***** it took me a while, but I cant remember exactly how I did it. Pretty sure it involved finding the perfect length screwdriver.


Yeah it is! My screwdriver options are pretty limited at the moment. I have a rusted wood chisel somewhere. There is no room to drive a hammer. I think I will try some small channel locks next. If that doesn't work, I may have to try and "bypass" that section.
 
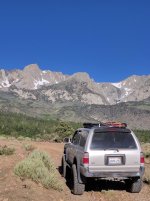
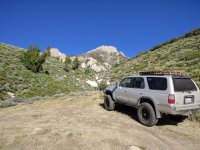
Went to do a little climbing on a small wall at the base of Mt Humphreys. It's the whitish wall directly above my roof rack in the first photo. Good times.

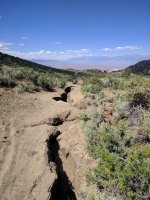
To get there you need to take Buttermilks Loop Road which is, well, a loop. The lower section has been washed out since April so we came in from the upper section. We got the climb done way fast so had some time to kill. Why not go out the lower way? How bad could it be? That "rut" is 3-5 feet wide and averages 4 feet deep and is 200 feet long. Yeah, it's a goner without some dozer work. I pulled right up to it to have a look and my wife thought I was going for it. Not even I'm that crazy. lol
 

Attachments

  • IMG_20170729_075758.jpg
    IMG_20170729_075758.jpg
    137.2 KB · Views: 479
  • IMG_20170729_082222.jpg
    IMG_20170729_082222.jpg
    137.8 KB · Views: 481
  • IMG_20170729_152555.jpg
    IMG_20170729_152555.jpg
    137 KB · Views: 480
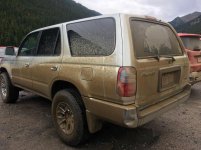
Drove up to the Moffat Tunnel in Rollinsville, CO about 20 minutes northwest of Golden.. Easy dirt road, fun drive. Got a little muddy too which is always fun
 

Attachments

  • IMG_2728.jpg
    IMG_2728.jpg
    137.3 KB · Views: 473
Went to do a little climbing on a small wall at the base of Mt Humphreys. It's the whitish wall directly above my roof rack in the first photo. Good times.

To get there you need to take Buttermilks Loop Road which is, well, a loop. The lower section has been washed out since April so we came in from the upper section. We got the climb done way fast so had some time to kill. Why not go out the lower way? How bad could it be? That "rut" is 3-5 feet wide and averages 4 feet deep and is 200 feet long. Yeah, it's a goner without some dozer work. I pulled right up to it to have a look and my wife thought I was going for it. Not even I'm that crazy. lol

Looks beautiful! Wish I had that kind of terrain over here on the east coast...
 
I got my vacation squared up so I'm going to Usal, northern California in 3 weeks. It is in the Lost Coast, 30 km of abandoned coast in the redwoods. There is a rough road that goes through that apparently has been driven this year.

Today I went to pick up some stuff from the wreck I'm picking clean. Got a set of Limited door panels, mine are cloth and a bit chewed up.

35450579883_9471bf3823_z.jpg


Also got a set of Limited flares for $100. The front ones are a bit bent from the accident but with some heat should straighten out. They'll need a repaint. They look great. Taped em on with gorilla tape, done!!! Haha, I kid.... they will be held on with 3M double sided VHB tape. Also they should bolt into a few places in the fender wells. The bottom of them looks a little unfinished without the running boards but I think when I get some sliders that should clean that up a bit. I actually kinda like the door panels... they will at least keep the crap off the door paint.

36121544601_000d5fc99e_z.jpg


Yesterday I put the rear license plate bezel back on because it was annoying me so much. I go to clean off the surface with alcohol and immediately all the touch up I did on the chaffed paint from the bezel starts rubbing off!! SoaB!!! I used one of those little touch up pens from Toyota and the paint never cured!! Still tacky after several weeks. I should bring it back. I'm going to order some paint in a can from that website referenced here for paint colours and pick it up in the states. So the bezel will have to come off again later... I sprayed it with SEM trim paint which almost looks too perfect.

36121544991_684cbf7f36_z.jpg


Also did some more welding up of the roof rack. I put all the cross bars on, just tacked.

35450579623_060851e952_z.jpg


Then I put it back up on the roof to compare the curve of the conduit holding it together to the roofline. It still needs some more bending which I'll sort out later. You can see in the second photo of the truck how low profile it is. It will stick up another 1/2" with the font / back piece of square tubing. I will then make an upper cage for it which will be bolt on, not weld on, in case I need the garage clearance with a lift etc. The base of the rack will remain though, since it's lower than the factory rack.

Other than the roofrack, the truck is ready for California. Still lots I want to do to it but I won't work on anything else before the trip
 
Last edited:
Drove the 4Runner to the Ohio State Fair. I know, nothing nuts, but the fair was really fun, so just wanted to mention that :)
 
Rear Brake Hose Round 2

I found my small channel locks and pulled that retaining clip off in 2 seconds. Kicking myself for
not doing it yesterday.

zionxix-albums-my+4runner+stuff-picture47151-20170730-065512-800x600.jpg


Even with a tiny brake line flare wrench, I was barely able to get 1/6 of a turn in that tight space.
It took me like 30min just to undo the upper portion of the line.

zionxix-albums-my+4runner+stuff-picture47155-20170730-071126-800x600.jpg


I was surprised how easy it was to undo the lower portion. It was only hand tight and not seized.
It was a nice confidence boost. Got the line removed. It needed to be replaced, badly.

zionxix-albums-my+4runner+stuff-picture47152-20170730-070500-800x600.jpg


When installing the new line, I found it impossible to get a 17mm wrench in a position that would allow tightening.
It then occurred to me that both ends are 17mm. I 'threaded' a gear wrench onto the hose and it made really quick work to snug it down.
Not too tight, just a bit, and I put antiseize on the threads.

zionxix-albums-my+4runner+stuff-picture47153-20170730-070755-800x600.jpg

zionxix-albums-my+4runner+stuff-picture47154-20170730-070840-800x600.jpg


1st bit of bad news. The replacement hose is 2inches shorter than the old one.
I purposely left the retainer clip off in order to give the line a little more slack.
I think my cheapest option is to buy a second hose and just extend it.

zionxix-albums-my+4runner+stuff-picture47156-20170730-071927-800x600.jpg


At this point I felt pretty good about the job thus far. Bleeding the brakes is all that remained.
I used a promotive power bleeder and was able to put 20psi holding. The passenger side rear caliper bled no problem.
The driver side caliper refused to cooperate. I took the bleeder completely out, still no fluid.
I pumped the brake a couple times, nothing. So I cracked loose the hard line on the driver side and tons of fluid was pouring out.
I took the drum off and tried hammering on the caliper to dislodge whatever was blocking it, nothing. I scraped around inside with a pick.
At this point replacing the caliper seems like the best option. So I tightened all the lines up.
Noticed the driver side line is leaking on the Hex-head side of the fitting. No amount of tightening will make it stop.
Its a slow leak, I just dont know how slow yet. Im hoping it will not drain the MC during the 2 weeks that I am gone.

Has anyone had good luck with those autopart store generic rear calipers?
How do I fix the line? Replace? Cut a tiny piece off and learn how to flare with the same fitting?

So yeah, I did all that work only to find some new old problems that were probably already there. Isn't that what Sundays are for?
 
Last edited:
Rear Hatch Work

Went to roll down the rear window and an awful crack/pop/crack sound. Both on the way down and the way up. I feared the worst. Pulled the panel and it turned out to be the plastic that covers the wire harnesses that go from the lock cylinder to the electric actuator. Whew, could have been a lot worse. Looks like the lock cylinder had been changed in the past. Zip ties to clean up wire routing and it's good as new.
 
At the age my 4Runner is at , I consider it as much of a gamble rolling down that back window as I do opening my sunroof :ohwell:

Went to roll down the rear window and an awful crack/pop/crack sound. Both on the way down and the way up. I feared the worst. Pulled the panel and it turned out to be the plastic that covers the wire harnesses that go from the lock cylinder to the electric actuator. Whew, could have been a lot worse. Looks like the lock cylinder had been changed in the past. Zip ties to clean up wire routing and it's good as new.
 
Went to do a little climbing on a small wall at the base of Mt Humphreys. It's the whitish wall directly above my roof rack in the first photo. Good times.

To get there you need to take Buttermilks Loop Road which is, well, a loop. The lower section has been washed out since April so we came in from the upper section. We got the climb done way fast so had some time to kill. Why not go out the lower way? How bad could it be? That "rut" is 3-5 feet wide and averages 4 feet deep and is 200 feet long. Yeah, it's a goner without some dozer work. I pulled right up to it to have a look and my wife thought I was going for it. Not even I'm that crazy. lol

Damn! wait for some ATVs or Razors come screaming thru there
 
Status
Not open for further replies.

Members online

Forum statistics

Threads
278,316
Messages
3,554,124
Members
248,016
Latest member
Advally Service

Trending content

Back
Top