What Did You Do To Your 3rd Gen Today?

Status
Not open for further replies.
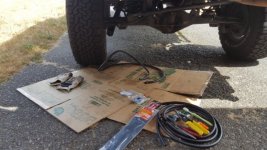
Replaced my clogged rusty up old brake bleeder screws and some heavy duty rubber caps that wont fall off any time soon. Put a little Silaramic grease on the threads to see if it would make my Mityvac work better but it didn't do anything much. Should stop them rusting at least.
 
steps back and forth

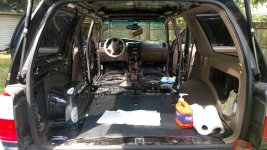
While working on sunroof, tarp evidently blew off during a thunderstorm. or course this is while we were at the lake. and with 95 degree days and 85% humidity mold set in quick. we were already deciding about pulling the carpet and cleaning anyway so this made the choice easy. now to decide if we are going to clean or replace. Brother works for a disaster cleaner. sprayed down the interior with a sanitizer. IMG_20170820_150637593_HDR.jpg

at least starting with a clean slate

and yes the sunroof is reinstalled and seems to be keeping water out.
 

Attachments

  • IMG_20170820_150637593_HDR.jpg
    IMG_20170820_150637593_HDR.jpg
    143.7 KB · Views: 505
Finally did my rear diff breather mod today.

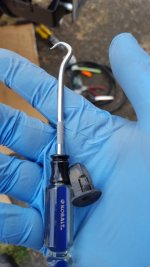
First I want to thank [MENTION=120071]mtbtim[/MENTION] and company for great write ups listing part numbers and helpful tips for making mods like this easy to tackle. I had to rush a little bit because I had to get to work so I didn't grab that many pictures of the progress as I was going but I did get it done. And somehow I managed to remove the gas filler guard without destroying those evil little Toyota plastic clips. The tool I had handy made it doable. Otherwise I would have just used zip ties and been happy with that.

I still have some plastic ties to snip and double check all my work before buttoning it up tonight after work. I will put a bit more in my build page when I finish.
 

Attachments

  • IMG_20170820_173642.jpg
    IMG_20170820_173642.jpg
    109.1 KB · Views: 387
  • IMG_20170820_173706.jpg
    IMG_20170820_173706.jpg
    106.3 KB · Views: 388
  • IMG_20170820_173728.jpg
    IMG_20170820_173728.jpg
    101.3 KB · Views: 390
Went up to the state forest above Corvallis Oregon to sleep in it to see the eclipse tomorrow. Got kicked out so now I'm in the walmart parking lot

Something was loose and the nut on the upper control arm for rear axle came off. Luckily the bolt is still in tgere so I'll head to Home Depot in the morning.
 
First I want to thank [MENTION=120071]mtbtim[/MENTION] and company for great write ups listing part numbers and helpful tips for making mods like this easy to tackle. I had to rush a little bit because I had to get to work so I didn't grab that many pictures of the progress as I was going but I did get it done. And somehow I managed to remove the gas filler guard without destroying those evil little Toyota plastic clips. The tool I had handy made it doable. Otherwise I would have just used zip ties and been happy with that.

I still have some plastic ties to snip and double check all my work before buttoning it up tonight after work. I will put a bit more in my build page when I finish.

Instead of getting the clips out you can also pop the gas filler cover off them, leave them in place and then use course thread screws like the front fender trim uses (they screw in to those same clips which hold the fender liner on) and place the cover back on top of the clip heads and screw them in to the clips.
 
Instead of getting the clips out you can also pop the gas filler cover off them, leave them in place and then use course thread screws like the front fender trim uses (they screw in to those same clips which hold the fender liner on) and place the cover back on top of the clip heads and screw them in to the clips.

Hahaha. I found this out on the upper two clips. I was able to manipulate the bottom ones with persistent contortions and blue language. The upper two, I was going to write off, as I have a few extra on hand if need be. The gas filler cover popped off and I removed the clips after the cover was out of the way without damaging the clips themselves. Thanks for the tip though.
 
Hahaha. I found this out on the upper two clips. I was able to manipulate the bottom ones with persistent contortions and blue language. The upper two, I was going to write off, as I have a few extra on hand if need be. The gas filler cover popped off and I removed the clips after the cover was out of the way without damaging the clips themselves. Thanks for the tip though.

You guys sure like to make things hard. lol I never even touched the clips or removed the plastic filler neck cover. For my method you'll need a shop vac, a drill, some mason twine, a small piece of plastic bag and a minute.

Step 1: Drill a 3/8" hole in the gas cap gasket.
Step 2: Cut 10 feet of mason line.
Step 3: Tie a small piece of plastic bag to the mason line.
Step 4: Push small piece of plastic through hole.
Step 5: Grab shop vac and plug it in.
Step 6: Find the shop vac attachment that's the rectangular looking one.(This step took
me the longest. lol)
Step 7: Turn on shop vac
Step 8: Put rectangular shop vac nozzle on bottom of filler panel. You have to separate
it enough with your finger to get the nozzle in.
Step 9: Watch the mason line move two feet and shut off shop vac.
Step 10: Remove line from shop vac nozzle.
Step 11: Tie clove hitch in mason line around extended breather mod tube.
Step 12: Pull mason line through gas cap cover until you can grab the breather line tubing.

That's a lot of steps but they go quick. lol

 
You guys sure like to make things hard. lol I never even touched the clips or removed the plastic filler neck cover. For my method you'll need a shop vac, a drill, some mason twine, a small piece of plastic bag and a minute.

Step 1: Drill a 3/8" hole in the gas cap gasket.
Step 2: Cut 10 feet of mason line.
Step 3: Tie a small piece of plastic bag to the mason line.
Step 4: Push small piece of plastic through hole.
Step 5: Grab shop vac and plug it in.
Step 6: Find the shop vac attachment that's the rectangular looking one.(This step took
me the longest. lol)
Step 7: Turn on shop vac
Step 8: Put rectangular shop vac nozzle on bottom of filler panel. You have to separate
it enough with your finger to get the nozzle in.
Step 9: Watch the mason line move two feet and shut off shop vac.
Step 10: Remove line from shop vac nozzle.
Step 11: Tie clove hitch in mason line around extended breather mod tube.
Step 12: Pull mason line through gas cap cover until you can grab the breather line tubing.

That's a lot of steps but they go quick. lol
Hahahaha... Love it. I mean, there are lots of ways to cook an egg, but I wouldn't have thought of doing it like that. LOL. That, and I don't currently own a shop vac. I am trying to slow my rate of tool purchases down to a reasonable amount. Two years ago, I had literally a hand full of tools. Since buying my 4runner, I have been on a tear. A shop vac would be handy to have around though... But I have been researching chain saws as I could use one to cut some aggressive hedges in my yard, as well as throwing one in the back of my rig for the odd piece of timber that blocks my path.
 
Last edited:
Did some random painting this weekend

Windshield wiper arms, horns, AC dryer and lines (cause they were visible through my satoshi grille)

Also, painted the mesh in my satoshi grille with spray-on bed liner

Got an appointment this morning with a body shop from the other guy's insurance to get an estimate on my rear end damage from accident on July 31. Hopefully they will just fix it (like the man from Mercury said they would on the phone) and not want to total it out.
 
I'm a few days late but I replaced my tired factory speakers with some Hertz dieci speakers on Monday! I'm pretty happy with it for my first in stall and choose the Hertz speakers because of their high sensitivity rating because I didn't want to add an amp and I added some sound deadening. The sound quality difference is night and day over stock, and the mid bass improved imensly!
66d12223d88afba0e37b6501ec2be8e4.jpg
bcde61be43e1132bf7392db7b2766905.jpg
5475d43e4b8de1067fc5fc99b2f18867.jpg


Sent from my SM-G930V using Tapatalk

So was it a direct swap?
 
Got an appointment this morning with a body shop from the other guy's insurance to get an estimate on my rear end damage from accident on July 31. Hopefully they will just fix it (like the man from Mercury said they would on the phone) and not want to total it out.

The body shop estimated $2,381.34 to replace the rear hatch and bumper and paint to match. Cheaper than I expected.

Now let's see if Mercury approves the estimate.
 
The body shop estimated $2,381.34 to replace the rear hatch and bumper and paint to match. Cheaper than I expected.

Now let's see if Mercury approves the estimate.

That seems to be in line with what I've gotten estimates for IRT my rear hatch and bumper. I got a local "expert mobile dent repair guy" that said he would do it for ~1400 or so. Obviously body shop repairs are highly subjective depending on the extent of damage but just thought I'd throw that out there as a reference point.
 
That seems to be in line with what I've gotten estimates for IRT my rear hatch and bumper. I got a local "expert mobile dent repair guy" that said he would do it for ~1400 or so. Obviously body shop repairs are highly subjective depending on the extent of damage but just thought I'd throw that out there as a reference point.

Good input, thanks for sharing [MENTION=94292]Patriot12[/MENTION]

Mine requires a new door, it's too damaged to fix; but I honestly don't know if I have the time to go find a door, do the work and just have it painted and pocket the remaining cash.
 
Status
Not open for further replies.

Members online

Forum statistics

Threads
278,316
Messages
3,554,120
Members
248,016
Latest member
Advally Service

Trending content

Back
Top