What Did You Do To Your 3rd Gen Today?

Status
Not open for further replies.
Installed amber gauge cluster bulbs. I only had one working original one. The new ones look great. I used Philips 194NA bulbs from the local parts store, cost me $10.
 
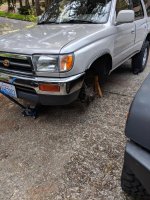
Started on my TBU. Figure since I plan on keeping for a long time and probably on't put a lot of miles on (although the miles I do put on will be tough), just went ahead and got a Powerstop kit. Arghhhh - 2 drivers side calipers. They jumped on it and have the replacement coming next week, but till then.. Got to finish off some stuff on the wife's Jeep at least
 

Attachments

  • IMG_20180505_114702.jpg
    IMG_20180505_114702.jpg
    140.2 KB · Views: 516
Took it to check out some WMAs in central Nebraska. Saw 1 turkey that was about it. And dozens of hawks.

image.jpg


Wasn't quite in the Sandhills yet but you can start to see it's basically just sand dunes stabilized by grass in first pic:

image.jpg


image.jpg


image.jpg
 
I started literally poking around at various rust spots with a screwdriver and punched a smallish hole in each rocker panel.

Also discovered the truck must have been rear ended on the driver side before I owned it because there was signs of body work. But they didn't put the sunroof drain back correctly so it caused rust underneath where the ventilation flapper tub is. They also did a poor job of putting the window back in and clogged up the weep holes and didn't seal it properly at the top so there is rust bubbles on the edge now.

Clipped the drain back to where it should be. And I'll order a new flapper valve. Not sure what to do about the rust blisters. Apparently I cant replace just the weather seal, it comes with a whole new window.

image.jpg


image.jpg


image.jpg


image.jpg


image.jpg
 
Just got a 96!4Runner SR5 with the 5VZ-FE. Kept having engine misfire codes... didn’t know that when I bought it! Lol. Oh well. I have taken the problem down to the fuel injectors and figure I may as well do valve covers while I am down there. Never been this far inside a vehicle. I’m nervous and excited. Just ordered cheap fuel plugs cuz mine tested at 17 ohms... oh well.

Take it easy hope to post some pics soon
 
I had a look at the recently rebuilt rear driveshaft as Im getting vibrations again at highway speed and a 'thud' when taking off from a complete stop. The damn rear ujoint has at least 1/8" of slop in every direction and the DC joint has puked grease out everywhere and feels loose. All of this after getting the spiel about 'great quality parts, we rebuild dozens of Toyota drive shafts with these parts and never have a issue..." MF'ers.. I'll be going back there in the morning
 
Lol nothing special just cleaned up the studs and replace old wore out lugnuts with brand new ones at 322,990 miles ...pretty awesome I know lol
 
Last edited:
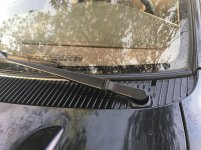
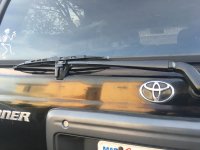
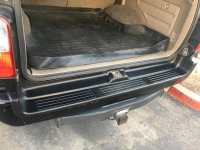
Restored my fr & rr wipers, wiper cowl, and rear bumper cover with Duplicolor trim & bumper paint. I can’t believe how much this changed the overall appearance of the rear of the vehicle in particular! The wiper cowl and rear bumper cover were so faded the looked light gray in color so the refresh is really noticeable.
 

Attachments

  • 90891B0C-3F90-41F7-9910-810791D4D648.jpg
    90891B0C-3F90-41F7-9910-810791D4D648.jpg
    134.9 KB · Views: 907
  • D6DBA4E0-6862-4C41-8ABF-1E0CA5555026.jpg
    D6DBA4E0-6862-4C41-8ABF-1E0CA5555026.jpg
    118.8 KB · Views: 604
  • 133C53AC-5791-455D-80A7-DC89EFC020CD.jpg
    133C53AC-5791-455D-80A7-DC89EFC020CD.jpg
    136.1 KB · Views: 599
Restored my fr & rr wipers, wiper cowl, and rear bumper cover with Duplicolor trim & bumper paint. I can’t believe how much this changed the overall appearance of the rear of the vehicle in particular! The wiper cowl and rear bumper cover were so faded the looked light gray in color so the refresh is really noticeable.


did you remove the pieces or paint it on the truck? It's one of my next things to do. looks great.
 
Awesome!

I need to do this. A write up on how you removed the cowl vent would be appreciated.

I didn’t take many photos, but I’ll try to do a quick how-to:

1. Pull plastic cover over the windshield wiper nut. They come off with bare hands pretty easily.

2. Remove nut with 14mm socket and wiggle/ pull wipers off (they have delicate ribs on the I.D. of the mounting hole on the wiper arm, so be careful).

3. Remove 6 Philips screws holding cowl down closest to windshield.

4. Pop hood.

5. There are 4 push pins holding down the cowl under the hood area. Use flathead screwdriver to gently pry underneath the rubber weatherstripping directly below the 4 push pins to release them.


That’s pretty much it. Not a whole lot to it amigo!
 
did you remove the pieces or paint it on the truck? It's one of my next things to do. looks great.

Thanks. I took everything off and gave it a good scrub and let it dry. Getting all of the debris out from the cowl where the mesh is was a pain but not hard just time consuming. Hit it with 3 light coats (no primer or prep solvents) and reinstalled it.
 
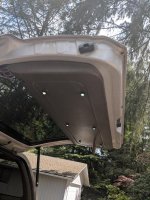
Copied thenightman's great idea for lighting under the hatch. Moved them inboard a little and didn't have to cut the threaded portion down.
 

Attachments

  • IMG_20180506_125710.jpg
    IMG_20180506_125710.jpg
    138.5 KB · Views: 702
Picked up a low mileage 5 speed trans cheap for $250 with 125k supposedly. Couldn't leave we'll enough alone with my ocd so it's getting a full tear down with new bearings. Here it is in a box, gears and everything look great. Hopefully the guy that tore it down can figure how to put it back together again.
This is replacing my 300+k crunchy 1st-2nd snynco that's grinding unless I'm real careful shifting. Been quite a while on the grind so it's beyond me wanting to rebuild that one.
4b91febc9bd62fe8cee7b338301438d4.jpg


Sent from my SM-N920V using Tapatalk
 
Restored my fr & rr wipers
I did my front wipers the other day, man they look so much cleaner. My rear wiper arm is ugly af. Tried pulling it off yesterday but I think it's rusted on pretty good. I soaked it with WD40 (got no penetrating oil at the moment) and left it overnight but that didn't help. Does the plastic cover over the nut come right off? Seemed pretty flimsy and I didn't want to break it but if it comes off I think that would make taking the rusted arm off a lot easier.
 
5. There are 4 push pins holding down the cowl under the hood area. Use flathead screwdriver to gently pry underneath the rubber weatherstripping directly below the 4 push pins to release them.

I assumed the push pins would/will break. I have them, and their receivers, in a Camelback cart on hold.

Thanks, bromigo!

Sent from my Pixel XL using Tapatalk
 
I did my front wipers the other day, man they look so much cleaner. My rear wiper arm is ugly af. Tried pulling it off yesterday but I think it's rusted on pretty good. I soaked it with WD40 (got no penetrating oil at the moment) and left it overnight but that didn't help. Does the plastic cover over the nut come right off? Seemed pretty flimsy and I didn't want to break it but if it comes off I think that would make taking the rusted arm off a lot easier.

Yeah, the plastic piece has to come off before you can get to the nut. It does seem like a thin plastic so be careful. I pulled up from the base and it swiveled off of the spot that the arm is hinged.

I assumed the push pins would/will break. I have them, and their receivers, in a Camelback cart on hold.

Thanks, bromigo!

Sent from my Pixel XL using Tapatalk

Now that you mention it, the push pins are fine but the white plastic receivers all broke upon reinstall so I’ll need 4 new ones too. I’d recommend anyone planning on removing the cowl to be prepared for them to break due to age, similar to the PCV valve rubber grommet.
 
Status
Not open for further replies.

Members online

Forum statistics

Threads
278,316
Messages
3,554,121
Members
248,016
Latest member
Advally Service

Trending content

Back
Top