What Did You Do To Your 3rd Gen Today?

Status
Not open for further replies.
Installed Rago Fab Modular panels (from latest Group Buy) A little more difficult to install than anticipated but well worth it!


Itre/otre

Die evil tie rods, hello Solo steering upgrade!

i-Nxvt2nM-L.jpg
 
Installed Rago Fab Modular panels (from latest Group Buy) A little more difficult to install than anticipated but well worth it!

Those look like they would be pretty useful. Did you just have to drill into the vinyl? What made it so difficult?
 
Those look like they would be pretty useful. Did you just have to drill into the vinyl? What made it so difficult?

Yes, you have to drill out the plastic (vinyl) but I found it more difficult to drill out the holes in the roof. I measured 3 times because you don't really get a do-over if you booger them up. It was also my first time using rivnuts. I bought a rivnut tool at Harbor Freight for $20 that worked fairly well.

 
I have a few rust spots and fading/hazed clear coat in a few spots, think your guy can fix those for $10K?

That's crazy talk man... it'll be at least $20K.

Seriously though, I went in there with the full intention of spending a couple of grand on this, just so I don't have to do my own paintwork (BTDT, it's sort of fun, but I don't have spray booth access anymore, nor do I really feel like spraying). But his numbers are absurd, it's like the most inflated insurance type estimate he could come up with - 3 hours to prep the hood, 5 hours to remove cladding, etc etc.

I'll get the hood painted (not at that place, obviously), but I'll hold off on the cladding for now, and maybe do it myself later.
 
Got an estimate to repaint my hood ($1700) and the Limited cladding ($3300). Where do I sign?? :bolt:

Leon - ur guy must know my guy. Got my quote on a minor hood massage and repaint. When completed, I'll pick it up and mount it.

Returned the quote to the tune of 1200 bucks - which included dismantling the ENTIRE front end (everything from the winch bumper - back) and repainting the quarters to get it to BLEND. And he must put it on....... really :frusty:

I'm all about your pursuit of perfection - but how about u just paint the effing hood........
 
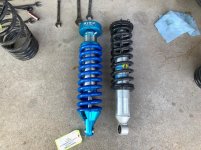
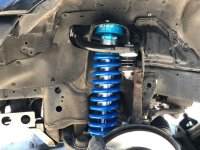
Removed 6112's and installed:

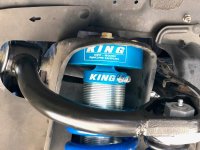
Kings
650lb coils
Ext travel

SPC UCA

Upper ball joints suck
 

Attachments

  • King vs Bilstein.jpg
    King vs Bilstein.jpg
    136 KB · Views: 556
  • King 2.jpg
    King 2.jpg
    136.1 KB · Views: 488
  • King.jpg
    King.jpg
    129.7 KB · Views: 492
Are those the King 25001-151?

They are, got em from DSM right before the price increase. Really good experience, I would recommend them to anyone looking for Kings/Fox, whatever else they sell. Good dudes.

What position did you install the SPC caster cam in, D (2°) or other?

Installed at setting D. After alignment, caster was right at 2.1*. It helped alleviate the rubbing I was getting in the rear of the wheel well.
 
They are, got em from DSM right before the price increase. Really good experience, I would recommend them to anyone looking for Kings/Fox, whatever else they sell. Good dudes....

Looks like the bump is about 200 bucks too, up to about $1,200 for a pair (fronts). I have not seen the price increase just yet though, at least with one vendor in the GB section. With the Memorial Day discount in effect, cart price is 950 bucks. More than I was planning to spend, but for those who want King, looks like now is the time...

Enjoy.
 
Installed at setting D. After alignment, caster was right at 2.1*. It helped alleviate the rubbing I was getting in the rear of the wheel well.

Great info, my 265/70-17s rub at the rear too - can't wait to install these UCAs!

How did you handle the UBJs?


Sent from my Pixel XL using Tapatalk
 
Great info, my 265/70-17s rub at the rear too - can't wait to install these UCAs!

How did you handle the UBJs?


Sent from my Pixel XL using Tapatalk

Mine were a pain in the ass. The cotter pin was pushed in too far by whoever serviced them prior and they were rusted in. I ended up removing the long bolt that holds the arm to the frame, spun it around and hit it with a cutting disk to cut that actual ball joint out. From there I rented the ball joint press kit from O'Reiley's and pressed em out. I will say that tool is a knuckle buster and soaking the ball joint with WD helped a bit.

I'm not excited to help my girl change hers out soon....
 
Mine were a pain in the ass. The cotter pin was pushed in too far by whoever serviced them prior and they were rusted in. I ended up removing the long bolt that holds the arm to the frame, spun it around and hit it with a cutting disk to cut that actual ball joint out. From there I rented the ball joint press kit from O'Reiley's and pressed em out. I will say that tool is a knuckle buster and soaking the ball joint with WD helped a bit.

I'm not excited to help my girl change hers out soon....
How did the pressing of the SPC adapter on go?

Aside from cotter pin issues, would you say this is a solo, on-vehicle job or would pulling the spindle completely make it easier?

Sent from my Pixel XL using Tapatalk
 
How did the pressing of the SPC adapter on go?

Aside from cotter pin issues, would you say this is a solo, on-vehicle job or would pulling the spindle completely make it easier?

Sent from my Pixel XL using Tapatalk

The SPC adapter was a tight fit, I sanded the inside of the spindle with some 800 to clean it up and just beat it in with a sledge, seemed to work fine.

I did it solo, I will say this would have been a lot easier if there was a helping hand, mostly because holding a grinder with one hand while holding up an UCA with the other is pretty sketchy.

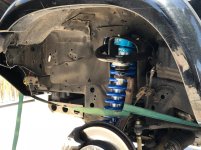
I did everything on the truck, you should be fine. I don't think the extra work of removing the whole spindle would be worth the hassle. I just used a ratchet strap to hold the spindle up so the CV and lower ball joint didn't get destroyed.

 

Attachments

  • King Install.jpg
    King Install.jpg
    135.8 KB · Views: 435
The SPC adapter was a tight fit, I sanded the inside of the spindle with some 800 to clean it up and just beat it in with a sledge, seemed to work fine.

I did it solo, I will say this would have been a lot easier if there was a helping hand, mostly because holding a grinder with one hand while holding up an UCA with the other is pretty sketchy.

I did everything on the truck, you should be fine. I don't think the extra work of removing the whole spindle would be worth the hassle. I just used a ratchet strap to hold the spindle up so the CV and lower ball joint didn't get destroyed.

B1tchen, thanks!
 
Status
Not open for further replies.

Members online

Forum statistics

Threads
278,316
Messages
3,554,120
Members
248,016
Latest member
Advally Service

Trending content

Back
Top