What Did You Do To Your 3rd Gen Today?

Status
Not open for further replies.
Installed at setting D. After alignment, caster was right at 2.1*. It helped alleviate the rubbing I was getting in the rear of the wheel well.

Great info, my 265/70-17s rub at the rear too - can't wait to install these UCAs!
Sent from my Pixel XL using Tapatalk

I have to have the alignment shop adjust the caster after installing my spc ucas and going up in tire size, got slight rubbing in the same area as you guy. It only rubs in reverse as I start to turn the wheel but if I lock it up before hand, it wont rub at all. Driving forward, I have no issues.
 
I have to have the alignment shop adjust the caster after installing my spc ucas and going up in tire size, got slight rubbing in the same area as you guy. It only rubs in reverse as I start to turn the wheel but if I lock it up before hand, it wont rub at all. Driving forward, I have no issues.

If you are lifted over 2" set your caster on D (+2°) position as a baseline. Take note, big box alignment shops and tire stores that do toe-and-go type alignment jobs may not want to mess with adjustable UCAs, nor know how lol
 
If you are lifted over 2" set your caster on D (+2°) position as a baseline. Take note, big box alignment shops and tire stores that do toe-and-go type alignment jobs may not want to mess with adjustable UCAs, nor know how lol

I'll makes sure its set up at (D, +2*) I have a buddy that does alignment and knows his way around lifted or lowered vehicles but at the time of my alignment I was running 265/70/17 tires on 5th gen wheels and since then Ive gone back to 5 star wheels and 285/75/16 tires. Its very little rubbing that Ive learned how to deal with it but Im sure itll be an issue when or if I go on trail runs.
 
I'll makes sure its set up at (D, +2*) I have a buddy that does alignment and knows his way around lifted or lowered vehicles but at the time of my alignment I was running 265/70/17 tires on 5th gen wheels and since then Ive gone back to 5 star wheels and 285/75/16 tires. Its very little rubbing that Ive learned how to deal with it but Im sure itll be an issue when or if I go on trail runs.

Well of course, 265/70/17 is a 31.6" tall x 10.5" wide tire (depending on manufacturer) while 285/75/16 is almost 33" tall x 11"+ wide; you can expect this will rub more than the "smaller" tire on the larger rim
 
Mine were a pain in the ass. The cotter pin was pushed in too far by whoever serviced them prior and they were rusted in. I ended up removing the long bolt that holds the arm to the frame, spun it around and hit it with a cutting disk to cut that actual ball joint out. From there I rented the ball joint press kit from O'Reiley's and pressed em out. I will say that tool is a knuckle buster and soaking the ball joint with WD helped a bit.

I'm not excited to help my girl change hers out soon....
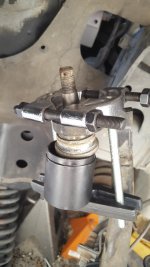
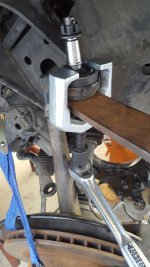
I was debating pulling mine to get the UBJ but came up with the bearing splitter pulling down and a sleeve over the UBJ up against the bottom of the arm. I have the big C clamp press but the stupid big ass thing won't fit in the wheel well. To press the new ones in I came up with this other deal. I had to cut a ~1/2" piece off of a sleeve to use on top. Not pretty but it works. Hardest part was getting the new UBJ to go in straight.
 

Attachments

  • thumbnail (11).jpg
    thumbnail (11).jpg
    75.3 KB · Views: 510
  • thumbnail (4).jpg
    thumbnail (4).jpg
    95.3 KB · Views: 497
Last edited:
I was debating pulling mine to get the UBJ but came up with the bearing splitter pulling down and a sleeve over the UBJ up against the bottom of the arm. I have the big C clamp press but the stupid big ass thing won't fit in the wheel well. To press the new ones in I came up with this other deal. I had to cut a ~1/2" piece off of a sleeve to use on top. Not pretty but it works. Hardest part was getting the new UBJ to go in straight.

I like the pitman arm puller press :D I already own one of those

As far as driving the UBJ out, I think a BJ press/4WD press kit from AutoZone should cover the removal, but I will expect to have to sweat it some
 
Cleaned and lubed my squeaky blower fan. It wasn't nearly as bad as others I've seen, but regardless, now it's clean and silent!


Then decided to push my luck and go to America's Tire (Discount Tire for most of you) in the middle of the day to get a nail pulled out. Crazy, right? Except there must have been a zombie apocalypse, I've never seen it like this:

 
I put these in the back of the truck today, which, ironically, combined with a full tank of gas, levelled out my rake by 3/4"
adf5f47dddc7db463b7bcbf427bd94c0.jpg


Sent from my Pixel XL using Tapatalk
 
Cleaned and lubed my squeaky blower fan. It wasn't nearly as bad as others I've seen, but regardless, now it's clean and silent!


Congrats on the registration! That's awesome. You didn't have to sell a kidney did you?

I also want to know how you got the fan apart. I destroyed one trying to do that.
 
Congrats on the registration! That's awesome. You didn't have to sell a kidney did you?

I also want to know how you got the fan apart. I destroyed one trying to do that.

Me too! I busted my old one trying to get the fan off the motor.
 
How the HELL did you get that apart!!!!!! Mine kept giving me a look like it was going to break in half every time I got a pick near it

I started by reading this thread, which initially convinced me that it's impossible to take the thing apart without breaking it in the process. So I tried squirting some lube in without disassembly, but I soon realized that there is no way the lube could get to the bushings that way.

Then I got to this post, and I figured I can give that a try too. To mimic his approach, I used a couple of Simpson Tension Ties (HTT5's I think) that I had on hand to slip between the fan cage and the base plate, but any heavy gage metal would work. Then I straddled the base plate on the straps over an open vise, gently pulled away the little plastic tab that sits in the shaft groove, and gently started tapping on the motor shaft with a punch (if you're keeping count, this really does take about three or four hands). The fan cage came off the shaft rather easily - after all, it's not a metal to metal press fit, just a plastic on metal.

4Runner4Leon- what lube did you use and where did you apply it? Nice job. Something I've been wanting to do as well.

I used white lithium grease. Once you get the blower motor out, you just squirt some at the bushing at either end. I suppose if I wanted to get really ambitious, I could have tried to take the bushings off the shaft, clean everything, and apply the lube more directly, but I thought I was already pushing my luck with disassembly this far, so I just sprayed at the bushing/shaft interfaces.

Frankly looking back at it, it probably makes more sense to just buy the TYC replacement assembly for 40 bucks (although some folks complained about the noise), instead of spending the hour on disassembly and reassembly. But I like tinkering, and it's satisfying to fix something instead of throwing it into the landfill.

Congrats on the registration! That's awesome. You didn't have to sell a kidney did you?

Thanks :). No, it wasn't that bad, though it did feel like it at the time. But it's very nice to finally be legit :).
 
Status
Not open for further replies.

Members online

No members online now.

Forum statistics

Threads
278,316
Messages
3,554,121
Members
248,016
Latest member
Advally Service

Trending content

Back
Top