What Did You Do To Your 3rd Gen Today?

Status
Not open for further replies.
X8lFTEr.png

just fixing the image
 
Cargo progress

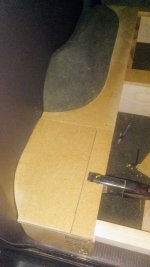
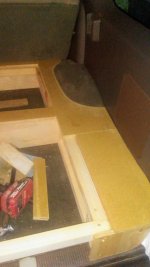
Made some headway on the cargo box. Had the contours transferred to foam board, then the 5/8 top I'm using (1/2 seemed to flex a bit much and 3/4 would encroach on my sub enclosure so I went in the middle for sake of drawer height), the hard part is done! Dialing in those wheel wells and the side cubbies took me some time with the templates and massaging of the wood, lots of scribes and palm sanding. Had to bevel the underside of the contours with my framing saw to compensate for the diminishing upward angle of the wheel wells for a tight fit. Got the lids ready to place and hopefully the hardware will be here this weekend. Still need to find a good matching carpet, thinking somewhere between speaker box and OEM plush...any suggestions?
 

Attachments

  • 20200123_162715.jpg
    20200123_162715.jpg
    136.9 KB · Views: 612
  • 20200123_163148.jpg
    20200123_163148.jpg
    131 KB · Views: 609
Looks good! I usually use a non-backed automotive carpet that has some stretch in it for covering raised floor builds like this (generally custom audio builds). It's pretty durable but if it's gonna see a lot of use/wear it will show over time so a thicker more OEM carpet would probably hold up better.

I like to wrap the carpet around the edges to the underneath side for a nice tight look from the panel to the vehicle but it also helps for an edge ever pulling up with wear. The downside is you'll have to account for the carpet thickness in order to do that which even with the thinner automotive carpet it's probably a good .125" plus all around.

Made some headway on the cargo box. Had the contours transferred to foam board, then the 5/8 top I'm using (1/2 seemed to flex a bit much and 3/4 would encroach on my sub enclosure so I went in the middle for sake of drawer height), the hard part is done! Dialing in those wheel wells and the side cubbies took me some time with the templates and massaging of the wood, lots of scribes and palm sanding. Had to bevel the underside of the contours with my framing saw to compensate for the diminishing upward angle of the wheel wells for a tight fit. Got the lids ready to place and hopefully the hardware will be here this weekend. Still need to find a good matching carpet, thinking somewhere between speaker box and OEM plush...any suggestions?
 
Thank you for the response, great info, just what I was looking for! The thicker stuff would certainly be nice for the wear and look, but yeah, it's pretty thick and would be very hard to tuck around the edges. That being said, I'm probably going to run whatever I use a scoche long around the carpeted wheel wells and feather it / tuck it into that gap (they're pretty damn tight around those), then stuff it down along the edges where the plastic is at for the fit and finish and to give a little cushion for any rubbing. I'll take a look at the non backed auto carpet. I kinda need that in hand before I do my final trimming...
 
Last edited:
Replaced my 19 year old lift gate struts because I got tired of either holding it up with my head or cracking me in the skull.
 
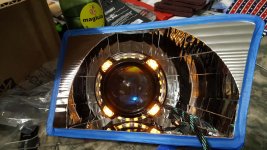
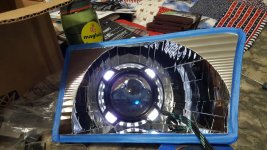
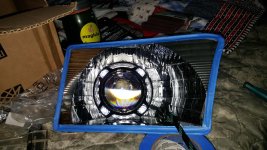
Well today I started on my projector retrofit, and we'll it's coming on great..... Except I'm waiting on replacement parts from the retrofit source. As of now I'm not a fan of them at all. So I made as much progress as I could with defective parts. Also got the headlights painted too. After that was all done, I proceeded to make some more progress on my f150 tank swap. Got the fuel level sender flange welded on and almost all parts needed to finish the swap. Just have to wait for some cash to order the last electrical connectors. Any ways only pics I have are of the led switch backs.
 

Attachments

  • 20200122_193450_compress79.jpg
    20200122_193450_compress79.jpg
    143.6 KB · Views: 453
  • 20200122_193419_compress11.jpg
    20200122_193419_compress11.jpg
    143.9 KB · Views: 471
  • 20200122_193411_compress86.jpg
    20200122_193411_compress86.jpg
    143.4 KB · Views: 461
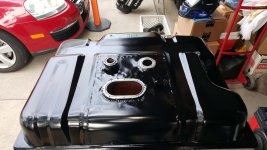
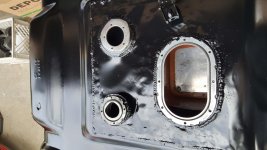
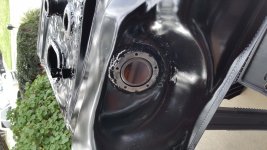
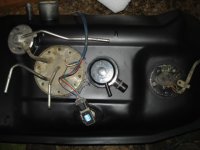
Well today I finished the work on the f150 tank. And boy I seriously hate welding sheet metal. Was able to pressure test it for leaks and only had 4 tiny leaks that were a quick fix. Running a modded 4runner fuel pump hanger, 4runner evap valve, 4runner fuel pump baffle and floatless fuel level sender. Will run a fuel level sender calibrator to get the sender to jive with the gauge. Truck side, I need to weld up the front mounts and re-route the exhaust and I can swap it in finally. Here's some tank pics the flange layouts kind of look like a face lol.
 

Attachments

  • 20200126_133147_compress6.jpg
    20200126_133147_compress6.jpg
    138.3 KB · Views: 445
  • 20200126_133157_compress30.jpg
    20200126_133157_compress30.jpg
    137.7 KB · Views: 438
  • 20200126_133212_compress74.jpg
    20200126_133212_compress74.jpg
    138.8 KB · Views: 439
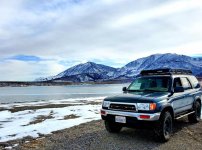
Went out for some waterfowl hunting but the lake was frozen... LOL
Shot some photos instead.
 

Attachments

  • thumbnail (75).jpg
    thumbnail (75).jpg
    139.6 KB · Views: 440
  • thumbnail (76).jpg
    thumbnail (76).jpg
    119.1 KB · Views: 432
  • thumbnail (77).jpg
    thumbnail (77).jpg
    137.4 KB · Views: 424
  • thumbnail (78).jpg
    thumbnail (78).jpg
    83.2 KB · Views: 418
I remember this stage in my 88 Runner to 02 3.4 swap. Had to graft everything (EVAP sensor, EVAP tube, etc) except for the pump panel, just swapped pumps. I had the donor tank so I oversized cut the sensors and whatnot out of the tank, trying to retain the factory mounting...drilled holes, and pounded/contoured the cut flanges to the shape of the tank and soldered them in like sweating copper pipe (after prep of course) turned out well. You can kinda see the sensor at the bottom of the pic how it was mounted...
 

Attachments

  • 001-1.jpg
    001-1.jpg
    41.1 KB · Views: 402
Well today I finished the work on the f150 tank. And boy I seriously hate welding sheet metal. Was able to pressure test it for leaks and only had 4 tiny leaks that were a quick fix. Running a modded 4runner fuel pump hanger, 4runner evap valve, 4runner fuel pump baffle and floatless fuel level sender. Will run a fuel level sender calibrator to get the sender to jive with the gauge. Truck side, I need to weld up the front mounts and re-route the exhaust and I can swap it in finally. Here's some tank pics the flange layouts kind of look like a face lol.

funny picture of fuel tank....watching SOLO with my grandkids right now...so fuel tank picture is fitting
 
Rad support and frame damage

We have these on my bike forums and didnt find one here with the search. So lets get this started. As the title states, what did you do to it today?

I have a 99 SR5 with 237,789 as of today. The past....2 weeks I have had a slow process with this.

Had this car for over a year now. I bought it as is with front end damage (that I stupidly did not notice) and decided to replace rad support, radiator, headlights and while I was at it, the timing because it was pretty due.

After finding that the radiator support was only held on by a single crappy weld on the passenger side and bondo where the support meets up to the rest of the body, I also got around to finding that the main bumper support is missing and there has been a frame correction on the driver's side. This "correction" is about 1/2" higher than the passenger side. So when I install the rad support back in, I am having trouble closing the hood.

One hand and the other, I love this suv. But jeez I wish I didn't buy it sometimes.

But hey, I bpught a welder so I can do a side gig and save up for a better 4runner! Maybe even a Taco
 
Status
Not open for further replies.

Members online

Forum statistics

Threads
278,316
Messages
3,554,120
Members
248,016
Latest member
Advally Service

Trending content

Back
Top