What Did You Do To Your 3rd Gen Today?

Status
Not open for further replies.
turned over 250,000 miles :party:

bc393874bfd897e69f40878b60c1fcde.jpg

ECT POWER engaged!!!
 
Not so much due to engine wear, just these vehicles don't particularly like zipping up steep inclines without ECT, or at least I've noticed. I've seen in both mine and my buddy's 4Runner, giving it some mustard on steep grades, the ECU almost bugs out and can't decide what gear to stay in - almost like it wants to keep climbing RPMs, but something makes it upshift, then it realizes you're not delivering power as you should so tries to downshift, only to try and shift preemptively again - but with ECT on this almost never happens. If I recall, the FSM even advises using ECT to assist on steep inclines, even without towing
The 5VZ is a damn strong engine, don't start giving up now!
 
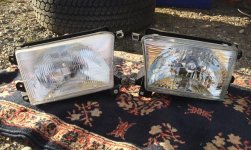
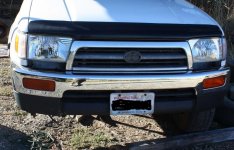
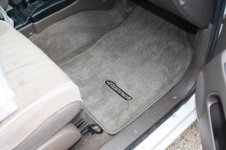
Headlight upgrade to 1999 model lights. Much nicer looking and clear as a bell. Very bright as well, kicks butt over my old worn stock '96 lights. They are a direct bolt in and wire connect as well!! I also put in my order for a super nice sound system today...cannot wait to install that. The suspension has gotten most of the attention so far. Now time for some niceties in the cab. I have touched up a few things. New clock, OEM 4runner logoed floor mats, new center console cover, full detail. Now it needs some new bulbs, a shifter bushing, new seat covers along with seat heaters and that new stereo and I will be styling.:flame:
Have a great day all!
PS: I also got new plates from DMV today for it. The old rear one was so sun baked all the color was gone and unreadable. Nice thing is they match the white exterior of my rig perfectly and there's mountains on them so how can you go wrong!!
 

Attachments

  • 1996 lights head1.jpg
    1996 lights head1.jpg
    139.3 KB · Views: 483
  • 1996 headlights in2.jpg
    1996 headlights in2.jpg
    77.8 KB · Views: 477
  • 1996 floor mat 1.jpg
    1996 floor mat 1.jpg
    84.6 KB · Views: 488
I reattached the hatch key cylinder which had fallen into the void. It was pretty easy to access but I had a difficult time getting the back glass window rack reattached. Once I got that sucker back into place it was an easy finish. I can now use the key to roll the window up or down. Now I just need to get a better remote because the cheap ones I bought on Amazon don't work the window.
 
A little silly....

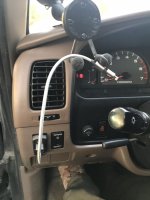
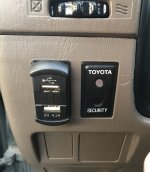
But I really dislike phone cables draped across my steering wheel so, I bought this. Tapped it into the cigarette lighter and ran the wires behind the dash. Add a 12 inch phone cable and good to go. To me, the volt meter is unnecessary but if you like it, it’s there. Doesn’t sit as flush as I’d like but it isn’t bad. I had to file the sides of the opening a little bit to make it fit but it was easy enough. Added a little hot glue to hold it in place and done.
 

Attachments

  • F9F1255D-32CA-4EDE-A83C-2E7795893DAC.jpg
    F9F1255D-32CA-4EDE-A83C-2E7795893DAC.jpg
    130.2 KB · Views: 411
  • A718310D-5EAE-495F-BE76-7BC88B0D9664.jpg
    A718310D-5EAE-495F-BE76-7BC88B0D9664.jpg
    127.6 KB · Views: 410
Picked up resurfaced flywheel from NAPA auto parts ($45) and received my new Marlin Crawler Clutch Kit ($350)! 2 more clips to remove my engine harness and snip my Master/Slave cylinder lines. Salvaging parts for my Manual swap.
 
Test fit these in the stock fog light slot.
S1 wide cornering amber. Now to figure out if I want to use the existing pre wiring for factory fogs and get a new stalk with a switch or wire them up my self to a switch in the punch outs beneath the dash hmmm options options options... also got to figure out a mount bracket. Hmmm gonna look BA

So small, but such a cool upgrade. Crazy how these little things cost $100+ each....
 
Test fit these in the stock fog light slot.
S1 wide cornering amber. Now to figure out if I want to use the existing pre wiring for factory fogs and get a new stalk with a switch or wire them up my self to a switch in the punch outs beneath the dash hmmm options options options... also got to figure out a mount bracket. Hmmm gonna look BA

Neat idea! Post up some more pics when you get a chance, I'm sure there are plenty of folks who would like to see these installed, and what they look like from a distance
 
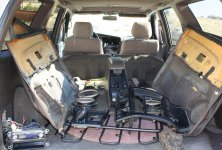
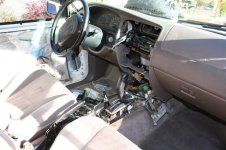
Taking advantage of a nice weather day to get on that new sound system install. Ripping out all the old to get ready for the new...Should be here later today. Great time to replace some instrument lights, work on that shifter bushing and detail up behind all the dash stuff.
New Sony all digital head unit with 6 new component speakers. Should sound good. The old Pioneer is showing its age but still a good unit. I have a classic DEH model with a display from 1991. Going to put that in my 93 2nd gen.
I used to do auto glass for a living for 5 years. Could have taken all this out blindfolded..lol :guitar3:
Have a great day all
 

Attachments

  • 1996 stereo 1.jpg
    1996 stereo 1.jpg
    137.6 KB · Views: 325
  • 1996 stereo 2.jpg
    1996 stereo 2.jpg
    112.3 KB · Views: 321
Just picker her up on Tuesday and went to get extra keys made. First mod taking off the badges and the front deflector.

edit not sure on the side ways pics, ill try and fix.
 

Attachments

Last edited:
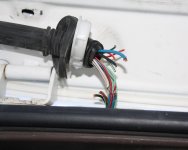
So while working on a place to install the XM satellite radio antenna today, I found this.....no wonder the rear 3rd brake light and plate lights are not working. In fact it is a wonder that anything is working back there. 5 complete severed wires and at least 3 with exposed wires. Well another thing to fix on the list. Should be pretty easy and I finally found out why the 3rd brake light never worked. In case you cannot tell this is the junction where the rear tailgate wires enter the body. I am thinking not the best place to use for the XM entry point...
On the plus side the install of said sound system is going very well. Got all the speaker locations readied up, this is not a plug and play set up, crossovers mounted, tweeters installed and all wires ran. All the wiring for the head unit is done. Need to mount it and the 4 speakers then run that XM. Should be ready for testing after that. Then reinstall all the stuff I took out! Sunday I should be jamming:drum:
 

Attachments

  • 1996 wires busted 1.jpg
    1996 wires busted 1.jpg
    58.7 KB · Views: 517
Last edited:
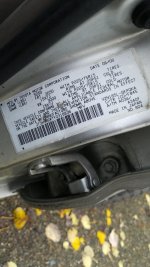
Took a peek at my production info to see when my vehicle was made, and noticed that my 4Runner was made with 15in wheels - but when I bought it, it had OEM 16in wheels and definitely has the bigger brake calipers (since they required grinding when i got new 16x8 wheels.)
Guess when the previous owner said he "did the brakes" a year or two back, he meant he upgraded them!
 

Attachments

  • Snapchat-523832911.jpg
    Snapchat-523832911.jpg
    137 KB · Views: 401
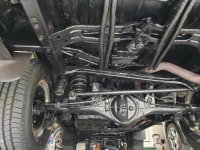
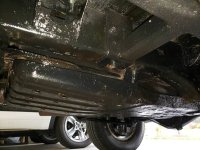
Por15 then sprayed with fluid film

here's some after pics I took after driving it home after the motorcity auto spa place did a wonderful job detailing my car full interior and exterior, I provided them a gallon of fluid film, angle grinder with wire brush cups, fluid film gallon kit.

They did the underbody detail and painted it POR15, then sprayed it all with fluid film after. Ready for the winter!!!
They are supposed to text me after pics while it was up in the hoist so I'll post better ones once I receive them.
 

Attachments

  • rsz_1rsz_20201030_164833.jpg
    rsz_1rsz_20201030_164833.jpg
    127.7 KB · Views: 380
  • rsz_1rsz_20201030_165040.jpg
    rsz_1rsz_20201030_165040.jpg
    129.5 KB · Views: 354
Other than scraping my knuckles pretty good I knocked out SPC UCAs, LBJs, and tie rods with the help of two other forum members.

Now to find a shop that will align adjustable control arms...
 
So while working on a place to install the XM satellite radio antenna today, I found this.....no wonder the rear 3rd brake light and plate lights are not working. In fact it is a wonder that anything is working back there. 5 complete severed wires and at least 3 with exposed wires. Well another thing to fix on the list. Should be pretty easy and I finally found out why the 3rd brake light never worked. In case you cannot tell this is the junction where the rear tailgate wires enter the body. I am thinking not the best place to use for the XM entry point...
On the plus side the install of said sound system is going very well. Got all the speaker locations readied up, this is not a plug and play set up, crossovers mounted, tweeters installed and all wires ran. All the wiring for the head unit is done. Need to mount it and the 4 speakers then run that XM. Should be ready for testing after that. Then reinstall all the stuff I took out! Sunday I should be jamming:drum:


Oh man thats a bad one. I have a few broken and its a pain to fix those since its such a tight work space.
 
Alternator light has been on for weeks with no issues but headed to the mountains next week so I bought a cheap alternator from Advanced. Would have preferred a rebuilt Denso but time is short. Fingers crossed


Sent from my iPhone using Tapatalk
 
Had picked up some old OEM axles and just rebooted them for spares. Always nice to have the wife help with applying the lube...
4af2ddc362b43c21ad9e4a4b19754038.jpg
79d86142b9dd4833a808a27794b1c477.jpg
bd03b995f8d6ef2da818b53874dac719.jpg


Sent from my SM-G975U using Tapatalk
 
Status
Not open for further replies.

Members online

Forum statistics

Threads
278,316
Messages
3,554,120
Members
248,016
Latest member
Advally Service

Trending content

Back
Top