
You are using an out of date browser. It may not display this or other websites correctly.
You should upgrade or use an alternative browser.
You should upgrade or use an alternative browser.
What Did You Do To Your 3rd Gen Today?
- Thread starter pin8246
- Start date
- Status
- Not open for further replies.


Fiffa
Member
Finally did the diff breather extension into rear tail light housing and while I was under there noticed that the parking break cable was really tight at full droop so added a bracket extension for it to give it a little slack.
Did you have it engaged when you were checking? My dumbass made a similar comment when posting about my rear spring install and it turned out to just be the tension added from applying the e-brake before jacking up the truck. :doh:
Put some reverse lights on my Sherpa rack:


With the winch/house power on, they turn on with the reverse lights. I might at some point add a switch to turn them on directly. Just some really cheap cube lights with 'sideshooter' LED's. Don't really want TOO many lumens back there, but the stock reverse lights just weren't cutting it.
And installed the Spiker hood struts my wonderful wife got me for Christmas. Very nice! Super easy install, hood opens further than it did before, and you just lift it up about a foot and it opens the rest of the way on its own.

With the winch/house power on, they turn on with the reverse lights. I might at some point add a switch to turn them on directly. Just some really cheap cube lights with 'sideshooter' LED's. Don't really want TOO many lumens back there, but the stock reverse lights just weren't cutting it.
And installed the Spiker hood struts my wonderful wife got me for Christmas. Very nice! Super easy install, hood opens further than it did before, and you just lift it up about a foot and it opens the rest of the way on its own.

Endlessblockades
Senior Member
And installed the Spiker hood struts my wonderful wife got me for Christmas. Very nice! Super easy install, hood opens further than it did before, and you just lift it up about a foot and it opens the rest of the way on its own.
That should make the new sponsor of this thread happy!
Last edited:

habanero
Senior Member
Both Spiker Engineering and eimkeith are excellent vendors, pleasant, easy transactions, awesome parts quality. I'd be pleased to do business again with either of them.That should make to new sponsor of this thread happy!
Not much going on in my neck of the woods. Hoping the carpet I cleaned is dry enough to install the weathertech mats my husband gave me for Christmas. It will be nice to have better matching and coverage floor mats. He is the best at knowing just what I would like. I'm a lucky woman.
Also waiting on parts to replace the left rear wheel bearing, and had to repair a broken/breaking wires on the reverse switch connector. Used a junkyard connector, easy fix.

Last edited:

Spiker Engineering
official vendor
That should make to new sponsor of this thread happy!
Sure does! Happy customers make the world a better place, one hood strut set at a time
 .
.stinkyspice
New member
Hi all. I’ve been on Tacoma world for years!! Just picked up my wife a 2000 4x4 limited runner. Stoked to contribute to this forum! Already did the tundra brake upgrade got the lines changed out to SS. Gonna keep it as stock and clean as I can hahahah. We will see how long that lasts.

cl4Rk
Member
is yours that nice red one you shared earlier?
Yeah! The red one is gonna get a new (to me) frame. It's very clean / rust free and it's going to get the por-15 treatment so it stays that way..


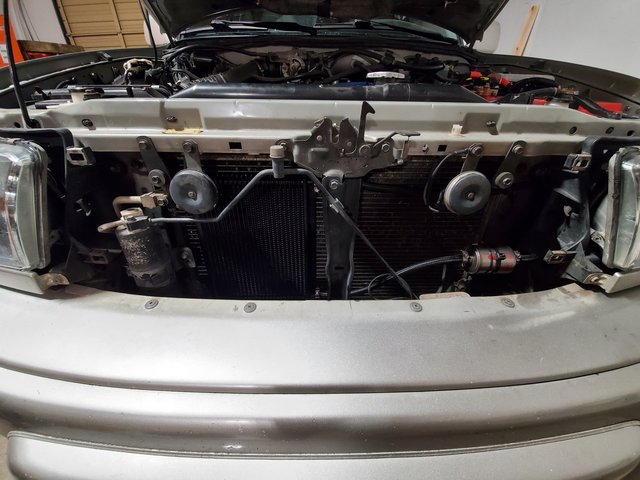
Yesterday was helping a friend put a new OME lift kit front and rear plus a diff drop on his 97 Tacoma. Today he helped me with plugs, new KYB shocks on the front (I replaced the rears over the summer), trying to diagnose a 4WD engagement issue (Haven't figured it out yet), putting speed bleeders on front and rear brakes and bleeding the brakes, and attempting to replace the fuel filter.
The new OEM fuel filter I got would not seal. We put it on and had a massive fuel leak, rechecked that everything was tight, pulled it off to recheck all the fittings and thread, put it back on, it continued to leak, and swapped the old one back on and it sealed up fine. It seems I got a bad fuel filter.
I also learned how much gasoline in the eye stings. I would not recommend it.
The new OEM fuel filter I got would not seal. We put it on and had a massive fuel leak, rechecked that everything was tight, pulled it off to recheck all the fittings and thread, put it back on, it continued to leak, and swapped the old one back on and it sealed up fine. It seems I got a bad fuel filter.
I also learned how much gasoline in the eye stings. I would not recommend it.

calimobber
Member
Hi all. I’ve been on Tacoma world for years!! Just picked up my wife a 2000 4x4 limited runner. Stoked to contribute to this forum! Already did the tundra brake upgrade got the lines changed out to SS. Gonna keep it as stock and clean as I can hahahah. We will see how long that lasts.
How do the new brakes feel?
I did the larger tundra swap and they have always felt a little squishy. Ive bleed a ton and even used techstream to flush. maybe its just the 2002's fancy acuator thats the trouble
Fiffa
Member
How do the new brakes feel?
I did the larger tundra swap and they have always felt a little squishy. Ive bleed a ton and even used techstream to flush. maybe its just the 2002's fancy acuator thats the trouble
I was just reading through Kirk D's build page and he addressed this as being a master cylinder issue with the bigger calipers. He put in a larger GM unit (with a bit of modding), so give it a look and see if it's something you want to get into (I know I don't, lol).
Kirks build thread

I was just reading through Kirk D's build page and he addressed this as being a master cylinder issue with the bigger calipers. He put in a larger GM unit (with a bit of modding), so give it a look and see if it's something you want to get into (I know I don't, lol).
Kirks build thread
I never had an issue with my TBU, however if you search there is actually a kit to do the GM swap to a 4runner. All the parts needed. For me....well...at least its not a Ford master cylinder

Fiffa
Member
I never had an issue with my TBU, however if you search there is actually a kit to do the GM swap to a 4runner. All the parts needed. For me....well...at least its not a Ford master cylinder
The "issue" was soft brake feel; to the point where he couldn't lock up the wheels with the ABS manually switched off. I never have questioned my TBU, so I've had no reason to look, but he made it sound like there was some modding that needed to happen to get the MC to work with the rest of the brake system. Good to know that there's a more simple option, though! My mod list will need replenishing eventually...

shawnathan9
New member
Installed a transmission temperature gauge, B&M 70264 Transmission Cooler, and...
Lately, I've been on a Timmy YT binge and have been going through a ton of useful content. I pulled the trigger and, last week, I decided to order a transmission temp. gauge and a transmission cooler for preventative maintenance.
The first thing I did was attempt to JB weld the temp gauge housing to the a-pillar plastic.
<a href="https://ibb.co/xSrsRGN"><img src="https://i.ibb.co/QFxc1n4/20201227-084950.jpg" alt="20201227-084950" border="0"></a>
I wasn't happy with the extra material that hung past the a-pillar so I decided to dremel/file away the excess.
Before:
<a href="https://ibb.co/vXFh44L"><img src="https://i.ibb.co/nPGBMMQ/20201227-082054.jpg" alt="20201227-082054" border="0"></a>
After:
<a href="https://ibb.co/s1yfGZ4"><img src="https://i.ibb.co/bvz0ZkV/20201227-202238.jpg" alt="20201227-202238" border="0"></a>
<a href="https://ibb.co/7G3WwDV"><img src="https://i.ibb.co/BghZXJj/20201227-082038.jpg" alt="20201227-082038" border="0"></a>
Dremeled a pathway for the wiring that will lead behind the a-pilar:
<a href="https://ibb.co/FWYwzJy"><img src="https://i.ibb.co/th2sDcv/20201227-202230.jpg" alt="20201227-202230" border="0"></a>
Following Timmy's guide, I assembled a brass tee and a brass bushing to fit the transmission temperature sensor:
<a href="https://ibb.co/S66VJ3V"><img src="https://i.ibb.co/BffTwCT/20201229-092740.jpg" alt="20201229-092740" border="0"></a>
*I decided to secure the sensor wiring with a loom and electric tape to keep it away from debris.
Continued with installing two brass barbs to complete the assembly:
<a href="https://ibb.co/tDnVD8j"><img src="https://i.ibb.co/M7KF7Mw/20201229-093226.jpg" alt="20201229-093226" border="0"></a>
<a href="https://ibb.co/QkWrtF7"><img src="https://i.ibb.co/VxF25W0/20201229-093658.jpg" alt="20201229-093658" border="0"></a>
I decided to wrap some electric tape on a pair of vice' and clamped both sides of the transmission tubing to prevent excess leakage/mess:
<a href="https://ibb.co/fqt8Z1G"><img src="https://i.ibb.co/0mZB1DV/20201229-094225.jpg" alt="20201229-094225" border="0"></a>
I made quick work of the fitting and decided to lead the sensor from the bottom to prevent any trapped air:
<a href="https://ibb.co/x5TJhN5"><img src="https://i.ibb.co/bd9z1kd/20201229-100213.jpg" alt="20201229-100213" border="0"></a>
After an initial test to determine the length of wire needed, I cut the plug side and soldered a thicker gauge wire to the plugs and later covered it with a loom:
<a href="https://ibb.co/YXqRw0b"><img src="https://i.ibb.co/Sc9sGfJ/20201227-205017.jpg" alt="20201227-205017" border="0"></a>
I fastened the cabling with a zip ties to prevent any possibility of it touching the belts:
<a href="https://ibb.co/Ht6Mcb4"><img src="https://i.ibb.co/WkZdrM5/20201231-150719.jpg" alt="20201231-150719" border="0"></a>
I also used a universal firewall boot and lead the loomed assembly through it first, measuring how much excess cabling I'll have lead into through the firewall, pushed it through with the loom, and it was water tight due to the loom being in place with the firewall boot.
Now, the I had to go through the trouble of removing the center console, radio, and then some soldering into the right connections.
<a href="https://ibb.co/4YfGpQ1"><img src="https://i.ibb.co/vQBGktX/20201227-110518.jpg" alt="20201227-110518" border="0"></a>
Along the way, I found remnants of the previous owners belongings under the console:
<a href="https://ibb.co/BLxCVF2"><img src="https://i.ibb.co/Q9RKFtv/20201227-090307.jpg" alt="20201227-090307" border="0"></a>
Since I was down there, I installed a Magnefine magnetic line transmission filter which was super easy to do:
<a href="https://ibb.co/bKZJdWy"><img src="https://i.ibb.co/S38rvs1/20201229-103308.jpg" alt="20201229-103308" border="0"></a>
I performed a quick fitting and was happy with the placement of the gauge and that the wiring worked out. Then, the JW weld snapped off and I realized I didn't use a plastic glue. I decided to use some small screws and decided to call it a day:
<a href="https://ibb.co/NsBZCTX"><img src="https://i.ibb.co/nbJzmPT/20201229-110812.jpg" alt="20201229-110812" border="0"></a>
The matching paint came the next day so know it doesn't look so tacky:
<a href="https://ibb.co/PZbLcK1"><img src="https://i.ibb.co/KjQP2dV/20201230-133000.jpg" alt="20201230-133000" border="0"></a>
*continued...
Lately, I've been on a Timmy YT binge and have been going through a ton of useful content. I pulled the trigger and, last week, I decided to order a transmission temp. gauge and a transmission cooler for preventative maintenance.
The first thing I did was attempt to JB weld the temp gauge housing to the a-pillar plastic.
<a href="https://ibb.co/xSrsRGN"><img src="https://i.ibb.co/QFxc1n4/20201227-084950.jpg" alt="20201227-084950" border="0"></a>
I wasn't happy with the extra material that hung past the a-pillar so I decided to dremel/file away the excess.
Before:
<a href="https://ibb.co/vXFh44L"><img src="https://i.ibb.co/nPGBMMQ/20201227-082054.jpg" alt="20201227-082054" border="0"></a>
After:
<a href="https://ibb.co/s1yfGZ4"><img src="https://i.ibb.co/bvz0ZkV/20201227-202238.jpg" alt="20201227-202238" border="0"></a>
<a href="https://ibb.co/7G3WwDV"><img src="https://i.ibb.co/BghZXJj/20201227-082038.jpg" alt="20201227-082038" border="0"></a>
Dremeled a pathway for the wiring that will lead behind the a-pilar:
<a href="https://ibb.co/FWYwzJy"><img src="https://i.ibb.co/th2sDcv/20201227-202230.jpg" alt="20201227-202230" border="0"></a>
Following Timmy's guide, I assembled a brass tee and a brass bushing to fit the transmission temperature sensor:
<a href="https://ibb.co/S66VJ3V"><img src="https://i.ibb.co/BffTwCT/20201229-092740.jpg" alt="20201229-092740" border="0"></a>
*I decided to secure the sensor wiring with a loom and electric tape to keep it away from debris.
Continued with installing two brass barbs to complete the assembly:
<a href="https://ibb.co/tDnVD8j"><img src="https://i.ibb.co/M7KF7Mw/20201229-093226.jpg" alt="20201229-093226" border="0"></a>
<a href="https://ibb.co/QkWrtF7"><img src="https://i.ibb.co/VxF25W0/20201229-093658.jpg" alt="20201229-093658" border="0"></a>
I decided to wrap some electric tape on a pair of vice' and clamped both sides of the transmission tubing to prevent excess leakage/mess:
<a href="https://ibb.co/fqt8Z1G"><img src="https://i.ibb.co/0mZB1DV/20201229-094225.jpg" alt="20201229-094225" border="0"></a>
I made quick work of the fitting and decided to lead the sensor from the bottom to prevent any trapped air:
<a href="https://ibb.co/x5TJhN5"><img src="https://i.ibb.co/bd9z1kd/20201229-100213.jpg" alt="20201229-100213" border="0"></a>
After an initial test to determine the length of wire needed, I cut the plug side and soldered a thicker gauge wire to the plugs and later covered it with a loom:
<a href="https://ibb.co/YXqRw0b"><img src="https://i.ibb.co/Sc9sGfJ/20201227-205017.jpg" alt="20201227-205017" border="0"></a>
I fastened the cabling with a zip ties to prevent any possibility of it touching the belts:
<a href="https://ibb.co/Ht6Mcb4"><img src="https://i.ibb.co/WkZdrM5/20201231-150719.jpg" alt="20201231-150719" border="0"></a>
I also used a universal firewall boot and lead the loomed assembly through it first, measuring how much excess cabling I'll have lead into through the firewall, pushed it through with the loom, and it was water tight due to the loom being in place with the firewall boot.
Now, the I had to go through the trouble of removing the center console, radio, and then some soldering into the right connections.
<a href="https://ibb.co/4YfGpQ1"><img src="https://i.ibb.co/vQBGktX/20201227-110518.jpg" alt="20201227-110518" border="0"></a>
Along the way, I found remnants of the previous owners belongings under the console:
<a href="https://ibb.co/BLxCVF2"><img src="https://i.ibb.co/Q9RKFtv/20201227-090307.jpg" alt="20201227-090307" border="0"></a>
Since I was down there, I installed a Magnefine magnetic line transmission filter which was super easy to do:
<a href="https://ibb.co/bKZJdWy"><img src="https://i.ibb.co/S38rvs1/20201229-103308.jpg" alt="20201229-103308" border="0"></a>
I performed a quick fitting and was happy with the placement of the gauge and that the wiring worked out. Then, the JW weld snapped off and I realized I didn't use a plastic glue. I decided to use some small screws and decided to call it a day:
<a href="https://ibb.co/NsBZCTX"><img src="https://i.ibb.co/nbJzmPT/20201229-110812.jpg" alt="20201229-110812" border="0"></a>
The matching paint came the next day so know it doesn't look so tacky:
<a href="https://ibb.co/PZbLcK1"><img src="https://i.ibb.co/KjQP2dV/20201230-133000.jpg" alt="20201230-133000" border="0"></a>
*continued...
Last edited:
shawnathan9
New member
*Removed the radiator grill, removed the car horns to prep for the trans. cooler install:
<a href="https://ibb.co/BzC3tbX"><img src="https://i.ibb.co/DVRWthx/20201231-141546.jpg" alt="20201231-141546" border="0"></a>
I decided that the current radiator is still good, for now, and so I opt'd out of replacing it today (though I had a OEM radiator on stand-by). Instead, I removed the 4 bolts and was able to clear enough room to install the trans. cooler. - I had to pull the radiator back, carefully without any damage to the fins, and fasten it with a bungee cord to keep it back far enough so I can reach down to install the cooler:
<a href="https://ibb.co/j5VnNmt"><img src="https://i.ibb.co/wLJ5kVt/20201231-141532.jpg" alt="20201231-141532" border="0"></a>
<a href="https://ibb.co/C1vQTBJ"><img src="https://i.ibb.co/dW6DzBb/20201231-141537.jpg" alt="20201231-141537" border="0"></a>
<a href="https://ibb.co/NsKT5wm"><img src="https://i.ibb.co/0crsTPF/20201231-141542.jpg" alt="20201231-141542" border="0"></a>
<a href="https://ibb.co/gTLNyrt"><img src="https://i.ibb.co/yyct0Ng/20201231-141529.jpg" alt="20201231-141529" border="0"></a>
Found the ideal set up, that everyone seems to use, and pushed the provided zip ties through the ac:
<a href="https://ibb.co/yXnCfDs"><img src="https://i.ibb.co/t4M6mSC/20201231-142718.jpg" alt="20201231-142718" border="0"></a>
As you can see here, you can get away with the install without removing the radiator:
<a href="https://ibb.co/gtf4Yxh"><img src="https://i.ibb.co/7rZkhqL/20201231-142727.jpg" alt="20201231-142727" border="0"></a>
<a href="https://ibb.co/QnW0WbM"><img src="https://i.ibb.co/FJQpQxz/20201231-142941.jpg" alt="20201231-142941" border="0"></a>
I decided to connect the tubing from the radiator end and then guide it to the cooler to have a good length fit. Installed the inlet hose on the bottom and the outlet on the top of the cooler:
<a href="https://ibb.co/CMmM1fZ"><img src="https://i.ibb.co/fnqn1s5/20201231-150756.jpg" alt="20201231-150756" border="0"></a>
<a href="https://ibb.co/Ht6Mcb4"><img src="https://i.ibb.co/WkZdrM5/20201231-150719.jpg" alt="20201231-150719" border="0"></a>
<a href="https://ibb.co/cb95SDP"><img src="https://i.ibb.co/tZ6fT8S/20201231-144953.jpg" alt="20201231-144953" border="0"></a>
<a href="https://ibb.co/59r5qyM"><img src="https://i.ibb.co/6ZH46xn/20201231-144958.jpg" alt="20201231-144958" border="0"></a>
I already noticed a difference when I was driving around today and found that my temps were 30-40 degrees cooler :car:
*Finally, a new pic without the cringe Amazon roof rack that the previous owner installed.
<a href="https://ibb.co/hVBXCVS"><img src="https://i.ibb.co/sqK5tqZ/20201230-132842.jpg" alt="20201230-132842" border="0"></a>
<a href="https://ibb.co/BzC3tbX"><img src="https://i.ibb.co/DVRWthx/20201231-141546.jpg" alt="20201231-141546" border="0"></a>
I decided that the current radiator is still good, for now, and so I opt'd out of replacing it today (though I had a OEM radiator on stand-by). Instead, I removed the 4 bolts and was able to clear enough room to install the trans. cooler. - I had to pull the radiator back, carefully without any damage to the fins, and fasten it with a bungee cord to keep it back far enough so I can reach down to install the cooler:
<a href="https://ibb.co/j5VnNmt"><img src="https://i.ibb.co/wLJ5kVt/20201231-141532.jpg" alt="20201231-141532" border="0"></a>
<a href="https://ibb.co/C1vQTBJ"><img src="https://i.ibb.co/dW6DzBb/20201231-141537.jpg" alt="20201231-141537" border="0"></a>
<a href="https://ibb.co/NsKT5wm"><img src="https://i.ibb.co/0crsTPF/20201231-141542.jpg" alt="20201231-141542" border="0"></a>
<a href="https://ibb.co/gTLNyrt"><img src="https://i.ibb.co/yyct0Ng/20201231-141529.jpg" alt="20201231-141529" border="0"></a>
Found the ideal set up, that everyone seems to use, and pushed the provided zip ties through the ac:
<a href="https://ibb.co/yXnCfDs"><img src="https://i.ibb.co/t4M6mSC/20201231-142718.jpg" alt="20201231-142718" border="0"></a>
As you can see here, you can get away with the install without removing the radiator:
<a href="https://ibb.co/gtf4Yxh"><img src="https://i.ibb.co/7rZkhqL/20201231-142727.jpg" alt="20201231-142727" border="0"></a>
<a href="https://ibb.co/QnW0WbM"><img src="https://i.ibb.co/FJQpQxz/20201231-142941.jpg" alt="20201231-142941" border="0"></a>
I decided to connect the tubing from the radiator end and then guide it to the cooler to have a good length fit. Installed the inlet hose on the bottom and the outlet on the top of the cooler:
<a href="https://ibb.co/CMmM1fZ"><img src="https://i.ibb.co/fnqn1s5/20201231-150756.jpg" alt="20201231-150756" border="0"></a>
<a href="https://ibb.co/Ht6Mcb4"><img src="https://i.ibb.co/WkZdrM5/20201231-150719.jpg" alt="20201231-150719" border="0"></a>
<a href="https://ibb.co/cb95SDP"><img src="https://i.ibb.co/tZ6fT8S/20201231-144953.jpg" alt="20201231-144953" border="0"></a>
<a href="https://ibb.co/59r5qyM"><img src="https://i.ibb.co/6ZH46xn/20201231-144958.jpg" alt="20201231-144958" border="0"></a>
I already noticed a difference when I was driving around today and found that my temps were 30-40 degrees cooler :car:
*Finally, a new pic without the cringe Amazon roof rack that the previous owner installed.
<a href="https://ibb.co/hVBXCVS"><img src="https://i.ibb.co/sqK5tqZ/20201230-132842.jpg" alt="20201230-132842" border="0"></a>

- Status
- Not open for further replies.
Similar threads
- Replies
- 9
- Views
- 26K


- Replies
- 0
- Views
- 2K
- Replies
- 5
- Views
- 1K

- Replies
- 13
- Views
- 3K


- Replies
- 11
- Views
- 21K


