What Did You Do To Your 3rd Gen Today?

Status
Not open for further replies.
A friend is actually gonna help me get the clearcoat off this weekend. I'm terrible at detailing related things and historically have not had the patience to do it right. I'm more of the "hit it with a hammer and send it" type.

I feel you there... I've noticed I have a lot more patience as I've gotten older. Too many times where I shorted the job in the moment and then got to look at my slop for the next several years or was so frustrated by the outcome I ended up doing it again right away.

Hard to swallow that delayed gratification of doing a Really detailed job, but just think of the years to come where you're going to look at the outcome and either thank yourself for taking the time or grumble because you didn't. That's what I force myself to do when I feel like I'm starting to just phone-in the work I'm doing. It works more often than not... but I still end up doing some things more than once (sheesh, was just on the roof of my garage yesterday fixing something I slapped together less than a year ago, woulda been less time, money and worked better if I'd just done it right at the start ~ talking 30 minutes a year ago vs. about 3 hours and another $100 yesterday).
 
... also learned about how much is too much grease for our driveshaft yokes. I kept pumping until I saw the sleeve move, but the vibrations I had already been feeling from the toasted needle bearing and old front wheel bearing was way more pronounced after this last maintenance! Took the zerks off from the front and back shafts, drove down the street making sure to be heavy and sudden on the brakes and accelerator, and put the fittings back in. Everything is much more subdued again, so remember... TWO TO THREE PUMPS AT THE MOST! You're trying to grease the splines, not fill to capacity. You need the extra space in there to allow the two sides of the shafts freely move as the suspension flexes.

Better yet -- pull the yoke off and grease the splines with an application specific grease. Don't use that zerk at all.
 
Cleaned my MAF Sensor and realized my steering rack has been leaking for at least 60K miles according to the invoices i have. It's the original so it makes sense i suppose with 240k. Might look to replace as I have a little disposable income at the moment although my steering is fine, soooo....
 
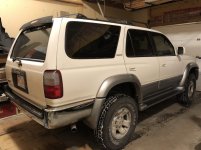
Got the rear replacement bumper on my limited.
 

Attachments

  • NEW REAR REPLACEMENT BUMPER.jpg
    NEW REAR REPLACEMENT BUMPER.jpg
    90.9 KB · Views: 351
... also learned about how much is too much grease for our driveshaft yokes. I kept pumping until I saw the sleeve move, but the vibrations I had already been feeling from the toasted needle bearing and old front wheel bearing was way more pronounced after this last maintenance! Took the zerks off from the front and back shafts, drove down the street making sure to be heavy and sudden on the brakes and accelerator, and put the fittings back in. Everything is much more subdued again, so remember... TWO TO THREE PUMPS AT THE MOST! You're trying to grease the splines, not fill to capacity. You need the extra space in there to allow the two sides of the shafts freely move as the suspension flexes.

Better yet -- pull the yoke off and grease the splines with an application specific grease. Don't use that zerk at all.

One would figure the extra grease would just bleed out. But then, why would it, if the grease seal in there is good and still sealing.
Pulling the yoke is a great idea. I would like to add, just remember to mark the 2 shafts pieces. That way you're able to keep the balance of the entire driveshaft when its back together.
 
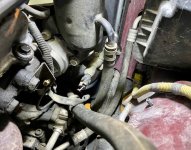
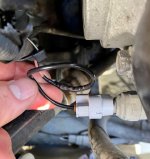
About a month ago I noticed that the power steering idle-up switch wire had been cut.

So today I soldered in a repair and verified that it’s working. At very low speeds, cranking the steering wheel will momentarily increase the RPMs by about 50 to 100.

(Not the best looking solder... I should’ve practiced before doing the repair since this was my first time... :cowboy: )

Toyota parts:
- 90980-11428 Housing, Connector F
- 82998-12440 Terminal, Repair W/W
 

Attachments

  • 07CFBC5E-8C1C-4E04-A21D-0C98C5F8A292.jpeg
    07CFBC5E-8C1C-4E04-A21D-0C98C5F8A292.jpeg
    124 KB · Views: 392
  • 11CB0D7C-B002-4CA2-AC66-C5A5A73137B6.jpeg
    11CB0D7C-B002-4CA2-AC66-C5A5A73137B6.jpeg
    96.1 KB · Views: 391
Last edited:
oil change and switch back to factory type battery clamps. Trying to flush the engine oil with frequent changes as was not well maintained when got it. Had junk battery cable clamps....those super cheap junk ones that would not get very tight., luckily they did not cut off the wire lugs, so was able to just bolt back on to new stock style

just baby steps to get this rig back in shape.
 
oil change and switch back to factory type battery clamps. Trying to flush the engine oil with frequent changes as was not well maintained when got it. Had junk battery cable clamps....those super cheap junk ones that would not get very tight., luckily they did not cut off the wire lugs, so was able to just bolt back on to new stock style

just baby steps to get this rig back in shape.

The worst thing about a Toyota is that they will allow a previous owner to neglect them for years and still keep going. And then we get to pay the piper.

Keep at it, you'll get there!
 
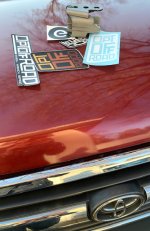
Painted the grill insert black to match the rest of the blacked out badges and accents. Also constructed some window vents out of gutter screen for overlanding...genius move whoever thought of that.
 
Finished up a slightly different take on a dual battery setup - now to see how the two batteries behave with each other.

Took out an 8(!) year old AGM battery that was starting to go - not nearly as much oomph as it used to have. Still, 8 years if a good run for a battery. I've added a bunch of stuff to the car over that time frame, though. On board air (dual Arb tucked in the rear cargo cubbyhole), a winch, lights front and rear. Wanted to get a deeper cycling style of battery, as well as a dual battery setup in case something happens and one goes dead out in the middle of nowhere.

But I also didn't want to reorganize the engine bay too much. So I thought about a 'tiny' battery. I've been using them for years on a couple of my other cars (turbo LS swapped Volvo 240 wagon, and my little rat rod Volvo 544) as a replacement for the full sized battery. And I've had no issues with them at all. They crank normally, in regular use they seem 100% adequate. If I had a car with a starting issue, or weak cranking in general, or something like that, obviously, the tiny battery has less Amp-Hours - so less spare capacity to play with.

So I used a Braille 14115 battery as the start/car battery. It's really small. The Odyssey PC680 is similar and usually a lot cheaper, but it's a little bigger. And an Optima yellow-top for the house/winch battery. I got a new holder for the Optima that reaches around the ends of the battery - and installed that in the normal spot in the 4Runner. Then welded on a bit of bracketry on the engine end of it to hang the Braille mount on.

Then I mounted a Blue Sea ACR switch on top, after pondering various other locations. There's not a lot of spare room in an 4Runner engine bay! Hanging it on top of the Optima makes removing and replacing the battery a bit more complex - but not by much.

Hooked the 'start' wires (heavy wire to the starter, slightly smaller one to the fuse box), as well as the engine block ground wire both to the Braille. Hooked the winch/house wiring to the Optima. I originally wired my winch wiring up to use a receiver cradle mounted winch, with Anderson connectors front and rear, since then I've instead permanently installed the winch in the front bumper instead, but left the rear wiring in place, with a solenoid to turn it off and on. And I've just been using that as a main 'house' bus - the OBA and lights are connected to it. Then a couple of short positive connector wires to connect the two batteries to the Blue Sea switch.

A couple of pics - it was sprinkling off and on while I finished it up.

The Braille, Optima, and Blue Sea ACR under the hood:
OZVrzjYh.jpg


The Blue Sea remote switch in the dash:
eziLGM1h.jpg


I had an old, somewhat fried Braille I'd swapped out of my wagon which I initially tried to use. It cranked slowly, wouldn't start, but bridge the house battery in and it would crank like normal. Good test of the 'dead start battery' scenario. So I took the good Braille out of the wagon and put it in the 4Runner - with the two separated and it running completely off the Braille - starts and acts entirely normal.

 
Last edited:
That's a cool idea for a dual battery setup. It almost looks like you're just keeping a spare for your motorcycles in there.
 
Yeah, I'd be more hesitant trying to run it with such a small battery, but in addition to the YT there as a backup, they've just worked so well on my other cars by themselves.

Now to see how the two of them get along with the ACR switch playing referee. They're both AGM style lead-acids, so they should (in theory) work together well enough.
 
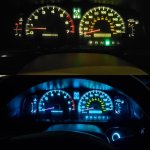
finally got around to changing the gross dash lights, ended up kinda ricey but anythings better then before will probably ended up switching them again in the summer
 

Attachments

  • unnamed.jpg
    unnamed.jpg
    106.5 KB · Views: 367
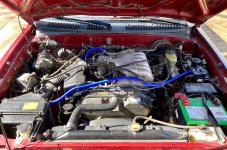
Started replacing all the 21-year-old hoses. Two down, many to go...
 

Attachments

  • 88CFCDC1-87DE-4607-A181-BC6E74C93D11.jpeg
    88CFCDC1-87DE-4607-A181-BC6E74C93D11.jpeg
    135.2 KB · Views: 361
Status
Not open for further replies.

Members online

Forum statistics

Threads
278,316
Messages
3,554,120
Members
248,016
Latest member
Advally Service

Trending content

Back
Top