What Did You Do To Your 3rd Gen Today?

Status
Not open for further replies.
New catback installed.

About four years ago I punctured the OEM muffler off road. At the time I did t want to drop much money into the exhaust ski welded in a Thrush muffler. It actually sounded good for a V6 but just too load with a family. Recently the Thrush cramped out. Went with a brand new Northeastern Exhaust and about an hour and a half later with cleanup, I'm very pleased.

Great fit. Much quieter (like OEM) and was a breeze to install.
 
Finally got our new phone mounts back from fabrication:

p7t4qFL.jpg


Here are the two versions side by side - Standard (right) and Extreme (left):

dgK9RSX.jpg

Those look AMAZING. I can't wait to try it out!

Thank you Spiker for engineering another great product for the T4R community. :trophy:
 
Finally got our new phone mounts back from fabrication:

p7t4qFL.jpg


Here are the two versions side by side - Standard (right) and Extreme (left):

dgK9RSX.jpg


This is the "mount only" option for those who want to supply their own phone holder:

fwOlduk.jpg


Magnetic mount option:

ZujV1xb.jpg


Here's the Panavise holder option:

7bQB688.jpg


Here is the RAM X-Grip option:

38Qh2Bt.jpg

Hey man, (It's Leon right?)
These are great like ur hood struts!
May I suggest you sell the cargo door struts too?
There's strong-arm ones in Amazon but from what I read on writeups the folks have to grab a couple of stuff from home depot to make it work. I'm sure you'll come up with a good kit that people would buy lol
 
Chopped out the rear spare tire carrier crossmember, and relocated my 'house' wiring busses (switched with a HD solenoid up front, - originally for use with a receiver mounted winch on either end) - making room for a second fuel tank in that area. I really wanted to use EMKeith's Ford tank setup - but I have a 4XI rear bumper - and it has some sturdy supports for the rear receiver hitch that take up room the Ford tank needs, so I'm trying something a little different. After looking at dimensions and layouts on a bunch of different tanks, I got a 1956-1957 Chevy tank with updated 'fuel injection' fuel pump mounts in it. This will just be an aux tank - I'm going to use the fuel pump in the Chevy tank to pump fuel to a T fitting on the Toyota tank's filler neck, and T the Chevy tank ventilation in to the Toyota tank vent system. If that seems to cause problems, I'll just convert it to an externally vented system. I'll put a flush 'aero' mount cap on the quarter panel between the stock filler door and the taillight. It's about 16 gallons of additional fuel, stored down low. With the spare tire crossmember out of the way - the tank is nicely tucked up between the frame rails.
 
Heater Core Flush

I am a complete newbie and not mechanically inclined, but yesterday I successfully restored the heater blowing hot air. Did my homework, asked for some advice and I flushed the heater core. Took me a bit, with some frustration at time, but ultimately I fixed it. It was the most mechanically thing I have ever repaired. Small win, but for me very satisfying.

I just appreciate the the 4R community, there is so much knowledge shared, with really no judgement on capabilities or FAQ's.

I am really just having so much fun with my 97' 5 spd. SR5. Learning more everyday and will be making small upgrades and maintenance work along the way.
 
Hey man, (It's Leon right?)
These are great like ur hood struts!
May I suggest you sell the cargo door struts too?
There's strong-arm ones in Amazon but from what I read on writeups the folks have to grab a couple of stuff from home depot to make it work. I'm sure you'll come up with a good kit that people would buy lol

Yup, that's me, under my vendor username :).

The cargo struts are tough to do in small quantities because of the highly unusual end fittings. I checked with my strut manufacturer, and they assured me that it would not be financially viable in any reasonable quantities. So unfortunately I'd suggest just going with 6815's.
 
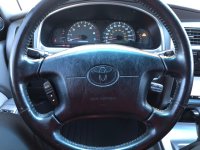
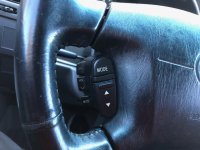
-01 Sienna steering wheel with swc and cruise control
-01 Sienna clock spring
-01 Sienna remote harness(behind the oem radio and 100% not necessary as you can splice the wires)
-3 additional Toyota wire terminals(i sourced these from the same Sienna)
-ASWC-TOY-LEX swc module

Direct bolt on and the airbag connectors are the same. 3 wires will be added to the 6 pin connector on the vehicle side to that clips into the clock spring.

I swapped the rear bezel and airbag brackets over to retain my black wheel. I painted the rear wheel bezel Kyrlon vinyl black(perfect match i might add)

Grey for 12v switch, green and black signal wires to Axxess module. Follow instructions per Axxess manual for auto program and connection. (two 12v switch and ground) The Sienna remote harness plugs into the Axxess connector directly or you can slice the wires together if you didn't find one.

If anyone needs further help with this, pm me. I should of taken pictures along the way. It's a super easy install. Its connected to an Apline ILX 650 and works perfectly.

I was able to obtain all parts from pick and pull. The Axxess AWC-Toy-Lec is from Amazon.

I have an extra 1stgen Sienna blue steering wheel with controls and cruise control for sale if anyone is interested. No clock spring.

Very cool! Tell us more!
 
Last edited:
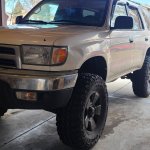
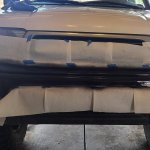
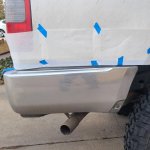
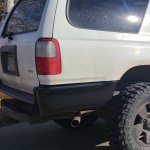
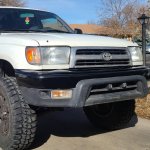
Because it was so nice out yesterday I spray painted the chrome bumpers. Because ew lol. The grill is next. I took off the flaps (I called them crap flaps because they're crap haha). Did 3 coats and called it good. My bf gave me some red dome lights but couldn't install them since fitment was wrong even though he said it was correct. Tried to change the headlights but the previous owner installed LEDs so I couldn't change them and now I have to research how to change it back. I bought the correct bulbs. The passenger side tends to act up - it will go really dim on occasion - so I have to research that now too.
 

Attachments

  • Before.jpg
    Before.jpg
    129.2 KB · Views: 269
  • Front Covered.jpg
    Front Covered.jpg
    130.1 KB · Views: 260
  • Rear Side.jpg
    Rear Side.jpg
    130.4 KB · Views: 245
  • Rear After.jpg
    Rear After.jpg
    121.2 KB · Views: 248
  • Front After.jpg
    Front After.jpg
    132.6 KB · Views: 250
Because it was so nice out yesterday I spray painted the chrome bumpers. Because ew lol. The grill is next. I took off the flaps (I called them crap flaps because they're crap haha). Did 3 coats and called it good. My bf gave me some red dome lights but couldn't install them since fitment was wrong even though he said it was correct. Tried to change the headlights but the previous owner installed LEDs so I couldn't change them and now I have to research how to change it back. I bought the correct bulbs. The passenger side tends to act up - it will go really dim on occasion - so I have to research that now too.

looks ok, now you just need to paint the lower part of that fat lip
 
On a Moab trip, took it on Fins & Things and the first fourth of Hell's Revenge, on stock street tires nonetheless. Crazy how factory capable these aging rigs are. Did smack some tow hitch.
 
On a Moab trip, took it on Fins & Things and the first fourth of Hell's Revenge, on stock street tires nonetheless. Crazy how factory capable these aging rigs are. Did smack some tow hitch.

badass! we were there last month and did Fins and Things (he drove; he's got a 2020 Colorado). Our buddy had a '44 Jeep that did really well too. That trail is fun even as a passenger!
 
Because it was so nice out yesterday I spray painted the chrome bumpers. Because ew lol. The grill is next. I took off the flaps (I called them crap flaps because they're crap haha). Did 3 coats and called it good. My bf gave me some red dome lights but couldn't install them since fitment was wrong even though he said it was correct. Tried to change the headlights but the previous owner installed LEDs so I couldn't change them and now I have to research how to change it back. I bought the correct bulbs. The passenger side tends to act up - it will go really dim on occasion - so I have to research that now too.


Looks good. Wondering if a person could just drop the lower section of the fat lip off (I realize you'd have dangling fogs to deal with) - do they simply unbolt?
 
Dropped the pan and replaced the trans filter. Retorqued the valve body while i was in there. On my back all day, that was a pain in the ass. Glad to have it done. I'll ATF refill tomorrow and check the levels!
 
Status
Not open for further replies.

Members online

Forum statistics

Threads
278,316
Messages
3,554,120
Members
248,016
Latest member
Advally Service

Trending content

Back
Top