What Did You Do To Your 3rd Gen Today?

Status
Not open for further replies.
I didn't drive mine long enough before I bought it for the CEL to come on. I've tested every check valve in the fuel/evap system and they all work. I'm thinking it's the gasket on the gas tank where the fuel suction tube is. The low pressure hose that goes to the fuel suction tube ruptured last year. I've got a temp fix on that, because you can't buy the hose separate from the suction tube assembly. But the fuel gauge now goes bonkers when less than half a tank of gas. I'll be dropping the tank soon and replacing the suction tube, gasket and fuel sending unit. Hopefully that will at least fix my uncertain fuel reading, if not the evap codes as well.

Sounds like you're on the right track. I replaced the fuel suction unit and gasket to try and fix the same fuel gauge problem. There was a TSB about this for 99-00 (TSB EL010-00). It turned out to be a burnt out component on the back of the cluster board I was able to repair for $10, the dealer wanted $500 for a new cluster and re-programming the odo chip.

Yeah you have to drop the fuel tank because the access hole under the rear seat is too small. It's wasn't terribly fun, I had problems reconnecting the electrical connectors above the tank. I remember having to cut one of the hoses during the job for some reason, possibly the one you're talking about and replaced with similar size fuel hose from Napa. Might as well replace the fuel pump and whatever else while you're doing it. I assume you tried replacing the gas cap?
 
Changed my rusty OEM front bumper to a non-rusty OEM front bumper :) Also made some progress on installing the York compressor. Finally finished making the pulley system!
 
I read this was the first job you're going to do and remembered it was the first thing I did (after engine/diff oil changes) so gave you the thorough run down ha. Second job I did was sway bar bushings and end links. 3rd job was lower ball joints and it escalated quickly to valve cover gaskets, brakes, fuel sending unit, radiator, etc. became fun to replace stuff as preventative maintenance. Pay a Toyota shop to do the rear axle seals/bearings though, frickin nightmare.

Spray a little WD40 on the rusted clips for a day or 2 and you can buy new e-clips are Lowes or Ace. Search the forum for the size of them or buy an assortment box.

sounds like most of what I need to get done on my 4R ha. thanks for the tips.
for everyone else's reference, I found the sizes on those e-clips from another thread here

McMaster-Carr

McMaster-Carr
 
Installed some new (used) speakers.

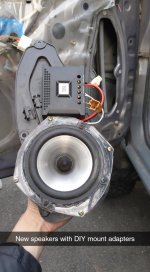
The fronts were 5.5 inch (I think) JBLs with external crossover. The crossover just barely fit under the door card if I positioned it very carefully. I made adapters out of 1/4" scrap plastic, to fit these into the stock speaker mounts. (see attached photo)

For the rears, I was able to squeeze in 6.5 inch shallow mount Pioneers. I removed the stock speaker mounts completely and made my own out of the 1/4" plastic. I used some old margarine containers to make some rain covers similar to the ones build into the back of the stock mounts. I loosely followed this guide: 3rd Gen rear door 6.5" speaker upgrade
 

Attachments

  • Snapchat-1483413020.jpg
    Snapchat-1483413020.jpg
    134.3 KB · Views: 348
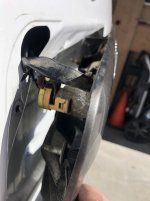
Removed the rear hatch lock cylinder. Can't get the key inside so getting the locksmith to rebuild. Broke one of the garnish clips...should be interesting to find one of those.
 

Attachments

  • rear hatch lock2.jpg
    rear hatch lock2.jpg
    88.7 KB · Views: 336
  • rear hatch lock6.jpg
    rear hatch lock6.jpg
    62.2 KB · Views: 337
Installed my Alphafoxtrot Designs roof rack and a 38in light bar, Still have to wire it but waiting to get all my other lights in so I can hooks up my SP-9100.
For anyone interested in this rack I will be doing a full write up and review. I will say it is a solid rack (more sturdy than some of the competitors ive seen.
Also hopefully this picture doesnt have any issues. (First time posting and adding picture)
Use code "RoyT4R" for 50$ off your rack!
 
Last edited:
Like, build a house from ground up? Or renovate?

That is also a nice 4runner. I really like the blurple. Good luck and keep posting awesome pictures!
 
Like, build a house from ground up? Or renovate?

That is also a nice 4runner. I really like the blurple. Good luck and keep posting awesome pictures!


I’m looking to purchase my first home. So the 4runner mods are going to have to wait a little while. But it’s ok.


Sent from my iPhone using Tapatalk
 
I picked up my rock slider order from Bay Area Metal Fabrications in Benecia yesterday morning. Turns out that they forgot about the powder coat request on my work order but they didn't know until I arrived after my 1.5 hr drive from the Peninsula.

On the spot, I had to decide to wait another two days or just take a refund on the powder coat and take them. Well, being a DIY kinda guy, I decided to take them and paint them myself.


BAMF sliders have a nice design to them. - I'm really liking their logo; BAD ASS Mother F@#$3R :)
<a href="https://ibb.co/4Kq1kxR"><img src="https://i.ibb.co/KbPKnHx/20210215-102012.jpg" alt="20210215-102012" border="0"></a>
<a href="https://ibb.co/b5Xw7KG"><img src="https://i.ibb.co/Xxt0VCG/20210215-102024.jpg" alt="20210215-102024" border="0"></a>

Did a quick test fit to determine where the mounting plates should be welded onto the sliders and to determine where they'll fit for good clearance of the wheel wells:
<a href="https://ibb.co/tDdFGyj"><img src="https://i.ibb.co/7K9Lf7M/20210216-083816.jpg" alt="20210216-083816" border="0"></a>

<a href="https://ibb.co/K5NjTLw"><img src="https://i.ibb.co/10sfFd6/20210216-083826.jpg" alt="20210216-083826" border="0"></a>

Just recently, I bought a welder and had been practicing how to weld various gauges of metal. So far, I still need to dial in my settings to optimize my welds and reduce bb's but I've learned to slow down and allow the puddles to penetrate the host metals to build a good weld. As far as aesthetics go, I still have a long way before any of my welds look like some instagram rainbow dime stacks:
<a href="https://ibb.co/nnffTJN"><img src="https://i.ibb.co/LJ66M7X/20210216-092155.jpg" alt="20210216-092155" border="0"></a>

<a href="https://ibb.co/GJbfPmY"><img src="https://i.ibb.co/0XdpJ54/20210216-102756.jpg" alt="20210216-102756" border="0"></a>

I started the weld job yesterday during my lunch break and then earlier this morning before I headed out to work. I packed it back in the Runner so I could do some clean up during my lunch break:
<a href="https://ibb.co/f1FF3fq"><img src="https://i.ibb.co/Wx55rZG/20210216-103124.jpg" alt="20210216-103124" border="0"></a>

*I'm debating on what kind of paint and color I should use for my rock sliders. I really like the bare steel look but rust is obviously an issue.

I'll be prepping the sliders by roughing them up, cleaning them and cleaning them again with a detergent and then isopropyl, and then some automotive primer.

I feel like a matte black is pretty much a standard.

I also have been thinking about a matching silver with my Limited trim; I'll use some skateboard paper for some additional grip on certain areas.

Not sure which way I'll go with it but I'll post an update once they're painted and on the Runner.

How long was the turn around?> I'm thinking about ordering.
 
I finally installed the 99+ console that I got from the salvage yard a long time ago. I love the BH3D cup holder that I've had for a while and kept it along with the swapped console, but cups feel much more stable now. I split the rear window switch from the wiring wrap and had just the right amount of play to move it to the blank on the left side of the dash.

In case it helps someone else, I was worried I was going to have to do some trimming since I didn't pull the e-brake bucket at the salvage yard. However, the newer e-brake bolted up perfectly in my existing 1997 bucket.

I also swapped my noisy idler pulley with a Gates equivalent. The bearing spins smoothly and quietly now.......which let me hear the next metal grinding noise somewhere in the rotating assemblies. Every time I work on the 4Runner, I'm reminded of Hal changing a light bulb on Malcolm in the Middle.

https://www.youtube.com/watch?v=AbSehcT19u0
 
replaced the top hose and changed the oil and filter at under 2500 miles ....big deal ? well this has been one abused neglected girl b4 I bought it 3 months ago....and trying to flush things out...just trying to giver her some love.

prob all in my head, but I think it ran better :)
 
replaced the top hose and changed the oil and filter at under 2500 miles ....big deal ? well this has been one abused neglected girl b4 I bought it 3 months ago....and trying to flush things out...just trying to giver her some love.

prob all in my head, but I think it ran better :)

What oil are you running on that short change?
 
What oil are you running on that short change?

the first one was walmart supertech as it was the cheapest full synthetic, that and a ydzz3 filter....like I said I wanted to flush it out from the neglect. This time it was castrol edge full synthetic as it was on sale, but I was out of zz3 filters so ran a zz1 i had on the shelf.
 
Status
Not open for further replies.

Members online

Forum statistics

Threads
278,316
Messages
3,554,120
Members
248,016
Latest member
Advally Service

Trending content

Back
Top