What Did You Do To Your 3rd Gen Today?

Status
Not open for further replies.
I definetly screwed up.

So, im in the middle of replacing the passengers side control arm, and when i went to torque down the nut connecting to the upper ball joint i stupidly still had the ratchet set to 174 ft-lbs (required for the axel shaft hub nut) when i should have set it to 80 ft-lbs. I didn't get it all the way down to the 174, but i feel i should replace the ball joint. Question for y'all do you agree that i should replace it or is there some known info that says the upper ball joint can take that much tension?
 
Question for y'all do you agree that i should replace it or is there some known info that says the upper ball joint can take that much tension?

Yeah, you've deformed threads/stretched the stem with that move. It's a weakened situation at this point and you're inviting failure (metal fatigue) by running it. There's no way to know if you managed to stay within the "elastic" area of the properties or got into the "plastic" stage. Sorry. :(


Hate it for you.
 
So, im in the middle of replacing the passengers side control arm, and when i went to torque down the nut connecting to the upper ball joint i stupidly still had the ratchet set to 174 ft-lbs (required for the axel shaft hub nut) when i should have set it to 80 ft-lbs. I didn't get it all the way down to the 174, but i feel i should replace the ball joint. Question for y'all do you agree that i should replace it or is there some known info that says the upper ball joint can take that much tension?

You should be able to figure out about how high you actually went on it by setting your torque wrench low at say 80ft-lbf and tightening the nut. If it doesn't turn but just clicks, then increase the setting and try again. Once you get it high enough that you are actually turning the nut again, you know you didn't get that high. I'd certainly be worried about it if you got all the way to 174ft-lbf, but knowing how high you actually got would be good to know in making a decision on replacing it or not.
 
You should be able to figure out about how high you actually went on it by setting your torque wrench low at say 80ft-lbf and tightening the nut. If it doesn't turn but just clicks, then increase the setting and try again. Once you get it high enough that you are actually turning the nut again, you know you didn't get that high. I'd certainly be worried about it if you got all the way to 174ft-lbf, but knowing how high you actually got would be good to know in making a decision on replacing it or not.


That was a great idea, looks like i got it to 126ft-lbs, so im just gonna replace it, i dont want it to snap.
 
Cam delete kit and set the 6112 struts to the 9th notch. Had it on 8th notch since install, doesnt look like it upped it much, seems a lot stiffer now too. Also installed my propane tank on the rear jerry can holder.

uc

uc

uc
 
Cam delete kit and set the 6112 struts to the 9th notch. Had it on 8th notch since install, doesnt look like it upped it much, seems a lot stiffer now too. Also installed my propane tank on the rear jerry can holder.

uc

uc

uc

You're probably at the point of pre-loading the coils instead of lifting their position
 
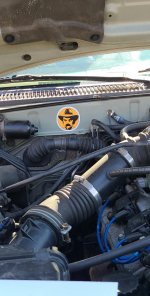
yet another sticker :cowboy:

ok....one...I dont know who the sticker is
two....looks like your running th ebig 3 wires
three....on the resonator delete...is that something you made your self....im about to make one myself just was not sure how or where to attach the vac line
 
Re-installed my two front power seats with recovered bottom pan. Had no problem taking out the 14mm seat bolts. When I re-installed I used some anti-seize. Cleaned out a bunch of grime underneath the seats and applied Lock-saver on the threaded mechanism below.
 
ok....one...I dont know who the sticker is
two....looks like your running th ebig 3 wires
three....on the resonator delete...is that something you made your self....im about to make one myself just was not sure how or where to attach the vac line

The vacuum line connects just below the two throttle cables if I remember correctly. Should be the same line that originally went to the resonator. Some void this and simply loop the line back to some other part of the intake plenum but I see no reason for this besides cleaning up the bay a little more
Sticker is Blaze Foley
 
I'm making a list of maintenance items that I want to perform on my truck. So far it's: Lower Ball Joints (over 200k miles and new to me), Tundra Brake Upgrade (front brakes at 25%) and Valve Gasket Replacement (noticeable oil leak on the engine).
 
I'm making a list of maintenance items that I want to perform on my truck. So far it's: Lower Ball Joints (over 200k miles and new to me), Tundra Brake Upgrade (front brakes at 25%) and Valve Gasket Replacement (noticeable oil leak on the engine).

I highly recommend all fluids and the radiator being top priority above brake upgrade and valve cover gasket. Actually, I don't have the brake upgrade and can't find reason to do it since they work astonishingly well for a stock daily driver.

Anyway, dig through the videos from Timmy and Sean (one of the stickies), and check out different build threads. Mine is 100% maintenance from buying a new-to-me '99, link in sig, if you want to have some other things to think about. And the one thing I'm Constantly talking up as being the biggest improvement was replacing all the bushings.
 
I'd agree with the radiator. The pink milkshake would really suck, but maybe it's been long enough that all the bad radiators have already failed. I haven't heard of it happening to anyone in a long time.

I'd also change the t-stat with the radiator, and do a tranny drain and fill.

Those bushing's make a huge difference, and for me it was especially true in the steering rack and front control arms.
 
I didn't do this today but I did do it the other day. I modified my air box to hold a k&n pod filter. Here are the pics:
d3e1d9efac3a8c461895112ba1c2969b.jpg
8b184e79e876ea048c2f5b49d7244963.jpg
5a7e17887270e694a1a413fbd2bc0b85.jpg
25a2a5e5b275e83798a137be078bda9d.jpg


Sent from my Pixel 4a using Tapatalk
 
I didn't do this today but I did do it the other day. I modified my air box to hold a k&n pod filter. Here are the pics:
d3e1d9efac3a8c461895112ba1c2969b.jpg
8b184e79e876ea048c2f5b49d7244963.jpg
5a7e17887270e694a1a413fbd2bc0b85.jpg
25a2a5e5b275e83798a137be078bda9d.jpg


Sent from my Pixel 4a using Tapatalk

well that will help things look stock at first glance. might be a pain to clean and change. Just remeber with these....do not over oil the filter as that has been shown to mess up the MAF
 
well that will help things look stock at first glance. might be a pain to clean and change. Just remeber with these....do not over oil the filter as that has been shown to mess up the MAF
It won't be too bad just have to pull the box out and remove the plexiglass cover to pull it out. Plus it's not like I'll be having to do that every week. I've had k&n on other vehicles and I'm always careful not to over oil them. I haven't had an issue yet.

Sent from my Pixel 4a using Tapatalk
 
Status
Not open for further replies.

Members online

Forum statistics

Threads
278,316
Messages
3,554,120
Members
248,016
Latest member
Advally Service

Trending content

Back
Top