What Did You Do To Your 3rd Gen Today?

Status
Not open for further replies.
New hat and shoes went on last night. Did a janky chop job on the bumper this morning, which I'm going to replace soon anyhow. Sitting in the garage are some new SPC control arms to hopefully eliminate the pinch-weld rubbing.

  • Rack from Sherpa Equipment Co
  • SCS F5 16x8 -25mm/3.5BS
  • Yokohama Geolander G003 M/T 285/75r16

hey [MENTION=567020]austindenny[/MENTION] i realize this post was from 2020, but what lift is on the truck in that pic?
 
Very pretty


Sent from my iPhone using Tapatalk

I've got a question; I just had this put into my runner as well, did you bolt your system down? I go off-roading and don't want it moving around (as heavy as it is) nor if heaven forbid I get into an accident I don't want it flying everywhere. If you bolted yours down how did you do it? many thanks!
 
I made it back in 2009 or 2010. Was trying to copy Shrockworks design. I really need to find all my old pics and make a build thread on here.

(few pics from the Rubicon)
Untitled

Untitled

looks great, nicely done I’ve got a steel custom front bumper sitting in my living room but decided its too much bumper for my 2WD 4cyl automatic
 
We have these on my bike forums and didnt find one here with the search. So lets get this started. As the title states, what did you do to it today?

I have to do a few of these in one reply to catch up. Please bear with.

The very, very first thing I did after getting my SR5 was to clean the interior, although it was almost spotless when I got it. Previous owners were sticklers, and it showed in the overall maintenance/condition of the 3rd gen. I like to get my own preferred products on the vehicle so it smells…familiar, you know?

I noticed the hatch hydrolic struts were beginning to show some wear, so I replaced them with Strongarm 6815’s, which now almost startle me every time I open it, it goes up so fast. (Pro Tip: don’t stick your chin over the hatch when opening) It takes work to close it, which just shows how much power these things have on the way up. The 6815 is an upgrade from the OEM.

Next came hood struts. This was the quickest, most satisfying mod I think I will ever do on my ‘98. The hardware is so well designed and it is so easy and quick to install, and has instant payoff, it is the very definition of immediate gratification.

Got a bug deflector on the way and some new wipers, nothing major yet. The first major expense will be suspension upgrades/replacements and maybe the timing belt and accompanying parts.

See you next job.
 
just sold my taco for this 4runner. a bit of oil all around the valve cover gasket has led me to go ahead and do a bunch of other maintenance while im in there.
before i started ive been running diagnostics to get a good idea of what all needs done.

1999 SR5 4x4
TRD supercharger
URD 7th injector kit

theres no codes and it drives smooth and with good power but ive been chasing down this rich condition at idle for a couple days and found some high grade f*ckery.

what i *was* gonna do today is clean the MAF sensor but one of the bolts is either stripped or the threaded insert came loose so somebody used some kind of gasket maker all around the MAF and inside the intake piping at the bottom of the MAF

ok fine. if its sealed and the MAF is working then ill ignore it for now.. but it doesnt. and it doesnt, kinda :[

so i took the intake pipe off and found a chunk of mud or rust or some other hardened brown boogers on the element. cleaned it as best i could but still visibly dirty.
 
Couple of pics from our recent trip:

Rose Garden Hill (near Moab):
78w4eg9h.jpg


Maze District of Canyonlands.

Teapot Canyon:
pMkk7p4h.jpg

uDhXjDBh.jpg


Rock formation called "The Wall":
rOYbCjhh.jpg


Doll House 1 campsite:
CC3WUmWh.jpg

pjhuvt1h.jpg


Flint Trail (a bit sketchier this year due to washout damage):
fKfLOlph.jpg


Panorama Point campsite:
9HYqr4Uh.jpg

eWAops2h.jpg


Needles District, Elephant Hill:
p8zji4Ph.jpg
 
yesterday i installed a '01 center console, kenmore excelon stereo and took my running boards off.

my friend took off and repainted his grill and front bumper with some black plastidip
 
Took my rear hatch license plate bezel off and JB Welded the lock cylinder mounts back to the bezel. Top plastic tab/mount broke yesterday, and the bottom one broke while removing the bezel. It’s now one good solid mount of JB Weld. Hardest part was getting the bezel’s snap clips to release, but fortunately I didn’t break a single one!

After seeing the thin plastic that the cylinder mounts to, it amazes me that Toyota designed such a flimsy mount. I’m surprised any of them lasted past the first year!
 
Last edited:
My LBJs are 2 years old. I wanted to see if I could measure the freeplay like the FSM specifies, just to get a datapoint on their "slightly used" condition.

JKuAyuX.jpg


Not the best setup. This is a great Starrett dial from the early 70's but the probe configuration is not ideal and it's mated with an el cheapo magnetic base. I lifted the LCA to get a couple inches under the tire and cranked up underneath the tire with a crowbar. The most movement I could get (at forces no doubt in excess of the 66 lbf the FSM requires) was 8-10 thousands, or 0.2mm. So I guess I'm OK but I'd like to get a better handle on this method.

7rrp5XR.jpg
 
I just finished painting the front grill and got my new head lights in the mail today. I am excited to put both of them on tomorrow and then do a coolant change.
 
Put in a new battery (Interstate) from Costco, and upgraded my positive battery terminal. Still figuring out how I’m going to do my negative terminal
 
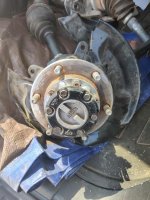
I finally found my Manual Hubs in one of the local yards!! I also grabbed a spare OEM CV for my current rig until this heat breaks and I can install these new hubs.


Just looking at some of the other parts I am going to need. From my local dealer, bearings are $95 each, but found this ebay listing for 2 for ~130, appear to be Koyo bearings, is this $60 delta just savings of not having the toyo box and the way I should go? Ebay 2X Koyo front bearings
 

Attachments

  • hubs.jpg
    hubs.jpg
    66.9 KB · Views: 294
We have these on my bike forums and didnt find one here with the search. So lets get this started. As the title states, what did you do to it today?

Well, I took out the clock to try to reheat the solder on the back of the board to see if that jump-starts it again. I’m waiting on a soldering kit so I can give it a try on it. Did the spring trick first to see if that worked; it didn’t.

Also installed a Blue Sea Systems USB dual charging port in place of the cigarette lighter. Didn’t get a chance to check to see if it worked as the dinner bell rang. Also replaced the wipers yesterday.
 
I ordered a replacement arm rest skin off Ebay to replace the super worn arm rest.

It was a pretty simple fix, I ordered the cover from ebay, took apart my arm rest, peeled off the old arm rest cover and staples and highly disintegrated 23 year old foam.

The plastic frame was quite damaged so I didn’t want to put it back without reinforcing it a bit, so I 3d printed a 2mm thick plastic reinforcement plate and glued it on. After reinforcing the frame, I used some random packing foam I had laying around my garage and made the arm rest MUCH more plush than the old arm rest.

Overall the color is a bit off but it looks way nicer overall.

Here are some pics
4runner Arm Rest Repair - Album on Imgur
 
installed white dash leds (but my fuel light won't turn off so if anyone sees this help lmao) and i moved my ECT and rear window switches to the left of the steering wheel per the 99+ cc mod


Sent from my iPhone using Tapatalk
 
Pinch weld mod, OME 890's in the rear and raised the king coilovers to match.

Still savin up to replace the rear shock as well... hopefully they can wait until i finish the slew of maintenance that i need to get done >_<
 
I finally found my Manual Hubs in one of the local yards!! I also grabbed a spare OEM CV for my current rig until this heat breaks and I can install these new hubs.


Just looking at some of the other parts I am going to need. From my local dealer, bearings are $95 each, but found this ebay listing for 2 for ~130, appear to be Koyo bearings, is this $60 delta just savings of not having the toyo box and the way I should go? Ebay 2X Koyo front bearings

Personally, I would go with the dealer. Far too many clones on eBay and I have found that out the hard way (multiple times).
Check with Olathe Toyota or McGeorge Toyota to see what they can offer. Their prices are better than Camelback, even with shipping.
 
Status
Not open for further replies.

Members online

No members online now.

Forum statistics

Threads
278,316
Messages
3,554,120
Members
248,016
Latest member
Advally Service

Trending content

Back
Top