What Did You Do To Your 3rd Gen Today?

Status
Not open for further replies.
We have these on my bike forums and didnt find one here with the search. So lets get this started. As the title states, what did you do to it today?

Replaced factory coil springs with OME 861 coils & put on 4XInnovations Dom sliders. It's so nice not to have Carolina Squat in TN lol.
 
Today I 3D printed a threaded oil funnel. I am not sure how I have functioned without this prior to today.

I am very willing to buy one of these if anyone has one for sale or knows a part number. I didn't see one readily available for the 5ZFE engine anywhere online.

Seems like this would make filling a lot faster. Which would help me a lot since I live in an area that's basically urban and have to stealth oil changes.
 
Sold the wifes 2018 commuter (hadn't moved in a month, neither of us really cared for it, good pricing on used cars...) so she's transitioned into the 4runner as her "main" commuter. Addressing a couple issues;

Replaced the Throttle Body mostly because the IAC valve was causing hot idle stalls. Price was only about $80 more for the complete TB than the IAC, worth the money to just eliminate everything there from being an issue for awhile (plus, functional spare):

E9H3KGV.jpg


And replaced the panhard bushings, which I'd overlooked/missed when I did all the Rest of the bushings last year. Trying to correct a disconnected feeling between where the body feels like it's moving and where the eyes say it's moving. Only really happens at speed in corners, but for the low cost and simplicity of replacing, it's a no-brainer;

3Dvql54.jpg


Only thing left are new tires, which are on order. Opted for the Continental TerrainContact A/Ts in stock sizing.

 
Sold the wifes 2018 commuter (hadn't moved in a month, neither of us really cared for it, good pricing on used cars...) so she's transitioned into the 4runner as her "main" commuter. Addressing a couple issues;

Replaced the Throttle Body mostly because the IAC valve was causing hot idle stalls. Price was only about $80 more for the complete TB than the IAC, worth the money to just eliminate everything there from being an issue for awhile (plus, functional spare):

E9H3KGV.jpg


And replaced the panhard bushings, which I'd overlooked/missed when I did all the Rest of the bushings last year. Trying to correct a disconnected feeling between where the body feels like it's moving and where the eyes say it's moving. Only really happens at speed in corners, but for the low cost and simplicity of replacing, it's a no-brainer;

3Dvql54.jpg


Only thing left are new tires, which are on order. Opted for the Continental TerrainContact A/Ts in stock sizing.

How was it replacing the panhard bushings?

I've replaced all the front suspension bushings with either new OEM or poly over the years, but all the rear links are still the original bushings. They don't seem to give any issues, but they do have nearly 280k miles on them...
 
on my 97 the sunroof/map lights wire plug just plugged right in to my connector, I think the 99+ has a different connector, see if you can snag a 96-98 connector at a junk yard.

I had issues figuring out the female connector for the outside air temp sensor, but found a small number on the sensor male connector and it help me track down the corresponding female connector.

I fuggered it out.

The connector is a 10 pin Sumitomo unsealed TS series. Unfortunately, you gotta buy like 50 at a time so, I just bought a 10pin sealed atv connector on ebay, already pigtailed
 
How was it replacing the panhard bushings?

I've replaced all the front suspension bushings with either new OEM or poly over the years, but all the rear links are still the original bushings. They don't seem to give any issues, but they do have nearly 280k miles on them...

Unbelievably easy. Probably the easiest of them all, R&R of the panhard bar was as simple as possible (I did drop the spare for room), bushings Looked okay, but had a good bit of flex when I levered against a screwdriver in a vise. Typical removal with a press (smaller socket on one side, larger on the other), no heat, they weren't particularly stuck. Whitelines went back in with simple hand pressure and fit back into the brackets just firmly enough that you could adjust up/down with a firm hit with a hand. 4runner just sat on it's own 4 wheels for this job, no lift/jacks/stands needed.

The rear links I think were similarly easy Except for the R&R. The axle likes to move on you, so you have to force it back into position (use a come-along, I destroyed the ratchet on a ratchet strap). I doubled my misery by pulling both upper and lower on the same side at the same time. Couldn't get one on the drivers side back in till I removed the Shocks (which I replaced at the same time). Glad I had a lift to do that job.

It's not the miles that's the killer with these, it's the Age. I'm only at 204k miles, and all the bushings I've touched have been trashed (control arms especially). I really don't want to do the body bushings, but I know it'd be beneficial.
 
Just replaced the factory downstream o2 sensor (post cat) on my ‘01. Pretty sure it hadn’t ever been changed. Pics on on my IG (I can never upload pics here!)
Bought Denso p/n 234-4261. Came with the crush washer attached to the sensor already as well as some Denso branded loctite. Hopefully this will rid that pesky P0420! Fingers crossed. Mileage: 304, 142
 
Auto shifter bushings. Used the RamonOrtiz55 write-up and the Timmy video as guides:

RO Write-Up
Loose Shifter? - Replace your shifter bushings! - Write up with pictures

TTT Video
Auto Trans Shifter Bushing Replacement & Transfer Case Shifter Seat Replacement (3rd Gen 4runner) - YouTube

Here's the part. Quantity is 4.
9038511003 - Bush. For control shaft; for floor shift control shaft; for shift lever - Genuine Toyota Part

Bushing Parts #s: 9038511003 (Supersession: 90385-11003)

Not a hard job, but my center console bottom was so dirty that the two bolts at the bottom of it were hidden under a pile of crap. Left them in, no problem. Removing the center console is not essential although it may make the job easier. Removing the cupholder is essential however, in order to access the two 10mm bolts at the rear of the shifter assembly.

Now the result of this repair is amazing! Going from zero bushings to 4 bushings means no more play in the shifter, and it feels like new! I highly recommend this repair!
 
Last edited:
Rear Brakes

OEM shoes with a Dorman hardware kit for good measure. Drums were smooth. I hadn't lined someone up to resurface them so I cleaned them up and reinstalled. Feels like the whole car is stopping now, not just the front.

I noticed after a test drive around the block three times that the left drum had some heat to it. Not so hot I couldn't leave my hand on it but as it had never occurred to me to touch the drums after driving I have nothing to compare it to. Well, it was hotter than the right side. I think I was able to push the adjuster lever out of the way and loosen up the star wheel a bit. After a longer test drive it felt less hot. But the right felt a bit hotter. Heat on both sides was eneven. It doesn't affect my speed while coasting. I'm thinking it'll work itself out and there's nothing to worry about but figured I'd mention it, just in case. Maybe I'll take the wheel off in the morning, loosen the star wheel and adjust it with the parking brake. Part of me needs to see that star wheel move.
 
I am very willing to buy one of these if anyone has one for sale or knows a part number. I didn't see one readily available for the 5ZFE engine anywhere online.

Seems like this would make filling a lot faster. Which would help me a lot since I live in an area that's basically urban and have to stealth oil changes.

Almost all Toyota motors have the same threading on the valve cover for the oil filler cap and screw-in filler funnels are available online from all the global whores.

For urban oil changes, I recommend attaching a length of hose to one of these Japanese Fumoto valves and enjoy an oil drain with a flip of a lever into your receptacle of choice. While OEM filters are rightfully beloved, you can also get a multi use (They CLAIM 20,000 miles) K&N or other brand and really crank out a stealth oil change without spilling a drop (3 of every 4 times. anyway - filter swap mess is for another post). The K&N filters ( scroll down) cost $14 but last long enough to make the cost a wash and are made in the USA. Finally, to end this unintentional sales pitch, the white K&N filters have a welded hex nut so you can remove them with all manner of common wrenches. I don't even use them much - just throwing it out there....
 
Last edited:
Started on my fun Labor Day weekend project. Thanks to [MENTION=148218]JZiggy[/MENTION] for inspiring me, I copied his lift precisely :).

umts2cE.jpg


More than happy to replace the KYB's I put in less than a year ago, which were already rusting in CA weather:

ULUZeIL.jpg
 
Auto shifter bushings. Used the RamonOrtiz55 write-up and the Timmy video as guides:

RO Write-Up
Loose Shifter? - Replace your shifter bushings! - Write up with pictures

TTT Video
Auto Trans Shifter Bushing Replacement & Transfer Case Shifter Seat Replacement (3rd Gen 4runner) - YouTube

Here's the part. Quantity is 4.
9038511003 - Bush. For control shaft; for floor shift control shaft; for shift lever - Genuine Toyota Part

Bushing Parts #s: 9038511003 (Supersession: 90385-11003)

Not a hard job, but my center console bottom was so dirty that the two bolts at the bottom of it were hidden under a pile of crap. Left them in, no problem. Removing the center console is not essential although it may make the job easier. Removing the cupholder is essential however, in order to access the two 10mm bolts at the rear of the shifter assembly.

Now the result of this repair is amazing! Going from zero bushings to 4 bushings means no more play in the shifter, and it feels like new! I highly recommend this repair!

I’ve had new bushings in my tool box for a while now, just awaiting a good opportunity to replace them. I tried doing it earlier in the summer with some crappy Amazon bushings I bought. Boy was that a mistake. Ended up putting it back together without bushings, went to Toyota and bought oem ones. Cannot wait to get it done though!
 
Just replaced the factory downstream o2 sensor (post cat) on my ‘01. Pretty sure it hadn’t ever been changed. Pics on on my IG (I can never upload pics here!)
Bought Denso p/n 234-4261. Came with the crush washer attached to the sensor already as well as some Denso branded loctite. Hopefully this will rid that pesky P0420! Fingers crossed. Mileage: 304, 142

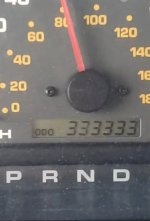
The elite 300k club
 
Hit the angel number 333,333 a couple days ago.:flypig:
 

Attachments

  • 20210906_144204.jpg
    20210906_144204.jpg
    103.9 KB · Views: 355
  • 20210906_144344.jpg
    20210906_144344.jpg
    115.2 KB · Views: 348
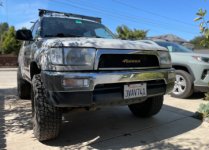
Finished up my satoshi mod...took me way too long, but am pleased with how it turned out! Going to replace the rest of my badges with the gold ones I picked out of the junkyard. Probably will remove the back '4Runner' one, perhaps put the small Toyota logo centered on the license plate molding instead.
 

Attachments

  • Screen Shot 2021-09-06 at 6.29 1.jpg
    Screen Shot 2021-09-06 at 6.29 1.jpg
    117.7 KB · Views: 338
got all the seat bolt covers i needed, fixed my rear window, passenger taillight, clock, got a spoiler and rear cargo panel all for the sweet total of 40$. money well spent.


Sent from my iPhone using Tapatalk
 
Last edited:
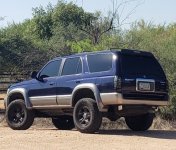
Installed the Dobinson lift and JBA UCAs, so much bling!

XeLm8Kp.jpg


Also decided to spruce up my flat black Pro Comp wheels. After trying a few colors, I like the Rustoleum Hammered Gray, that looks like a keeper.

Before:

Wlojswg.jpg


After:

KSzQ6XJ.jpg


Still need to figure something out for centercaps.
 
Status
Not open for further replies.

Members online

Forum statistics

Threads
278,316
Messages
3,554,120
Members
248,016
Latest member
Advally Service

Trending content

Back
Top