What Did You Do To Your 3rd Gen Today?

Status
Not open for further replies.
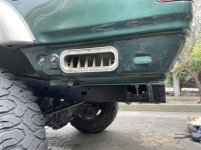
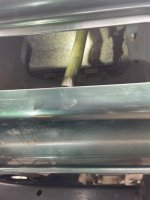
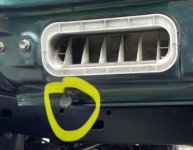
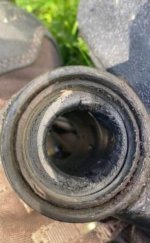
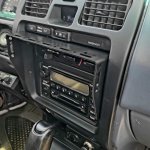
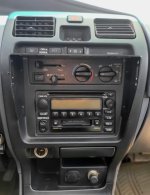
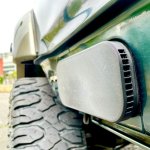
Finally got around to installing the 4CE cabin pressure/filter port out back. Inside (3rd pic) is another nasty dust-infested filter material that I really should have tried to vacuum out or something but didn't have a way to do that so i beat it for a while and wiped the area clean.
 

Attachments

  • 4CE1.jpg
    4CE1.jpg
    128 KB · Views: 257
  • 4CE2.jpg
    4CE2.jpg
    133 KB · Views: 263
  • 4CE4.jpg
    4CE4.jpg
    124.8 KB · Views: 256
Looks interesting. Where does your sunroof drain empty to now?

Good question. If that's what the clear tube did maybe I can can extend it and route it out the mystery plug hole in yellow below. I have my sunroof silicone'd shut currently, so hopefully it doesn't drink much. The clear tube was clipped to the OEM insert in the earlier pic and didn't appear to be going anywhere. Did I disconnect it from something? I'm not putting the stock bumper back on so I can access the internals easily.
 

Attachments

  • vent.jpg
    vent.jpg
    21.6 KB · Views: 251
Last edited:
Flushed power steering fluid, removed and cleaned reservoir. Cleaned MAF sensor.

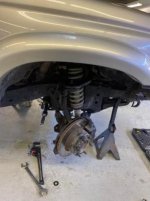
Went for a test drive and I think I heard the front right wheel bearing going out. That's precisely why I don't go to the doctor.

dIaRVAD.jpg
 
Good question. If that's what the clear tube did maybe I can can extend it and route it out the mystery plug hole in yellow below. I have my sunroof silicone'd shut currently, so hopefully it doesn't drink much. The clear tube was clipped to the OEM insert in the earlier pic and didn't appear to be going anywhere. Did I disconnect it from something? I'm not putting the stock bumper back on so I can access the internals easily.

Yep, that's one of the sunroof drains. It runs from the left rear corner of the sunroof to the vent it was clipped into. Just don't pull on it too much, it's got a wimpy spring clamp holding it to the sunroof.
The drain on the right side pokes through a hole in the body, above the tailpipe and under the rear cargo storage. Much like what you're thinking with Mr. Mystery plug.
 
Replaced my ITREs+OTREs, also decided to do my passenger side UCA. ITREs were in decent shape but the rest was shot! Decided to grab my tools and do it myself and save some cash! Not as bad of a job as I thought; replaced with new OEM parts
 

Attachments

  • Screen Shot 2022-07-04 at 11.07.55 PM.jpg
    Screen Shot 2022-07-04 at 11.07.55 PM.jpg
    25 KB · Views: 216
  • Screen Shot 2022-07-04 at 11.08.02 PM.jpg
    Screen Shot 2022-07-04 at 11.08.02 PM.jpg
    25 KB · Views: 219
Pulled the ARB bumper off my two-wheel drive, going to be listing it for sale

Decided to clean up the stock bumper before selling the truck, not really sure why LOL

My clutch started slipping so I started researching replacements. Ordered a timken throw out bearing since every kit that I've seen everybody complains about the bearings


Sent from my Pixel 4 XL using Tapatalk
 
Pulled the ARB bumper off my two-wheel drive, going to be listing it for sale

Decided to clean up the stock bumper before selling the truck, not really sure why LOL

My clutch started slipping so I started researching replacements. Ordered a timken throw out bearing since every kit that I've seen everybody complains about the bearings


Sent from my Pixel 4 XL using Tapatalk
I'll be ordering the pro clutch/flywheel bundle from LC Engineering in a couple months. 5VZ 10" Pro Clutch + Flywheel Bundle Kit They do have just the clutch kit without the flywheel.
 
After installing the driver side manual hub on Saturday, spent Sunday installing the passenger side. And replaced the split steering rack boot with a rubber one that's (just barely) stretchy enough to fit over the outer tie rod end so no disassembly/potential realignment needed.

And replaced both sway bar links, the passenger side has been loose for a while and making random pops and clunks (WHAT WAS THAT?). It fell right apart at the socket when I put a wrench on it and twisted it.

After that I replaced the oil in the 'new' transfer case and the NWF Eco-crawler doubler case. I've put about 500 miles of driving on it after the install. Oil still looked pretty good coming out, I put Redline 75-90 gear oil back in. And while I was at it, and the belly armor was still off, replaced the trans oil with Redline MT-90, and changed the engine oil. I have a Fumoto valve on the engine, but it's always a struggle to reach in over the skid and fit the drain hose on.

And then I put the belly armor back on again. Ready for our summer Colorado/Utah trip.

I still need to get the coilover wrenches out and raise the front suspension an inch or so. I had them set just short of CV shaft destroying height (where the ribs start rubbing on each other even when going straight). Not a concern with the manual hubs any more.
 
Decided to celebrate my continued recovery from Covid in the past few days by finally installing the TrakMotive TO-8043ET extended travel axles I picked up a few weeks ago:

DzO7amn.jpg


Quite a bit beefier than OEM:

fKdkzYg.jpg


Also replaced the axle seals while I was at it:

wDjncNs.jpg


VZpYAm1.jpg


MJOtpOE.jpg


The passenger side axle popped in just by pushing on it. The driver side was giving me trouble to the point that I started wishing for a friend (hard to come by when you're still Covid positive). Even pounding on it with a 5 lb dead blow didn't do it, because you really need a third hand for that. Then I thought of a trick that I have never seen mentioned (maybe I just didn't see it), which worked like a charm, and the axle popped right in. I wish I had taken photos.

While at it, I noticed some oil under the hub cap on the driver side. I'm guessing that must be bearing oil, which I guess means the bearing is no longer sealed, so time for a new bearing soon?

Y5BmTSs.jpg
 
The passenger side axle popped in just by pushing on it. The driver side was giving me trouble to the point that I started wishing for a friend (hard to come by when you're still Covid positive). Even pounding on it with a 5 lb dead blow didn't do it, because you really need a third hand for that. Then I thought of a trick that I have never seen mentioned (maybe I just didn't see it), which worked like a charm, and the axle popped right in. I wish I had taken photos.

What was the trick to installing the seal?

Thanks for those PNs!

Sent from my Pixel 4 XL using Tapatalk
 
What was the trick to installing the seal?

Thanks for those PNs!

The trick wasn't for the seals, but for popping the axles in. I used a long crow bar (the same one I needed to pry the axle out).

I loosely installed the axle in the differential, until I could feel that the splines were lined up. Then I took the crow bar, pushed one end against the ground, with the middle portion bearing on the flat of the outer CV joint. Then I simply pushed in on top of the crow bar, and the axle popped in with hardly any resistance.

Leverage is your friend!

Here is a crude sketch:

QQWHG7k.png
 
The trick wasn't for the seals, but for popping the axles in. I used a long crow bar (the same one I needed to pry the axle out).


I loosely installed the axle in the differential, until I could feel that the splines were lined up. Then I took the crow bar, pushed one end against the ground, with the middle portion bearing on the flat of the outer CV joint. Then I simply pushed in on top of the crow bar, and the axle popped in with hardly any resistance.


Leverage is your friend!


Here is a crude sketch:


QQWHG7k.png
Gotcha. Clever monkey

I've had no issue hammering them in.

I'd like to see your next trick for pulling them out lol

Sent from my Pixel 4 XL using Tapatalk
 
What was the trick to installing the seal?

In my case was able to use my oil filter cap wrench to knock the seal in, the time before I was able to use the old dust shield, but this time it was a new style seal. Froze it and tapped it in place.
BnTtCCw.jpg


hhaa8Vd.jpg


that was 2 years ago, so far so dry.

...I'd like to see your next trick for pulling them out lol

Oooh, I'm seeing what you're saying. Let's cross fingers the beef and boots means he never has to find out,
and, if he does...
:snacker:


Nothing too exciting over this way. A little tiny 20 watt gmrs radio went in, coax and antenna pending, along with reinstall of interior trim,
put the rear skid on after talking to it with the sledge hammer and re-painting it.
Still trying to catch up on all the things that got away from me during the school year of craziness.

Indoors now, 98 degrees with a heat index of 110. It's a wet heat.

C9QIGJq.jpg
 
Last edited:
In my case was able to use my oil filter cap wrench to knock the seal in, the time before I was able to use the old dust shield, but this time it was a new style seal. Froze it and tapped it in place.

that was 2 years ago, so far so dry.

Nice. I'll be doing mine on the truck tho. I might use a pipe to drive it in so I can keep it straight at a distance.


Oooh, I'm seeing what you're saying. Let's cross fingers the beef and boots means he never has to find out,
and, if he does...
:snacker:

I pulled one as a test. Without the trilobe cup to pry against it's a challenge not to bend the dust seal ring on the half shaft.


Indoors now, 98 degrees with a heat index of 110. It's a wet heat.

C9QIGJq.jpg

Wet heat is best for meat, not humans. Sounds like you're cooking low and slow lol

So you found your HAM forever home?


Sent from my Pixel 4 XL using Tapatalk
 
Nice. I'll be doing mine on the truck tho. I might use a pipe to drive it in so I can keep it straight at a distance.
Did the oil pan seal + arb locker, took advantage of the bench time. :)
If it helps the advantage of that particular cap wrench is the lip being thick enough to contact both the seal and, when it was in the right spot, the lip in the tube. Surely a pipe can do the trick, maybe something pvc-like?

Wet heat is best for meat, not humans. Sounds like you're cooking low and slow lol

So you found your HAM forever home?
Doing as much as I can outside before the sun gets me, lucky me gets to go into the a/c and pop out only as needed- whack-a-mole style. I have a lot to do indoors, but somehow keep ending up...here.

I ended up with an Anytone AT-779u/v gmrs. We have the license and it mostly fits the bill for what we do. Still want to take the ham test, it's offered pretty often around here. Mostly for the because can. May have to get one of those inreach dealies to (hopefully never) use for medical emergencies, we're gettin' kinda old.

Heh, today me and the kid used our old Uniden frs/gmrs handhelds to communicate between the basement and the garage. Needed to figure out which poorly marked circuit breaker the garage door opener of stuckedness uses and didn't want to run up and down stairs a bunch. Worked pretty good.
 
Last edited:
Oh yeah, that's another thing I got done on my '99. Pulled out the mini-CB that rarely worked well, and even when working was full of static, buzzes, hisses, short range, etc. And installed an Anytone 779UV mini GMRS. About as easy of an install as possible. It was a tiny bit wider than the mini CB, so I had to dremel on the dash bezel for a bit (it's where the ashtray was) and in it went. And I used the same antenna cable as the CB used, going to a bracket on the rear of the truck, just to the side of the hatch. I had to drill out the mount a modest amount, and installed a GMRS antenna.

Tested it out with a handheld FRS radio and even with the motor running, and the A/C fan running (things that would cause noise on the CB) it was crystal clear. Range should be dramatically better as well, the 779UV puts out 20 watts on some channels. I'm not sure what the CB transmit wattage was, 4?

The 779UV can be used in 'easy' mode (1-30 GMRS channels), but you can also get into programming it via a PC app and do more sophisticated things with it. For example, programming in other channels outside the GMRS frequencies. I guess legally speaking you shouldn't ever transmit on them, but for example the GMRS setup also brings in the weather radio channels as receive only channels.

It was a bit confusing when I first powered it up, it seemed to be setup as a dual band Ham radio. Cycling through VHF and UHF frequencies, but not the GMRS range. Habanero looked up online and found you need to do a hardware 'secret button' trick to access a setup menu that allows you to set it to GMRS configuration. I kind of thought that the hardware was licensed (as well as the user) for ham or GMRS usage, but... I guess with a secret setup you can sell a radio that does both?

Anyhow, high hopes for clear trouble-free communication on our trip this year.
 
Status
Not open for further replies.

Members online

Forum statistics

Threads
278,316
Messages
3,554,120
Members
248,016
Latest member
Advally Service

Trending content

Back
Top