What Did You Do To Your 3rd Gen Today?

Status
Not open for further replies.
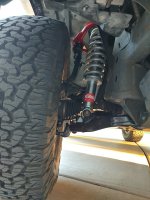
Yep, the YY/YB coils
I'm interested in hearing your thoughts and experiences with your new toytec springs in comparison to the Tundra ones. Do you have a build thread or anywhere you post about your rig?

Sent from my SM-S908U using Tapatalk
 
I'm interested in hearing your thoughts and experiences with your new toytec springs in comparison to the Tundra ones. Do you have a build thread or anywhere you post about your rig?

Sent from my SM-S908U using Tapatalk

No I don't, but I'll remember to come back and update you.
 
Figured I’d ask this here since I can’t post a new thread yet. Today I finished replacing my timing belt, water pump, etc. When I started it up for the first time, coolant started heavily leaking out of the water pump, only when the motor is running (from what I can tell at least). I know I torqued everything down, so I guess my main question is how do I know if it’s the gasket or the water pump itself? I’m mainly just trying to avoid pulling everything apart a 3rd time, so I want to make sure I take care of the leak when I pull it all apart this time. I used the kit from @%1;’s video, so it should be all OEM if that matters. From the tiny section of the water pump I could see while the engine is running, it looked like coolant was bubbling and coming out around the gasket by the thermostat, but I haven’t taken it apart yet so I’m not sure if that’s the only place. I cleaned off where the old gasket was, I also didn’t use any RTV when installing the new gasket. Should I try using that this time? Just looking for some advice on why it’s leaking, and if there’s any one time use things that I should replace after tightening it all down once (like do I still need a new crank bolt, even though it’s only been installed once and for less than a day?)


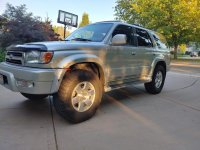
Here’s a pic of the rig:
488816c631b8923a4a5b23a309332033.jpg


Sent from my iPhone using Tapatalk
 
Figured I’d ask this here since I can’t post a new thread yet. Today I finished replacing my timing belt, water pump, etc. When I started it up for the first time, coolant started heavily leaking out of the water pump, only when the motor is running (from what I can tell at least). I know I torqued everything down, so I guess my main question is how do I know if it’s the gasket or the water pump itself? I’m mainly just trying to avoid pulling everything apart a 3rd time, so I want to make sure I take care of the leak when I pull it all apart this time. I used the kit from @%1;’s video, so it should be all OEM if that matters. From the tiny section of the water pump I could see while the engine is running, it looked like coolant was bubbling and coming out around the gasket by the thermostat, but I haven’t taken it apart yet so I’m not sure if that’s the only place. I cleaned off where the old gasket was, I also didn’t use any RTV when installing the new gasket. Should I try using that this time? Just looking for some advice on why it’s leaking, and if there’s any one time use things that I should replace after tightening it all down once (like do I still need a new crank bolt, even though it’s only been installed once and for less than a day?)

Sharp looking 4Runner! I would try renting a coolant pressure tester from autozone/advanced/o'reilly's and pressurize the system while looking for leaks. Do that before removing any timing covers/etc. You might get lucky and only have an issue with the thermostat gasket. If it's behind the timing cover then you'll need to get the timing covers off again to get a better look at where the leak is coming from. After the timing covers are off put the upper radiator hose back on and pressurize the cooling system again to find your leak. If you have to go that far I would reuse the crank bolt, but that's just me.
 
Sharp looking 4Runner! I would try renting a coolant pressure tester from autozone/advanced/o'reilly's and pressurize the system while looking for leaks. Do that before removing any timing covers/etc. You might get lucky and only have an issue with the thermostat gasket. If it's behind the timing cover then you'll need to get the timing covers off again to get a better look at where the leak is coming from. After the timing covers are off put the upper radiator hose back on and pressurize the cooling system again to find your leak. If you have to go that far I would reuse the crank bolt, but that's just me.

Thank you! If I were to pressure test the system after taking all the covers off, would I have to uninstall then reinstall and refill the radiator, or is there a way to get the timing covers off while leaving the radiator installed?

As for the thermostat gasket being the culprit, if that's the case wouldn't it be leaking from where the elbow attaches to the water pump? (and just to make sure, you're talking about the o-ring that goes around the thermostat right?) When I took a look while the engine was running it was bubbling up around the gasket between the pump and the block, which kind of leads me to think it's the gasket... :(
 
Thank you! If I were to pressure test the system after taking all the covers off, would I have to uninstall then reinstall and refill the radiator, or is there a way to get the timing covers off while leaving the radiator installed?

As for the thermostat gasket being the culprit, if that's the case wouldn't it be leaking from where the elbow attaches to the water pump? (and just to make sure, you're talking about the o-ring that goes around the thermostat right?) When I took a look while the engine was running it was bubbling up around the gasket between the pump and the block, which kind of leads me to think it's the gasket... :(
It’s been awhile since I’ve done a timing belt, but I thought you could remove the lower timing cover without removing the lower radiator hose. If you do need to remove the lower radiator hose you will have to refill the cooling system before pressure testing. The radiator shouldn’t be an issue or interfere with removing the timing covers.

I couldn’t remember how visible the water pump gasket is without having the timing covers removed.
 
Last edited:
It’s been awhile since I’ve done a timing belt, but I thought you could remove the lower timing cover without removing the lower radiator hose. If you do need to remove the lower radiator hose you will have to refill the cooling system before pressure testing. The radiator shouldn’t be an issue or interfere with removing the timing covers.

I couldn’t remember how visible the water pump gasket is without having the timing covers removed.


That’s really good to know! I assumed you had to remove the radiator (along with the lower coolant hose) to have enough room to pull off the fan and have enough room to do anything, but I just watched another video where the guy left it in. I only watched Tim’s video before doing it and he removes it in that so I just assumed it was required. Guess that gives me a little more confidence in being able to check it all fairly quickly. When doing it the first time it took me ~3-4 weeks between work, school, and everything else, so I was kind of dreading having to do it all again.


Sent from my iPhone using Tapatalk
 
I assumed you had to remove the radiator (along with the lower coolant hose) to have enough room to pull off the fan and have enough room to do anything, but I just watched another video where the guy left it in. I only watched Tim’s video before doing it and he removes it in that so I just assumed it was required.

The rad comes out to remove the crank bolt with an impact. Well, it gives a whole lot more room to work, which is nice too, but it's not necessary.
 
It was time at 225,000 for suspension attention. Tires were done so it made sense to go all in with upgrades while replacing.

New upper and lower CArms, Ball joints and Eibach Pro Truck level one suspension. Take-off wheels from a FJCruiser moved me up to 17", and take-off KO2's with 5k miles on them (all 5 of each).

Also got her professionally detailed so I know it got good product and mechanical polishing that I cant do. Had her since new. Limited 2000.
 

Attachments

  • 0824220746a_HDR.jpg
    0824220746a_HDR.jpg
    134.4 KB · Views: 282
  • 0824220750_HDR.jpg
    0824220750_HDR.jpg
    132.8 KB · Views: 283
I know..right? i literally hack sawed a piece of muffler stock to perform this mod on a previous 3rd gen..i gotta its really nice and the price isnt bad..
 
I'm interested in hearing your thoughts and experiences with your new toytec springs in comparison to the Tundra ones. Do you have a build thread or anywhere you post about your rig?

Sent from my SM-S908U using Tapatalk

So I just put the coils in this weekend and I can already tell you they're MUCH better than the Tundra coils, they're noticeably smoother for sure. With Tundra 5100s, the Toytec coils on perch 2/5 will give the same height as the Tundra coils on perch 3/5, or just about the same - I think i may have lost a tiny bit of lift, but it can always be moved up one perch higher unlike the Tundra coils. So right now about a 23.5" hub-to-fender measurement including the 1/4in top plate spacer. I imagine using the Toytec coils on perch 3/5 would give you upward of 3.5" of lift or more, and would require limit straps, SPC UCAs and possibly extended CVs from Napa, but I'm probably gonna do it anyways next weekend. I have 2in of rake that I can't stand to look at anymore
 
Last edited:
So I just put the coils in this weekend and I can already tell you they're MUCH better than the Tundra coils, they're noticeably smoother for sure. With Tundra 5100s, the Toytec coils on perch 2/5 will give the same height as the Tundra coils on perch 3/5, or just about the same - I think i may have lost a tiny bit of lift, but it can always be moved up one perch higher unlike the Tundra coils. So right now about a 23.5" hub-to-fender measurement including the 1/4in top plate spacer. I imagine using the Toytec coils on perch 3/5 would give you upward of 3.5" of lift or more, and would require limit straps, SPC UCAs and possibly extended CVs from Napa, but I'm probably gonna do it anyways next weekend. I have 2in of rake that I can't stand to look at anymore

This is good info, thanks for the update. I will happily trade .5-1" of lift for a better overall experience. Glad to hear they're operating much smoother than your Tundra setup. I've had the Tundra 5100's/springs for about 103K miles now and I'm wondering if it's time for a front end refresher soon. I've got the Napa heavy duty CV's but it's just a pain to have them rip. I wouldn't want to risk that again by increasing any more lift height than I already have. So far the CV's have been great to my truck and I honestly love them.

As far as the rake goes, I'd love to see a photo. I personally like the rake. I remember when I first installed my Sonoran Steel 1.2 setup and the rake was insane. Even after it settled it was still very noticeable. Nowadays it sits almost completely level, although I can tell it's still higher in the back when I try to step into the truck from the rear doors. The aspect I like most about the rake is that, even with my setup having 103K miles on it, it doesn't sag. It just sits level. And I'd rather have that than the ugly rear end sag like most of these trucks have (with OEM setups of course)
 
This is good info, thanks for the update. I will happily trade .5-1" of lift for a better overall experience.

So try dropping the clip 1 position. This is only setting spring preload (how much weight is needed before it moves), more preload means more weight needed.... it all devolves into theory from here (I deleted it, boring to anyone not specifically looking for it). The short and sweet of it is that less preload on ANY appropriate spring will yield a smoother ride. Or, you can toss some more weight on the front end, it has the same over all effect as far as the preload is concerned (but you might introduce wallowing under heaving braking, really depends on the spring rate).

Hate that there isn't a better source for springs, where you can pick the rate and length independently. That way you could dial in both the preload that's right for the weight of the vehicle AND the ride height you desire ~ it'd be the best possible solution. Well, or making the shock body itself length adjustable (this is the norm for motorcycles, which is my particular avenue of expertise).
 
Yeah I agree with Brian, if you don't mind taking a little dip and are riding on the 3rd perch I would suggest lowering the clip one position and seeing how you like it, maybe throw in a top plate spacer if need be
 
Status
Not open for further replies.

Members online

Forum statistics

Threads
278,316
Messages
3,554,120
Members
248,016
Latest member
Advally Service

Trending content

Back
Top