What Did You Do To Your 3rd Gen Today?

Status
Not open for further replies.
...So I plugged in my old motor, which worked on disassembly (I locked it to make removing it easier). And.... it was dead too?

Habanero was nice enough to unplug her locker and test out both of these actuators on her truck, and, neither one worked properly there either? But her locker did. Curiouser and curiouser.

So I took the wiring harness (the wiring from the locker to the body, and a pigtail of the car wiring to that) and stripped the two motor power wires, and tried that on a battery, alternating positive and negative terminals. And both motors worked normally and properly. ??? Hab? Your wiring might have an issue?
Agree, the culprit to my troubles with intermittent/slow rear locker on our last Utah/Colorado trip seems to be that little bit of wiring. So your locker win is sorta my locker win too. :thumb:

Putting the testing and likely repair or replace of it on the Truck Too Much To-Do List.

EDIT: Tested the bad harness for continuity, found none between the connectors on one of the power wires. I next removed the hard outer sheathing, kept testing down the wire until I found where continuity stopped. After carefully stripping the wire I found the break midway between the connectors. Will check mine when I can, am expecting something similar.
d5J0SVOm.jpg
 
Last edited:
Take a look at the rear suspension and see how bad my coils are sagging if they are. Mentally preparing for some sort of lift. I have a set of 285/75r/16 Goodyear wrangler mtrs on my Silverado that has needed work for a while (the reason I got my 4runner) and now I can only pay attention to my 4r. Anyways they're basically new and I look at them ever day thinking how good would they look on the runner. Moneys tight until peak season at work and was wondering if the "33s" would fit if I did a 2 inch spacer lift front and rear. My buddy had good luck with it and wheels his Tacoma with the spacer lift. He only runs 265/70r/16 though. I know I'll have to grind the pinch weld off at least but does anyone know if they would fit with 2" strut spapers?
 
Take a look at the rear suspension and see how bad my coils are sagging if they are. Mentally preparing for some sort of lift. I have a set of 285/75r/16 Goodyear wrangler mtrs on my Silverado that has needed work for a while (the reason I got my 4runner) and now I can only pay attention to my 4r. Anyways they're basically new and I look at them ever day thinking how good would they look on the runner. Moneys tight until peak season at work and was wondering if the "33s" would fit if I did a 2 inch spacer lift front and rear. My buddy had good luck with it and wheels his Tacoma with the spacer lift. He only runs 265/70r/16 though. I know I'll have to grind the pinch weld off at least but does anyone know if they would fit with 2" strut spapers?

I really wouldn't recommend wheeling with spacer lifts. It will work, but not great. The ride will be pretty harsh and it wears out other components faster. Just wait until money isn't tight and have at it. For the rear 80 series LC front coils and rear shocks do fantastic on a budget, really not much more than a spacer lift would be especially if you can find the coils for free like I did. For the front you are not going to be able to get by that cheap but it's worth it in the end. I know most people on here really like Billsteins for the front but I've been extremely pleased with my OME Nitrochargers. Had to spend a good amount on them but not as much as fancier coilovers. Some people call them harsh but I think they are firm, frankly the rear 80 series setup is closer to harsh and I don't even call it that. Depends on if you want your truck to feel like a boat or if you want it to feel planted.

Also as far as fitting bigger wheels, remember with IFS especially lift really doesn't make them fit better in any scenario besides on the street. You really should be concerned with how they fit with suspension compressed in which case a lift really doesn't make a difference.
 
Last edited:
Transmission Cooler

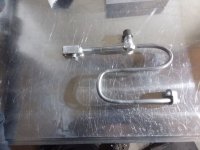
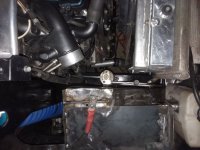
Went with the B&M 70264, in series, return at top. Already had a temp sensor on the send line and a Magnefine on the return. Kept the Magnefine between the radiator and the cooler.

Not as pretty as some but it should get the job done. Now I need to remount that horn. Should look into an upgraded horn while I"m at it.


XXLZUhy.jpg
 
Transmission Cooler

Went with the B&M 70264, in series, return at top. Already had a temp sensor on the send line and a Magnefine on the return. Kept the Magnefine between the radiator and the cooler.

Not as pretty as some but it should get the job done. Now I need to remount that horn. Should look into an upgraded horn while I"m at it.


XXLZUhy.jpg

If you do get a new horn there is only one acceptable choice.
sddefault.jpg
 
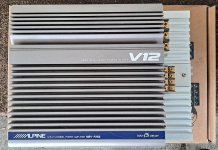
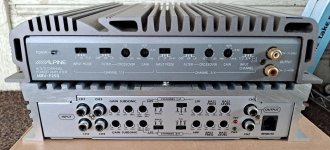
Installed a new Ampere Audio AA-75.4 4x channel amp to replace a 30 year old Alpine MRV-F250 4x channel amp. Went from 4x25w to 4x75w. I was also running the Alpine amp in 2-channel bridged mode to power just the front speakers with 80w/channel while powering the rear door speakers with the Kenwood deck. I got my amp on close-out from down4sound.com. With all the extra power available, the system is cleaner and clearer. It's a really nice sounding amp with more than 75w/ch available, at least according to my 'Scope. I ended up with about 105w/ch. Also, the extra power to the rear speakers adds more punchy mid-bass to the system, which is nice. I had to adjust the subwoofer amp gain to compensate, but there was headroom available there.
 

Attachments

  • Amps Comparo.jpg
    Amps Comparo.jpg
    143.4 KB · Views: 177
  • Control Panels.jpg
    Control Panels.jpg
    130.1 KB · Views: 178
20230422_1653177.jpg20230422_1653255.jpg
20230423_1457599.jpg20230423_1505477.jpg
 

Attachments

  • 20230422_1653177.jpg
    20230422_1653177.jpg
    46.1 KB · Views: 174
  • 20230422_1653255.jpg
    20230422_1653255.jpg
    47.3 KB · Views: 178
  • 20230423_1457599.jpg
    20230423_1457599.jpg
    50.6 KB · Views: 173
  • 20230423_1505477.jpg
    20230423_1505477.jpg
    80.8 KB · Views: 172
Transmission Cooler

Went with the B&M 70264, in series, return at top. Already had a temp sensor on the send line and a Magnefine on the return. Kept the Magnefine between the radiator and the cooler.

Not as pretty as some but it should get the job done. Now I need to remount that horn. Should look into an upgraded horn while I"m at it.


XXLZUhy.jpg

A while back I upgraded to 4th gen horns and am very happy with it. Much less wimpy sound, much louder and pretty damn cheap if I recall. Connectors are the same so they plug right in
 
A while back I upgraded to 4th gen horns and am very happy with it. Much less wimpy sound, much louder and pretty damn cheap if I recall. Connectors are the same so they plug right in

Thanks, I'll look into that. I switched to the FIAMMs a while back and they're good but for some reason I have an urge to try something new. Been looking at the Hella Sharp/Stark. Have to do something while I wait for other parts from Amayama!
 
I made more work for myself

I was doing my valve cover gaskets and I dropped plastic bits under the camshaft on the drivers side.

I followed Tim's video, but the tape wasn't good enough for how brittle my wiring harness was. It disintegrated. Oh well. Right now my plan is to wrap the wire in silicone rescue tape and then a wire loom. But before that I need to make sure all the plastic parts are out. Here is a picture of the exhaust cam on the drivers side. I couldn't get the picture to focus on the plastic, but it's in the red circle, and it's pretty far down there. I don't own tweezers that are 5+ inches long.

2023-04-24_04-01-42 by Jeff Burt, on Flickr

I'm thinking that the best way to go is probably to pull the exhaust camshaft to remove any plastic parts. It's not connected to the timing belt. I'm positive it won't be a ton of fun, and I would need to pay special attention to the position of the cam when reinstalling. Any thoughts on this?

 
I was doing my valve cover gaskets and I dropped plastic bits under the camshaft on the drivers side.....
Any thoughts on this?

Shop vac with a straw taped to the business end? One of those flexible remote grabber things? A thin wire with something sticky wrapped around the end (in a way that you don't then also have to figure out how to remove a sticky thing from there too)?
 
I was doing my valve cover gaskets and I dropped plastic bits under the camshaft on the drivers side.

I followed Tim's video, but the tape wasn't good enough for how brittle my wiring harness was. It disintegrated. Oh well. Right now my plan is to wrap the wire in silicone rescue tape and then a wire loom. But before that I need to make sure all the plastic parts are out. Here is a picture of the exhaust cam on the drivers side. I couldn't get the picture to focus on the plastic, but it's in the red circle, and it's pretty far down there. I don't own tweezers that are 5+ inches long.

2023-04-24_04-01-42 by Jeff Burt, on Flickr

I'm thinking that the best way to go is probably to pull the exhaust camshaft to remove any plastic parts. It's not connected to the timing belt. I'm positive it won't be a ton of fun, and I would need to pay special attention to the position of the cam when reinstalling. Any thoughts on this?

Remember you can put a bolt in that split gear to keep the spring in it loaded so that your timing is right when you put it back in and align it to the intake cam.
 
I was doing my valve cover gaskets and I dropped plastic bits under the camshaft on the drivers side.

I followed Tim's video, but the tape wasn't good enough for how brittle my wiring harness was. It disintegrated. Oh well. Right now my plan is to wrap the wire in silicone rescue tape and then a wire loom. But before that I need to make sure all the plastic parts are out. Here is a picture of the exhaust cam on the drivers side. I couldn't get the picture to focus on the plastic, but it's in the red circle, and it's pretty far down there. I don't own tweezers that are 5+ inches long.

2023-04-24_04-01-42 by Jeff Burt, on Flickr

I'm thinking that the best way to go is probably to pull the exhaust camshaft to remove any plastic parts. It's not connected to the timing belt. I'm positive it won't be a ton of fun, and I would need to pay special attention to the position of the cam when reinstalling. Any thoughts on this?

Try dipping ur screwdriver in bearing grease and stick said to the plastic bits and remove said. unless the pieces r large I wouldn't spend to much time trying to remove said, they will work themselves into the oil pan and most if not all will be removed next oil change. Unless u have to I wouldn't pull the cam shafts.
 
Finally got CAT data ready for smog.

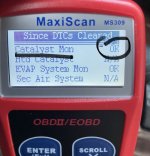
A small but important victory as my reg expires in 3 days. Maybe this will help someone in the future. First like a dumbass, I lost all my good and complete emissions data installing a set of fogs a month ago and had all the data quickly re-acquired except for the Cat. I had tried every Toyota Drive Pattern scheme to set the data but it wasn't happening after 1000+ miles and I was getting worried. Then, I killed by battery by leaving the new fogs switched on for a day and a half while not driving it (the Baja Designs lens covers are light-proof and the little led on the Camry switch is dim). Had to throw the battery on the charger and 2 weeks later it still wasn't setting Cat data. I popped underneath before another road trip last weekend and cranked on all the connector bolts on the MF cat-back exhaust and the data set the next day. Got smogged today. I am pretty sure the downstream O2 sensor is a rather sensitive unit and detected an issue even though it was post-cat. 2 years ago I threw a P0420 shortly after installing the exhaust system and it was resolved by cranking on the bolts for the pipe section connectors. Upside is that with the battery out I disconnected my DRL connector. My headlight bulbs will last forever now and I'm not announcing my presence everywhere I go.

Hallelujah!
 

Attachments

  • SMOGGGGG.jpg
    SMOGGGGG.jpg
    87 KB · Views: 220
Last edited:
Pissed me Off

My Mechanic is @ a loss with my 1997 Toyota 4Runner, 289,000 miles

New here; I need some help, please. I have taken my Runner to the dealership for service, and they "can't recreate the problem," and the videos don't tell them anything because she isn't throwing any codes.
So it's left to me and my research; I am at a loss, and so is my mechanic.
I have spent over $3,000 trying to fix it.

Problem #1: Normally, she will cold-start just fine. However, if I drive her for 30 minutes, and put her in park, she will rev up to 2-3000 rpms. Sometimes, she will come down, sometimes not. If I put her in gear, she'll drop to 1-1500 rpms. Then, put her in neutral or park, and she will rev back up again.

Problem #2: Cruise control won't work

Problem #3: The trip meter doesn't work

I'll turn her off and attempt to restart, and she won't turn over. I have replaced the following:
6 Spark Plugs
2 Ignition Coils & Boots
Idle Air Control Valve
then the whole Throttle Body Assembly
Crankshaft Position Sensors
Camshaft Position Sensors

Even after all that, she is still causing problems. However, problem #2 seems to be fixed.

My mechanic has checked everything, he thinks that the only other thing is the Fuel Pump, Fuel Pressure Sensor.

Please take a look at the videos in the link below. Maybe you can help.

Shared album - Kelli May - Google Photos
 
Forward O2 Sensor

A little preventive maintenance. Ordered Denso from Amazon last night and it was at my door when I woke up. Aft sensor will be here in 2 days.

W3NrIGF.jpg
 
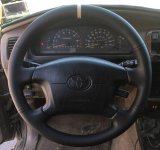
Got my East Detailing wheel cover stitched up. Waaaay nicer than the grungy paracord wrap.
I switched to an all black wheel/column and added the tan stripe because racecar.
and yes - the rest of the interior is currently super dusty...'tis the season!
 

Attachments

  • EaDeWheel.jpg
    EaDeWheel.jpg
    118.4 KB · Views: 232
Status
Not open for further replies.

Members online

No members online now.

Forum statistics

Threads
278,316
Messages
3,554,120
Members
248,016
Latest member
Advally Service

Trending content

Back
Top