What Did You Do To Your 3rd Gen Today?

Status
Not open for further replies.
Got a sweet deal on some 255/75r17 Kenda M/T’s and had em mounted today
 

Attachments

  • IMG_8034.jpg
    IMG_8034.jpg
    137.9 KB · Views: 242
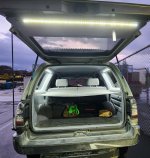
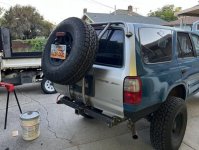
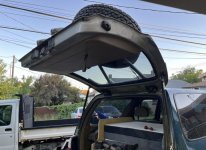
Finished welding my tire carrier, then replaced the stock struts with some super strong ones. They're about an inch longer, so the hatch does make contact with the body when it's fully open. A little hammering should help with the rubbing.

The struts could stand to be a little weaker as it's fairly tough to close the hatch. But with bigger tires in the future I think it should work out fine.

A piece of tubing extends from the wheel mounting plate out and receives a smaller tube with the license plate, license plate light, rear camera and center stop light. Easily removable if I need to change a tire.

I opened and closed it a dozen times and it works super smoothly. I pray that it continues to be that way for a long time.
 

Attachments

  • IMG_6896.jpg
    IMG_6896.jpg
    62 KB · Views: 227
  • IMG_6897.jpg
    IMG_6897.jpg
    60.9 KB · Views: 228
[MENTION=623942]hstaker[/MENTION] Incredible work on your hatch tire carrier! What was your main motivation for this design?
 
[MENTION=623942]hstaker[/MENTION] Incredible work on your hatch tire carrier! What was your main motivation for this design?

Thank you! I removed my spare from the stock location to make room for an air tank and an auxiliary fuel tank (future project.)

The main reason I went this route is I wanted something more convenient than a bumper swingout. I don't like that a swingout requires extra space behind the truck to open, and I just hate extra steps.

So in short, I'm just lazy.
 
I finished up my JDM 3rz install. The old motor had 290k. Even though it was still running ok it was leaking from EVERYWHERE. The only thing not leaking was the rear main bc I just refreshed it when I did the clutch.
 
Never had this happen before, but my right rear rotor has a 1.5 inch crack in it. Going to see if I can get it covered under warranty. It's a brembo rotor, maybe 15 miles on it.
 
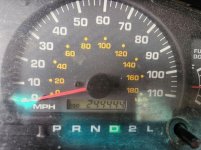
hit 244444 miles
just broken in
would post a pic but cant remember how on this forum,easy on taco. tundra and other forums
 
hit 244444 miles
just broken in
would post a pic but cant remember how on this forum,easy on taco. tundra and other forums

I've never done it from a phone but if you have a picture on a computer, hit Reply, then the Paperclip icon then Browse to the photo you want to upload. I find that the photo size can be an issue and I reduce them to no bigger than 1400 pixels in any dimension.......
 

Attachments

  • UPLOAD.T4R.JPG
    UPLOAD.T4R.JPG
    110.5 KB · Views: 92
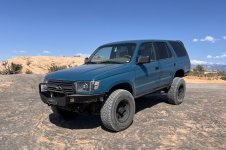
Couldn’t seem to post this until now, but last week I finished my front bumper and then headed to Moab with my friend. We did Fins n Things and Hell’s Revenge.

I was feeling super confident on Hell’s Revenge, but we both chickened out on Hell’s Gate. We did complete the Staircase though. My friend’s 4th gen had a hard time (maybe I’m just a bad spotter?) but my Cassie made light work of it with the rear locker.

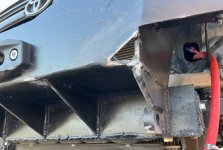
The front bumper sticks out a couple inches farther than I would’ve preferred, but surprisingly I had no issues with approach angle. I only scraped once on both front and back, but that’s because we were rushing to get back to town and I went down a pretty big ledge. In my defense, it was 104 degrees and I wasn’t thinking straight.

Overall I’m very happy with how the bumper looks. My winch should fit snugly in there and hopefully not block too much airflow through the radiator. No idea where I should mount the control box though.

 

Attachments

  • IMG_6942.jpg
    IMG_6942.jpg
    129.4 KB · Views: 80
  • IMG_6938.jpg
    IMG_6938.jpg
    130.2 KB · Views: 84
Couldn’t seem to post this until now, but last week I finished my front bumper and then headed to Moab with my friend. We did Fins n Things and Hell’s Revenge.

I was feeling super confident on Hell’s Revenge, but we both chickened out on Hell’s Gate. We did complete the Staircase though. My friend’s 4th gen had a hard time (maybe I’m just a bad spotter?) but my Cassie made light work of it with the rear locker.

The front bumper sticks out a couple inches farther than I would’ve preferred, but surprisingly I had no issues with approach angle. I only scraped once on both front and back, but that’s because we were rushing to get back to town and I went down a pretty big ledge. In my defense, it was 104 degrees and I wasn’t thinking straight.

Overall I’m very happy with how the bumper looks. My winch should fit snugly in there and hopefully not block too much airflow through the radiator. No idea where I should mount the control box though.

Looks good - sounds fun. I've watched a lot of Hell's Gate videos, including another somewhat annoying Cybertuck that just popped up on the algo and I've always hoped I'd have the cojones to try it first time there, but I get the feeling that the first time is a bit more mentally challenging that you'd think. I have friends who can just turn their alarm circuit off and send crazy lines and jumps on bikes, but I may be an over-thinker.....sad. That said, I have ridden all the Moab MTB trails including the pretty exposed Portal Trail on POS 90's MTBs (in the 90s).
 
No idea where I should mount the control box though.
Look for space inside the wings of the bumper. You might need to strip the control box down to bare bones. I did that on my coastal offroad bumper. Works great! It is tight, but there was zero room with my setup and that was where it fit.
 

Attachments

  • 20240419_154547_TPa6hUQH0m.jpg
    20240419_154547_TPa6hUQH0m.jpg
    127.5 KB · Views: 171
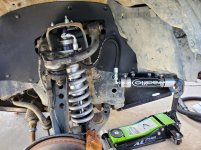
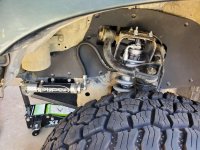
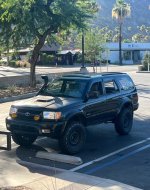
Now for what I did today. Got the radflo coilovers and resis mounted up to the front. Easy, like swapping oem for oem, but they are longer then stock as I opted for the extended travel version. Which I think is 1.5 inches longer then stock, but I'm unsure.

Specs of radflo:
2.5"
Extended travel
Resi's
Custom valving

The frame has the correct holes I needed for the resi brackets. The front hole i drilled out and put a rivnut. Just had to space them off the frame 1/2 inch or so. Passenger side has one of the 2 holes needed. So 2 more rivnuts later it's mounted up. No clerance issues or rubbing. Perfect.

Took it for a rip in the neighborhood, son of a biscuit, I should have done that sooner. I'm running 650lb springs.

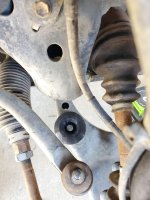
Oh also threw on the perry parts front bumps.

Edit - from research, front limit straps are in my future. To save the cv's mostly. Limit straps will be on the rear regardless.
 

Attachments

  • 20240716_135741_XgivCqzT8n.jpg
    20240716_135741_XgivCqzT8n.jpg
    138.6 KB · Views: 170
  • 20240716_135810_jDX0UhYH0H.jpg
    20240716_135810_jDX0UhYH0H.jpg
    137.5 KB · Views: 169
  • 20240716_135756_mAHBTVru56.jpg
    20240716_135756_mAHBTVru56.jpg
    132.5 KB · Views: 164
Last edited:
I've never done it from a phone but if you have a picture on a computer, hit Reply, then the Paperclip icon then Browse to the photo you want to upload. I find that the photo size can be an issue and I reduce them to no bigger than 1400 pixels in any dimension.......

thanks, forgot to resize
 

Attachments

  • 20240713_163750.jpg
    20240713_163750.jpg
    109.8 KB · Views: 161
I've always hoped I'd have the cojones to try it first time there, but I get the feeling that the first time is a bit more mentally challenging that you'd think.

Absolutely. I'd have a lot more confidence to try it if I had a spotter who is familiar with Hell's Gate, but for me and my buddy it was just our second time in Moab. Seeing it in person is pretty daunting.

Right now I think I want 35s and a front locker before I attempt it. But that's probably overkill
 
Look for space inside the wings of the bumper. You might need to strip the control box down to bare bones. I did that on my coastal offroad bumper. Works great! It is tight, but there was zero room with my setup and that was where it fit.

Thanks for the tip. I think that's the best spot for it, although I may have to lengthen one or two wires that came with the control box.

I have to say, those coilovers are looking sweet!
 
[MENTION=623942]hstaker[/MENTION] yeah I had to extend all the wires for the winch. It's not that hard. And thanks about the coilovers.
 
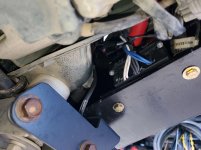
I second attaching the box inside the bumper wing. I also did mine with a SB X20 inside a Coastal Closed-Top kit.

I cut an oblong hole to feed the wires though and drilled 4 holes to match the box. The attached pic
poorly illustrates the cutouts on the passenger side main vertical plate. Snugged up great, just allowed
the hardwired remote option to fit, and didn't have to extend any wiring. I wish I had pics, but that version got smushed
by an inattentive driver. Winch/associated wiring (and frame) survived though!
 

Attachments

  • plate.jpg
    plate.jpg
    14.7 KB · Views: 153
I second attaching the box inside the bumper wing. I also did mine with a SB X20 inside a Coastal Closed-Top kit.

I cut an oblong hole to feed the wires though and drilled 4 holes to match the box. The attached pic
poorly illustrates the cutouts on the passenger side main vertical plate. Snugged up great, just allowed
the hardwired remote option to fit, and didn't have to extend any wiring. I wish I had pics, but that version got smushed
by an inattentive driver. Winch/associated wiring (and frame) survived though!

That's a great idea! I'm sure that cutout is what protected the wiring from getting pinched. I might just steal that.

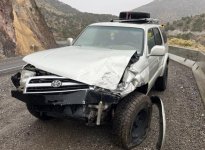
My previous bumper also got smushed. For my current bumper I had to make a front crossmember with rectangular tubing since the frame rails weren't level or straight anymore.
 

Attachments

  • IMG_0879.jpg
    IMG_0879.jpg
    68.5 KB · Views: 151
Status
Not open for further replies.

Members online

No members online now.

Forum statistics

Threads
278,316
Messages
3,554,120
Members
248,016
Latest member
Advally Service

Trending content

Back
Top