What did you do with your 4runner today?

Ordered new fuel cap.

CEL came on today. Used the Carista OBD2 Android app and pulled code P0456 (Evaporative Emissions System - Small leak detected). Went and check the cap and it is very loose not matter how many times is clicks while I tighten it.

It's funny I read about this code popping up on many vehicles.. No lie my fuel cap is in three peaces.. the white center has broken out of the actual cap and the spring has come unattached as well.. the black cap on mine has essentially become a key to remove the rest of the cap lol... Still no code though.. :lol:
 
removing the rack takes about 20 minutes. same amount of time you spent taping things up.

Also use a heat gun to speed up your process. thin coat, heat gun to dry, then rinse and repeat

I've got it down to 10 with caps on and 3 with them already off. Lol
Think it'll be about 3 more times before I put the caps on after this latest project.
 
Not today but finally used it to move into my new apartment. My roommate also drives a 3rd gen so it's pretty much a 4runner takeover here.

06e01eda4b431499f38e4e22b1f12b1f.jpg
 
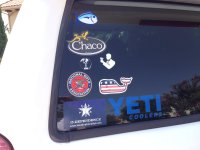
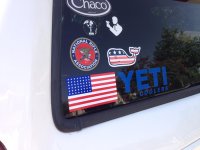
After 1 1/2 years of having the Texas Independence sticker in the collage, it was time to replace it. mainly because the blue was starting to fade to purple.

Got the 48 star American Flag from Military-Graphics.com Takes a while on shipping but worth it.
 

Attachments

  • IMG_3138.jpg
    IMG_3138.jpg
    124.4 KB · Views: 298
  • IMG_3141.jpg
    IMG_3141.jpg
    124.3 KB · Views: 297
[MENTION=86678]ebg18t[/MENTION] yeah I plan on doing it in the future. Clearly they're needed but funds are allocated elsewhere at the moment.
 
Last edited:
Didn't like the look of the opening in the rear wheel wells after I remove the mud flaps. Trimmed off the flaps and put the portion the fills the opening in the wheel wells.

232323232%7Ffp93232%3Euqcshlukaxroqdfv7568%3Dot%3E2328%3D%3A65%3D378%3DXROQDF%3E27%3B7699997248ot1lsi


232323232%7Ffp93232%3Euqcshlukaxroqdfv7326%3Dot%3E2328%3D%3A65%3D378%3DXROQDF%3E27%3B76%3A3479248ot1lsi


:roadkill:
 
Didn't like the look of the opening in the rear wheel wells after I remove the mud flaps. Trimmed off the flaps and put the portion the fills the opening in the wheel wells.

232323232%7Ffp93232%3Euqcshlukaxroqdfv7568%3Dot%3E2328%3D%3A65%3D378%3DXROQDF%3E27%3B7699997248ot1lsi


232323232%7Ffp93232%3Euqcshlukaxroqdfv7326%3Dot%3E2328%3D%3A65%3D378%3DXROQDF%3E27%3B76%3A3479248ot1lsi


:roadkill:
I'm dealing with the same issue but it's the screw and the part of the flap you have left that stick out the most. I'm thinking I'll have to remove the flap completely when wheeling then put it back on after.
 
Didn't like the look of the opening in the rear wheel wells after I remove the mud flaps. Trimmed off the flaps and put the portion the fills the opening in the wheel wells.

232323232%7Ffp93232%3Euqcshlukaxroqdfv7568%3Dot%3E2328%3D%3A65%3D378%3DXROQDF%3E27%3B7699997248ot1lsi


232323232%7Ffp93232%3Euqcshlukaxroqdfv7326%3Dot%3E2328%3D%3A65%3D378%3DXROQDF%3E27%3B76%3A3479248ot1lsi


:roadkill:

I did the same thing, then I stuffed a tire pretty good and it ripped on the thin portion near the bolts. Just a heads up.
 
They turned out awesome. Did you replace the lenses or restore them?

Thanks. I restored them. I literally sat in my shower with wet/dry sandpaper and sanded and sanded with water running over them. I also polished the inside of the lens with a pad and paste because it looked like the inside of a dirty windshield, crap had accumulated on it. I finished with 2000 grit and then used the spar urethane/mineral spirits method to clear the lens. It took me 10-12 tries to figure out how to get the best results. I wasn't happy with the method last time but it was due to user error. This time, they turned out great tho.
 

Members online

Forum statistics

Threads
278,316
Messages
3,554,113
Members
248,016
Latest member
Advally Service

Trending content

Back
Top