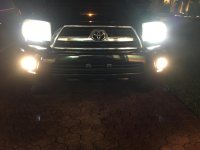
XenonDepot HID vs LED, initial photo. (Pics reposted)

Guys:

The Philips based bulbs come with different size grommets then the XenonDepot bulbs.

Here are pics of the XenonDepot grommet:

XD-JGC15-HID_INSTALL-05.jpg

XD-JGC15-HID_INSTALL-06.jpg

XD-JGC15-HID_INSTALL-07.jpg

XD-JGC15-HID_INSTALL-08.jpg


Steve
 
Guys:

The Philips based bulbs come with different size grommets then the XenonDepot bulbs.

Here are pics of the XenonDepot grommet:

XD-JGC15-HID_INSTALL-05.jpg

XD-JGC15-HID_INSTALL-06.jpg

XD-JGC15-HID_INSTALL-07.jpg

XD-JGC15-HID_INSTALL-08.jpg


Steve

I received my kit last week and plan on installing my philips 4300's this week. I don't want to make the hole too large so just for clarification this diameter of the hole is to be 1" like your picture shows correct?
 
LOL! I just got done saying maybe I've pointed them too low. I will try again after dark tonight and see if that helps. Bluntly, I don't think the light output is great on these bulbs, unless I've missed some crucial setup step. Would you please do me a favor and send me a link to the HID equivalents? I'm looking for the 5K to match my Philips but hoping to get less light scattered to the sides and more concentrated straight ahead. Thank you!

Which Phillips do you have that you are you trying to match?
 
Just noticed my install maybe a little different. I have a 2006 with projection lights. How do I remove the dust cap and make to make a larger hole?
 
Well I figured things out and it took me about 4 hours to install these lights from start to finish. What took pretty long was figuring out where to mount the hardware and running the cables with zip ties. That is the most time consuming part. I also ran into a few little things that prolonged the install.
The positive cable that goes from the passenger side light to the positive battery terminal needs to be about 2-3 feet longer to run it properly around the battery back to the positive terminal.
The positive connection to the battery needs to be a larger size. I had to use a drill bit to open up the rings. It was too small for attaching to my battery terminal bolt.
Instructions for older model 4runners should say the bulbs go right in just like the factory bulb. I didn't need to trim a dust cover because I don't have one on my 4th gen.
The Milwaukee step hole drill bit attachment is $49 at Home Depot. I bought one but didn't need it so I'll be returning that. It would have saved me time going to buy that and now having to return it.
The kit includes 4 or 6 zip ties which is nice but you will need about 10-15.
Removing the battery and radiator cover makes running the wires and installation a little easier.
To remove the radiator top cover it's easy but some of the gromets broke because they were old. If you tie zip ties in the holes where the gromets go then the gromet won't really fit in that hole anymore. Unless you use very small zip ties.
Other then those little issues I'm happy with the brightness and color of these lights. You can really tell the difference from the stock lightbulbs. I posted a pic with the OEM fog lights on for a good comp of what the stock low beams looked like. I will probably change the fogs but not sure to go with the LED HID kit to match the lows or just replace the bulbs with better yellow.

Here is the write up that helped me figure a few things out. Keep in mind the hardware from that write up is from what appears to be an older version of the HID kit.
http://www.toyota-4runner.org/engin...ories/16283-hid-install-2006-4ruunner-3.htmlt

 

Attachments

  • IMG_9477.jpg
    IMG_9477.jpg
    129.9 KB · Views: 1,346
Last edited:
XenonDepot HID vs LED, initial photo.

Hello friends, I just bought the xenondepot hid kit for my 2016 TE. What is the correct hole size?
There are a few hole size in this thread to drill. I just want to make sure I get it right the first time. Thanks in advance.


Sent from my iPad using Tapatalk
 
Last edited:
Hello friends, I just bought the xenondepot hid kit for my 2016 TE. What is the correct hole size?
There are a few hole size in this thread to drill. I just want to make sure I get it right the first time. Thanks in advance.

I ordered mine with the Philips bulbs, and when asked XenonDepot told me 1" was needed. That still felt a little on the loose side. I'd suggest a step drill like many others, start smaller and work your way up. You can grab a set from Harbor Freight for about $15
 
Last edited:
I ordered mine with the Philips bulbs, and when asked XenonDepot told me 1" was needed. That still felt a little on the loose side. I'd suggest a step drill like many others, start smaller and work your way up. You can grab a set from Harbor Freight for about $15


Thank you my friend. Got it all installed last night =)


Sent from my iPad using Tapatalk
 
The positive cable that goes from the passenger side light to the positive battery terminal needs to be about 2-3 feet longer to run it properly around the battery back to the positive terminal.
The positive connection to the battery needs to be a larger size. I had to use a drill bit to open up the rings. It was too small for attaching to my battery terminal bolt.

I received my HID kit late last week from [MENTION=12905]XenonDepot[/MENTION]. Holidays and end-of-year work activities have kept me from installing them, but I did assemble all the connections, and noticed also the positive lead is really short. Holding up the assembled harness with the hood opened I can't see how that lead will reach the battery. Mind sharing what you did to extend the positive lead?

Here is the write up that helped me figure a few things out. Keep in mind the hardware from that write up is from what appears to be an older version of the HID kit.
http://www.toyota-4runner.org/engin...ories/16283-hid-install-2006-4ruunner-3.htmlt

Also tried the link. It appears to be a dead link.
 
I received my HID kit late last week from [MENTION=12905]XenonDepot[/MENTION]. Holidays and end-of-year work activities have kept me from installing them, but I did assemble all the connections, and noticed also the positive lead is really short. Holding up the assembled harness with the hood opened I can't see how that lead will reach the battery. Mind sharing what you did to extend the positive lead?

I ended up going straight to the positive lead after I passed the radiator. Instead of going around the battery which would be the right way to do it. But since I was limited on length I didn't have much of a choice.


Also tried the link. It appears to be a dead link.

Here it is again: http://www.toyota-4runner.org/engin...essories/16283-hid-install-2006-4ruunner.html
 
[MENTION=147655]vwmasstransit[/MENTION] -- We respond to emails daily -- sometimes once a day, sometimes more then once a day; It really depends on the day (and time zones). Either way, I'm sorry to hear that you are experiencing a problem. Please send me a PM With your order information so that I can give you a call and get this sorted out. Alternatively, you can call us toll free @ 1-877-522-2701.
[MENTION=5227]Sifrk[/MENTION] -- 2" seems like quite a bit (considering you're 10 ft from a garage). Try adjusting the light a little higher, but if ultimately you're not happy with the light output then I would suggest looking at HID. Let me know if you want to go that route (they will be brighter), and I will do my best to help you out.
[MENTION=90192]2chains[/MENTION] & [MENTION=118816]xpress[/MENTION] - The "color shift" is not a huge change. It's visually noticeable, but it's not like going from 4300k bulbs to 5000k bulbs. If you're looking to completely eliminate any "yellow" or "warmer tones" then you may be happier with 5000k. Keep in mind though that higher kelvin temperatures do not produce as many lumens as the bulbs you currently have.

Steve

Steve

I just sent you a pm.
 
Hello friends, I just bought the xenondepot hid kit for my 2016 TE. What is the correct hole size?
There are a few hole size in this thread to drill. I just want to make sure I get it right the first time. Thanks in advance.


Sent from my iPad using Tapatalk

I have the Xenon Depot kit with the Phillips 4300K

A 7/8" hole gave a nice tight fit
 
I received my HID kit late last week from [MENTION=12905]XenonDepot[/MENTION]. Holidays and end-of-year work activities have kept me from installing them, but I did assemble all the connections, and noticed also the positive lead is really short. Holding up the assembled harness with the hood opened I can't see how that lead will reach the battery. Mind sharing what you did to extend the positive lead?


Also tried the link. It appears to be a dead link.

Sifrk, I got XD's Phillips kit and did not have to run anything to the battery. I used their guide (attributed to [MENTION=129593]MTN4RNR[/MENTION]); note, he did not use the relay harness (nor did I):

H11 HID Headlight | 2016 Toyota 4Runner HID
 
Sifrk, I got XD's Phillips kit and did not have to run anything to the battery. I used their guide (attributed to [MENTION=129593]MTN4RNR[/MENTION]); note, he did not use the relay harness (nor did I):

H11 HID Headlight | 2016 Toyota 4Runner HID

It's not required to use the relay? I couldn't find the information in the installation pamphlet which came with the HIDs, then in what circumstances would we need them?
[MENTION=12905]XenonDepot[/MENTION] How do I tell if I received the Philips bulbs? From the instructions [MENTION=144110]trapshot68[/MENTION] posted, it looks like I'm expecting to see a blue wire somewhere but all my wires are black.
 
Last edited:
It's not required to use the relay? I couldn't find the information in the installation pamphlet which came with the HIDs, then in what circumstances would we need them?
[MENTION=12905]XenonDepot[/MENTION] How do I tell if I received the Philips bulbs? From the instructions [MENTION=144110]trapshot68[/MENTION] posted, it looks like I'm expecting to see a blue wire somewhere but all my wires are black.

The relay harness is optional with the 4Runner as our Xtreme ballast is a 35w low draw ballast which the 4Runner is more than capable of handling. Using the relay harness is great because it ensures you always get 12 volts constantly and directory from the battery.

As for the Philips bulbs, here is a little info to help identify them. Philips D2S/D2R bulbs come with a P32D base. This is where all the Philips markings are found. This base gets removed in order to accommodate a custom molded halogen base so that the product can be used in halogen headlights. These custom molded bases are laser aligned to ensure optically correct beam patterns. A Philips bulb can be easily recognized by the design of the burner. Philips HID bulbs have a unique shape to them.

-Danny
 
The relay harness is optional with the 4Runner as our Xtreme ballast is a 35w low draw ballast which the 4Runner is more than capable of handling. Using the relay harness is great because it ensures you always get 12 volts constantly and directory from the battery.

As for the Philips bulbs, here is a little info to help identify them. Philips D2S/D2R bulbs come with a P32D base. This is where all the Philips markings are found. This base gets removed in order to accommodate a custom molded halogen base so that the product can be used in halogen headlights. These custom molded bases are laser aligned to ensure optically correct beam patterns. A Philips bulb can be easily recognized by the design of the burner. Philips HID bulbs have a unique shape to them.

-Danny
[MENTION=12905]XenonDepot[/MENTION] Danny, probably easier if I just post the picture. Are these the Philips HID bulbs?
7820ba662e338ad5a79d989d7fed0c31.jpg
 
Hey,

That is the XenonDepot 4300k capsule -- not the Philips 4300k ($45 additional option). The relay harness is optional on the T4R.

Steve
 

Members online

No members online now.

Forum statistics

Threads
278,316
Messages
3,554,121
Members
248,016
Latest member
Advally Service

Trending content

Back
Top