Zombie Truck 2.0 MPAV Build!

:pout:

The disconnect project is on hold for now, it technically was a success; but there were some tolerance issues that needed to be addressed before it would be ready for real world testing

I knew there was a thread for it but hadn't seen it in a while. I just assumed, based on your track record, that it would be a success and there would be a new for sale thread when it was completed.

Between a lot of personal issues, stress at work, and some other serious stuff in my life I haven't gotten a chance to hit up Tech Shop let alone adjust the design to correct the original flaws. Not to mention I had thought about an entirely different design all together, but currently I am just at this point in my life where I just don't have the energy to do anything.

:(

I know how you feel..
 
Surprisingly, I've never seen a picture, let alone build, of your rig. Until now, I didn't even know if it actually existed!
 
Surprisingly, I've never seen a picture, let alone build, of your rig. Until now, I didn't even know if it actually existed!

So you're saying you thought I was just one of those sad pathetic excuses of a guy trying to fit in on a forum even though he had no real reason to be on the forum since he didn't have a 4Runner to begin with? :crybaby:

On a different note, I just tried to mock-up the transfercase skid plate again in the driveway and the CBI Slider brackets are exactly where the crossmember needs to go, so notching is more like "cut the entire center bracket support for the sliders out" which makes me slightly nervous.
 
So you're saying you thought I was just one of those sad pathetic excuses of a guy trying to fit in on a forum even though he had no real reason to be on the forum since he didn't have a 4Runner to begin with? :crybaby:

On a different note, I just tried to mock-up the transfercase skid plate again in the driveway and the CBI Slider brackets are exactly where the crossmember needs to go, so notching is more like "cut the entire center bracket support for the sliders out" which makes me slightly nervous.

Can't you slot the skid plate? I know others had to notch theirs.
 
Can't you slot the skid plate? I know others had to notch theirs.

The problem is that if you look at the picture I put in the above post the bracket for the slider actually wraps around the entire frame rail and bolts at the top (Its a great design that makes it as solid as a welded set-up from my experience.) The crossmember is design specifically to fit between the frame rails and bolt on from the side of the frame rail rather than the bottom like the rest of the skid plates.

I can't physically fit the crossmember between the frame rails with the sliders installed and the bracket is almost exactly where the crossmember needs to go so I can't notch anything because I'd have to cut almost the entire width of the bracket to fit it. :(

So it looks my only option may be to modify the crossmember to bolt from the bottom, at least based on how it looks like its supposed to go.
 
So it looks my only option may be to modify the crossmember to bolt from the bottom, at least based on how it looks like its supposed to go.

I finally got the pictures to zoom in (iPad issue). if you cut the slider like you said and bolt from the bottom I think you will be fine. My RCI plate mounts inside but I didn't realize the slider strap was so wide on yours. My sliders are welded. After you cut and bolt the slider from the bottom, maybe hit it with a quick spot weld on either edge of the slider bracket for piece of mind. It will be easy to cut the weld if needed.
 
So you're saying you thought I was just one of those sad pathetic excuses of a guy trying to fit in on a forum even though he had no real reason to be on the forum since he didn't have a 4Runner to begin with? :crybaby:

On a different note, I just tried to mock-up the transfercase skid plate again in the driveway and the CBI Slider brackets are exactly where the crossmember needs to go, so notching is more like "cut the entire center bracket support for the sliders out" which makes me slightly nervous.
I thought you may have, in reality, been a mechanic for Nissan, trying to steal our mods for your X-TERRA!
 
Just read you entire thread! Really cool to see the progression. Nice parts too...

Sucks about your slider/ armor interference. Could you possibly weld on your sliders by replacing the mounts? So basically cut off the bolt on brackets, weld on square plate turned 45* etc, then weld that to your frame? Not sure how you feel about welded sliders but... its a option to get you around your issue..

Keep your head up, enjoyed your thread.
 
Just read you entire thread! Really cool to see the progression. Nice parts too...

Sucks about your slider/ armor interference. Could you possibly weld on your sliders by replacing the mounts? So basically cut off the bolt on brackets, weld on square plate turned 45* etc, then weld that to your frame? Not sure how you feel about welded sliders but... its a option to get you around your issue..

Keep your head up, enjoyed your thread.

I am trying to avoid welding them on because I feel I may go with another design later down the road and cutting and re-welding is a pain. I've got one or two ideas for modifying the set-up to make it work, we'll see how it goes.
 
So an update on the skid plate situation. I got a call from Josh at RCI regarding my email and we talked some. Apparently all I was missing in terms of hardware was just 2 bolts and the installation instructions. For anyone interested RCI does make a modified Transfercase Crossmember that is special order (they reduce the width of the crossmember brackets) to accommodate most bolt-on sliders, unfortunately in my case the CBI's were just 100% in the way and some mild trimming wouldn't help much. So after talking with Josh we pretty much agreed that the best bet was to modify the CBI brackets to install the Transfercase Crossmember (on a side note, the reason the foam sheet was installed between the plate and crossmember was to protect them, apparently you're still expected to take the two apart for installation.

So I snuck the 4Runner in at the end of work today and borrowed my co-worker's cut-off wheel and went to town on the CBI slider bracket, I cut it just to the end of the frame rail because I wanted to secure it back to the frame later. I then mocked up the crossmember onto the vehicle and snugged it in place, unfortunately I didn't have as much real estate as I thought I was going to have so I only had room for one hole through the bottom of the plates. I then spent the next few minutes drilling a 17/32" hole through about a 1/2" of combined steel, which is not as fun as it sounds; I HIGHLY recommend you wear long sleeves and a turtle neck if you're doing this, I have small burns from where hot chips flew around (I was just too tired and tried to wrap a fender cover around me like a shawl... didn't work as well as I had hoped.) After drilling the holes in the frame I removed the sliders to install the RivNut Insert into the frame and bolted everything back together. My only real regret is that I can't reach the top of CBI bracket to drill new holes and install a bolt through the frame to make it a bit more secure, but there's enough bracket left and its secured pretty well that it shouldn't matter. I will more than likely address this nagging concern when I do the body lift later down the line since it should give me enough access to the frame rail.

Here's the bracket after I cut it off and drilled it out for the RivNut insert (the insert is actually already installed in this picture, you can barely see it)


This is a close up of the bolted crossmember over the CBI slider pinching it to the frame, the upper portion is not secured to the frame, I'm hoping the fact its still a L-shaped bracket and that when the vehicle is resting on the sliders the other two U-Channel brackets and natural tendency to push against the frame will not affect structural integrity of the sliders)


Finally a shot from the side of all the plates installed and ready to beat some rocks up! Also, no you're eyes are not playing tricks on you, the transfercase skid plate actually is angled a little like a ramp because of the way the crossmember is installed, so it doesn't sit as flat as the other plates do; honestly I kind of like it like that as it will help shift the obstacle onto the gas tank skid plate hopefully a little smoother.


Post Note-

I'm a little bummed the RCI Skid Plates don't protect the LCA's like the factory plates try to do, but I guess that's why they make LCA skids! I'm thinking those may be the next mod and/or a body lift; not entirely sure at this point.

 
Last edited:
Small Update:

So I noticed after I installed the RCI skid plates I had a loud clunking/scraping noise when flexing the rear axle, usually on things like steep gas station ramps and driveways when going at an odd angle.

Turns out when I installed the RCI Gas Tank Skid plate I put all the nuts on the outside of the skid plate (because it was easier to tighten the nuts that way.) Now I don't remember if their instructions mentioned it, but the furthest bolt on the passenger side of skid plate actually sticks out enough with the nut on it to nick the differential flange under the right flex. Simple fix was to reverse the bolt with the rounded carriage side on the outside of the skid and the nut on the inside, it was just a matter of not enough clearance. Hope this helps anyone else who felt similar noises after installing their RCI skid plates. Sorry I didn't snag any pictures I was trying to get home from work and it slipped my mind until I got home and now I am too lazy to crawl under the 4Runner.
 
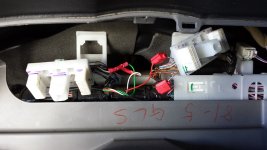
So I just installed something on my 4Runner that I got as a birthday present, I'll update later with a detailed post; but for now internet cookie for who ever guesses correctly!

20140920_170226.jpg
 

Attachments

  • 20140920_170226.jpg
    20140920_170226.jpg
    121.1 KB · Views: 1,040
Minor update:

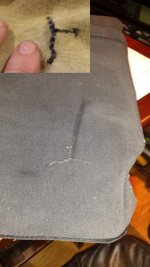
I finally got tired of staring at this anoying tear in my rear seat arm bolster. I don't know how it happened a few years ago, but it absolutely pissed me off to no end as it is the only fabric damage in my vehicle! Was giving one of the body shop guys a ride back to the shop and he was commenting how clean the vehicle was and absolutely shocked it was an '04. It made me a bit self-conscious of the tear and so I decided to sew it back up.

It was a bit tricky because it split in 3 ways and then one of the legs it sort of started making a L-shape. But I did my best and stitched it up and then added some duct tape on the back side to try and pull the little hills down. But at least this way it won't get worse and it looks a bit nicer.

20141205_172541.jpg
 

Attachments

  • 20141205_172541.jpg
    20141205_172541.jpg
    57.3 KB · Views: 936
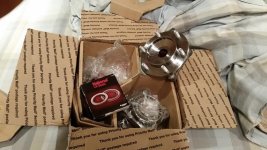
look what just came in!

20150202_180656.jpg

Big thanks to [MENTION=99491]Bumper2Bumper Auto[/MENTION]!

Great looking product, good delivery time, and great price. Can't wait to throw these on sometime later this week/weekend.
 

Attachments

  • 20150202_180656.jpg
    20150202_180656.jpg
    67.2 KB · Views: 950

Members online

Forum statistics

Threads
278,316
Messages
3,554,120
Members
248,016
Latest member
Advally Service

Trending content

Back
Top