Zombie Truck 2.0 MPAV Build!

Body lift? Lol

I'm still amazed how good that steering wheel looks.

You can get the wheel for about 100$ less on ebay. search something along the lines of "prado steering wheel black wood" or "fj120 sport steering wheel."
 
You should do a write up on how to do the steering wheel swap. Because I have no idea where to start.
 
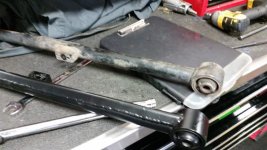
Side by side of the old vs. the "new" trailing links I made, nice shiny new paint!

20160119_161815.jpg

I would have taken pictures of the body mount chop I did... but honestly I'm a bit ashamed of how they came out. I tried to go with the "Slot and Bend" method and I probably should have waited until I actually installed the body lift (it's sitting in my tool box with new bushings) but I wanted to get it out of the way. Functionally it's fine and the welds will hold, I am just not too happy with how it looks cosmetically... I may cut that entire section out and fabricate a new reinforcement panel later down the road...

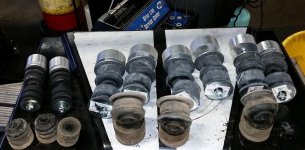
Though looking at the new bushings vs. the old ones I swear the new ones alone would give the vehicle a .5" body lift since the old ones seem to be squished pretty damn good by comparison (they are 11 yrs old...)
 

Attachments

  • 20160119_161815.jpg
    20160119_161815.jpg
    58.1 KB · Views: 2,843
So I installed the body lift on the 4Runner tonight, ended up taking a lot longer than I had anticipated as I ran into some hiccups I had not anticipated.

I didn't take a lot of pictures because I was in "Task Mode" and there's a great write-up on Toyota120 for installing a 1.5" Body Lift:

4Runner Body Lift Installation - Toyota 120 Platforms Forum

I will note that I did not notice that one of the power steering hoses from the reservoir is pulled extremely taut when you lift 1.5". I actually pulled the hose off the pump when I raised the body and even when reconnected the reservoir is pulled at a sharp angle, not a huge deal as I just need to get a slightly longer hose as it's a low pressure line; but something to note.

Another thing I ran into and it seems to be the same in the write-up is that the drop-down brackets for the radiator are a bit tricky to line-up since the bolt-holes from the radiator are blocked by the sheetmetal. Currently the bottom bolts are installed, but the top is secured by zip-ties to the drop down bracket until I look at it again tomorrow.

Other than that everything was just a ton of little things piling up, i.e. I didn't think I would need to take my gas tank skid and transfer skid plates to pull my sliders to make it easier to raise the body. Also No.1 and No.2 body mounts were shot, in retrospect I should have bought new sleeves along with the bushings as the sleeves on all 8 mounts were in varying degrees of rust/covered in crap. The No.2 didn't look horrible, but when I pulled it off I found evidence that it was not sealing against the bracket properly and had to spend a good hour cleaning pressed/caked in dirt,grime, and rust in the mount brackets with a wire brush and parts wash. It was pretty clear that the mount was pulling away from the body too much, the No.3 mount had a light amount of debris and No.4 was the cleanest by far. I wish I had taken pictures of the mounts before I cleaned them, but it's not surprising for 11yr old body mounts on a vehicle I tend to off-road in.

Here's a picture of the old vs. the new mounts:
20160122_164133.jpg

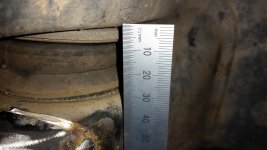
They come uncompressed from the factory, when you install them you're going to tighten them until the sleeve contacts the top and bottom bushing plates setting them to the correct height. So the picture below was me measuring to see if the mount had compressed (which it hadn't since it was supported by the sleeve, but it was too weak allowing debris to build up under it and eat away at the sleeve which was very pitted).
20160122_161325.jpg

I will have to take a picture of the 4Runner tomorrow and post it, it was just too dark when I finished a few hours ago to get a good one.
 

Attachments

  • 20160122_164133.jpg
    20160122_164133.jpg
    95.5 KB · Views: 2,461
  • 20160122_161325.jpg
    20160122_161325.jpg
    111.5 KB · Views: 2,458
Good info. I'm considering a 1" body lift on mine but know that I'll be bothered if I leave old bushings and crappy sleeves in there. How much did the OEM bushings run you?
 
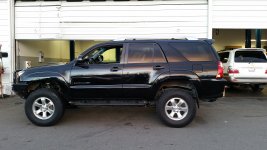
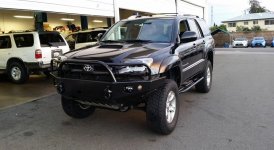
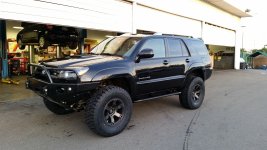
As promised pictures! :D

Check out that body gap! OH YEAH! and that front bumper gap, I could fit a Civic in that gap!

20160123_171110.jpg
20160123_171053.jpg
 

Attachments

  • 20160123_171110.jpg
    20160123_171110.jpg
    134.4 KB · Views: 37,132
  • 20160123_171053.jpg
    20160123_171053.jpg
    62.5 KB · Views: 5,458
Not really an update on the 4Runner, but sort of relating to it.

I've been thinking of doing this for a long while now and got a good offer going so it's become a no brainer for me. I'll be moving up to Bend, Oregon in a few weeks once I get back from my vacation up here.
 
Not really an update on the 4Runner, but sort of relating to it.

I've been thinking of doing this for a long while now and got a good offer going so it's become a no brainer for me. I'll be moving up to Bend, Oregon in a few weeks once I get back from my vacation up here.


You're going to love it. They'll have to pay me a pretty penny to go back to Cali now that I'm up here. Stop by in Ashland on your way through if you have time and we can grab a drink :tea:.
 
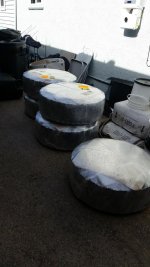
Oh look what was waiting for me when I came home from vacation!

Shipped.jpg
550lbs of something good I imagine! :bowl:

Yup, that's some meat right there!

SS.jpg
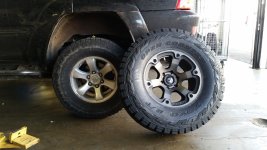
After a quick run through the carwash with the new shoes squeaky clean:
Done.jpg
:reddance:

Couple notes, had to do some rough trimming just to get them to turn without rubbing (still rubbing on the body mount at full lock and some compression, will need to redo the BMC probably), the pinch weld is going to be an issue as well and I'm thinking I'll bump caster up from 4 to 5 degrees to see if I can get a bit more clearance.

Another annoyance is that I just noticed my driver's side headlamp full of condensation... no standing water so I am wondering when that started...
 

Attachments

  • Shipped.jpg
    Shipped.jpg
    137.3 KB · Views: 1,917
  • SS.jpg
    SS.jpg
    130.1 KB · Views: 9,875
  • Done.jpg
    Done.jpg
    135.9 KB · Views: 54,266
Oh look what was waiting for me when I came home from vacation!

View attachment 192747
550lbs of something good I imagine! :bowl:

Yup, that's some meat right there!

View attachment 192748
After a quick run through the carwash with the new shoes squeaky clean:
View attachment 192749
:reddance:

Couple notes, had to do some rough trimming just to get them to turn without rubbing (still rubbing on the body mount at full lock and some compression, will need to redo the BMC probably), the pinch weld is going to be an issue as well and I'm thinking I'll bump caster up from 4 to 5 degrees to see if I can get a bit more clearance.

Another annoyance is that I just noticed my driver's side headlamp full of condensation... no standing water so I am wondering when that started...
I had to hammer pinch welds flat then use a BFH to push everything back a little bit to boot! Lol
Looking good man!
 
I had to hammer pinch welds flat then use a BFH to push everything back a little bit to boot! Lol
Looking good man!

Yeah, thinking if I should try grinding them down almost flat and tacking them with the welder instead of hammering them... either way I'll need to do that along with cutting off most of the body mount (I didn't slot and fold enough of it to clear the tire, at this point it may be better to cut it all off and redo it with a plate later down the road...)

I'm trying to figure out how the hell I am going to do an alignment as our heads have the old claws which latch onto the wheel which I have been having to use a deadblow to seat on my factory rims because how tightly the tire fits at the edge of wheel. Having just dropped $3500 on wheels and tires I don't want to scratch my brand new rims just yet..
 
Yeah, thinking if I should try grinding them down almost flat and tacking them with the welder instead of hammering them... either way I'll need to do that along with cutting off most of the body mount (I didn't slot and fold enough of it to clear the tire, at this point it may be better to cut it all off and redo it with a plate later down the road...)

I'm trying to figure out how the hell I am going to do an alignment as our heads have the old claws which latch onto the wheel which I have been having to use a deadblow to seat on my factory rims because how tightly the tire fits at the edge of wheel. Having just dropped $3500 on wheels and tires I don't want to scratch my brand new rims just yet..
Tacoma guys and the few 4runner guys running big tires, 38-40", cut the whole pinch weld out about 6 of so inches wide and a foot or more long and then weld in a flat piece of sheet metal. They also cut the body mount, make a new one back several inches, then use a heavy plate steel to connect to the original hole. I'll eventually be doing that after I sas.
 
When I cut back my pinch areas on the front, the body starts to widen up, ()3 layers of bodies) I welded the bodies together so they didn't separate/rip open and can smell the rubber seal between them. You can only go so far with them.

Edit... So how far up in size did you go?
 
When I cut back my pinch areas on the front, the body starts to widen up, ()3 layers of bodies) I welded the bodies together so they didn't separate/rip open and can smell the rubber seal between them. You can only go so far with them.

Edit... So how far up in size did you go?

285/70R17 on factory Sport Edition 17" to 35x12.5R17 Toyo Open Country R/T on Fuel D564 Beast Wheels 17x9 with -12 Offset.
 
@Having_Fun

Yeah, when Keak was chopping his 4Runner up for his 42's or whatever size he's running now he showed me how much of the body he cut into. I don't remember if he had someone weld all the sheetmetal together before plating it over, I do recall suggesting that though.

I think the best way to go about it if I decide to cut that shoulder out is to use a TIG welder to tack the sheets together, have a sheet/plate made with holes/slots, TIG weld the tacked sheets to the plate and then perhaps either weld a cap plate or fill the holes/slots in. It's a lot of work, but since you're cutting out a section where multiple sections of body paneling come together for strength, it'd be the best way to ensure rigidity and strength.

I'm not quite sure I'm gonna go that far yet though, I'll try and throw the 4Runner on the alignment rack after work (if my service manager doesn't throw me out since I'm putting my two weeks in...) and see if 5 degrees of caster and a bit more trimming will help with that.
 
Oh look what was waiting for me when I came home from vacation!

Couple notes, had to do some rough trimming just to get them to turn without rubbing (still rubbing on the body mount at full lock and some compression, will need to redo the BMC probably), the pinch weld is going to be an issue as well and I'm thinking I'll bump caster up from 4 to 5 degrees to see if I can get a bit more clearance.

Another annoyance is that I just noticed my driver's side headlamp full of condensation... no standing water so I am wondering when that started...

that looks good. my BMC on my drivers side is pretty much a round plate that hugs the body mount bushing. I did the little by little and ended up doing the work 3 times. Do as much as you can cause your gonna need to compensate for spring sag over time. Im running a 6 of caster and its not bad and its saving me from plating the footwells
 

Members online

Forum statistics

Threads
278,316
Messages
3,554,120
Members
248,016
Latest member
Advally Service

Trending content

Back
Top