What Did You Do To Your 3rd Gen Today?

Status
Not open for further replies.
Appreciate if you did post all of the hose part numbers in one spot, Leon. I will probably do this late in the summer myself and it would be good to use your list as a starting point for my 99

Regarding the oil cooler o-ring, could you have held it in place with some Grease? Like the stuff energy suspension sends with their bushings, that stuff is tacky AF

Sent from my Pixel 4 XL using Tapatalk
 
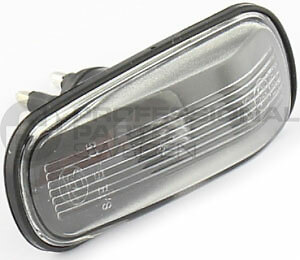
Hard to tell from the pic, but it looks like the Saab side markers I'm using on mine.

s-l500.jpg

They come in clear/yellow bulb or yellow lenses.

If you wire the hot wire to the parking light circuit, and ground it to the hot wire on that side's turn signal bulb, it will do both. When parking lights are on, current will flow through the side marker bulb and on through the larger turn signal bulb, lighting the smaller side marker bulb, but not enough current to light the turn signal.
And when the turn signal bulb goes on, then that circuit 'saturates' (probably not the right word) and no long acts as a ground for the side marker bulb, so it goes off.

Net result, bulb is on when parking lights are on, bulb blinks when turn signals are on.
I saw those on your truck, my plan is to just make my marker lights flash with the turn signals but I was going to do it a little more complicated, using a relay to interrupt the ground circuit to the side marker bulb. I'm already spliced off the positive marker lights for other things so I can't interrupt that wire.

Am I overthinking it?

Sent from my Pixel 4 XL using Tapatalk
 
I saw those on your truck, my plan is to just make my marker lights flash with the turn signals but I was going to do it a little more complicated, using a relay to interrupt the ground circuit to the side marker bulb. I'm already spliced off the positive marker lights for other things so I can't interrupt that wire.

Am I overthinking it?

Sent from my Pixel 4 XL using Tapatalk

Give it a try wiring it the way I did, with a 'floating ground' on the turn signal hot wire. It wouldn't work with similarly sized bulbs, but since the turn signal is big, and the side marker is small, it works.

Forgot to mention, when the parking lights are off, and the turn signal turns on, the side marker light will light as well, current going the other direction, hot from the turn signal, grounding through the parking lights (again, enough current to light the little side marker bulb, not enough to light up all the other parking lights). That won't work with an LED bulb, though, those are diodes and current will only flow one way through them.
 
Give it a try wiring it the way I did, with a 'floating ground' on the turn signal hot wire. It wouldn't work with similarly sized bulbs, but since the turn signal is big, and the side marker is small, it works.


Forgot to mention, when the parking lights are off, and the turn signal turns on, the side marker light will light as well, current going the other direction, hot from the turn signal, grounding through the parking lights (again, enough current to light the little side marker bulb, not enough to light up all the other parking lights). That won't work with an LED bulb, though, those are diodes and current will only flow one way through them.
Thanks, I'm all LED
I'll PM you to keep things less cluttered here

Sent from my Pixel 4 XL using Tapatalk
 
Appreciate if you did post all of the hose part numbers in one spot, Leon. I will probably do this late in the summer myself and it would be good to use your list as a starting point for my 99

Regarding the oil cooler o-ring, could you have held it in place with some Grease? Like the stuff energy suspension sends with their bushings, that stuff is tacky AF

Sure thing Mike, I'm attaching my cheat sheet with the part numbers. The hose numbers refer to the numbering in the other post.

Regarding the o-ring, I think some grease would have helped, though the o-ring did have some little "bumps" on it to keep it in the groove reasonably well. I think all my futzing with it must have displaced it at some point though. The real problem I had was not so much the o-ring falling out, as getting the bolt to thread into the block - there are no indexing features to center the cooler on the block, and the bolt threads have no taper, so until it's properly lined up, the bolt just hits the flange around the tapped hole.
 

Attachments

The oil cooler ended up giving me the most trouble. I did see a couple of videos on the project, but those folks either had a 2WD, or I'm just dumb, because I could barely see the cooler directly from the bottom, let alone reach it, it was blocked by the axle. I could get to it from the rear bottom, but it was a long reach. So I ended up going through the wheelwell, which wasn't bad after removing the wire harness that was blocking the big mounting bolt:

UkmNiGg.jpg


Here are all the parts involved, you can see my old o-ring was so brittle it broke into pieces:


W15XsFa.jpg


To get to the front clamp of the long hose, I had to remove the oil dipstick and the wire harness tab that's attached to the water pump, then it was pretty accessible:

S9hrdH8.jpg


The new o-ring goes into this groove on the cooler:

xbTr1bR.jpg


I struggled to get the mounting bolt to line up with the threaded hole in the engine block, and when I fired up the engine after the job was done, I was treated to about two quarts of oil on the ground before I was able to shut the engine off. As I suspected, the o-ring slipped as I was fighting the mounting bolt, and got chewed up during installation. Fortunately, someone must have been looking out for me because for some odd reason, I received two of these o-rings in my order, so now I had a spare. I took out the old one (and confirmed that it got obliterated), but then spent no less than 20 minutes trying to get the bolt to engage without letting the o-ring slip out again. I don't know what I was doing wrong, the videos made it look so easy. Perhaps it's because I was being stubborn and did not disconnect the water hoses from the oil cooler, so they were fighting my attempts to properly position the cooler on the block. Regardless, it was a challenge, but eventually I prevailed :).

As for the hoses, all the ones in the linked thread worked out for me, except for two. One was the rear heat hose 87245-3D090, which I was told was not right for my truck, and instead used 87245-35750:

1Nvc2Q5.jpg


Also, one of the throttle body hoses, 99556-10300, was longer than the one I removed, so I cut it to the same length as old.

I can post the list of all the hose and clamp part numbers that I used, if that would be helpful.


thanks, I did just watch some youtube videos last night and one talks about how people that get from below have 2 wheel drive.
gonna order a spare o ring , incase I have trouble like you did.....noticed some of your parts did not have typical toyota but EAC bags and numbers...who is that
 
Last edited:
thanks, I did just watch some youtube videos last night and one talks about how people that get from below have 2 wheel drive.

That makes sense!

gonna order a spare o ring , incase I have trouble like you did.....noticed some of your parts did not have typical toyota but EAC bags and numbers...who is that

No idea why that is, I've seen this before even when ordering form Toyota dealers.
 
noticed some of your parts did not have typical toyota but EAC bags and numbers...who is that


No idea why that is, I've seen this before even when ordering form Toyota dealers.

Dealers buy parts in larger quantities, bulk lots, and label them when selling smaller quantities, like 8 LBJ bolts that come in a 10 pack - that's what you are seeing.

Sent from my Pixel 4 XL using Tapatalk
 
Got my CV axles replaced today at NTB, with new OEM diff seals as well. $857.85 out the door, with a discount, despite being quoted $450~ over the phone. So yeah I won’t be going to NTB again. I am happy they got replaced, especially because they needed it BADLY…. But my wallet is not happy :mad2:
 
Took two years for me to realize I've been underestimating my MPGs every time I fill up the tank. I never take into account the fact that the odometer/speedometer are calibrated for the smaller stock tires. If I understand my owners manual correctly and my 4Runner came with 265/70 16s, then it's roughly a 3.4% difference. Makes me feel better.

Thanks to <a href="!241062!3rd-gen-t4rs/241062-pics-thoughts-after-upgrading-32-265-75-16-lt-tires.html">this guy</a> for enlightening me...
 
Took two years for me to realize I've been underestimating my MPGs every time I fill up the tank.

A good way to check the calibration of your odometer is to start tracking your distance with the GPS on your phone (or mile markers on the freeway) and drive 5 miles, then compare that to the odometer reading. That can give you a better idea than the door sticker.
 
saw my check engine light kick on....about a few miles later at a stop light notice idle is a little ruff and idling at about 600. p0446...let the game begin.
I had a spare charcoal cannister and all the electrical attachements....but bad guys took that a few weeks ago when they robbed my garage. Its all prob in a dumpster someplace as who can they sell it to or pawn shop it to. aholes
 
Cleaned it out from a weekend trip to Orcas Island, WA and threw in the weathertech floor mats that arrived while I was gone. I love the mats already, very durable and they fit perfectly. A little speedy but i'll never get my floors dirty again. Also about Orcas, it's a 3rd gen mecca. I saw probably 5-7 3rd gens and a rad 2nd gen. Some stock, some built out, it was really cool to see so many on the beautiful roads out there.
 
A good way to check the calibration of your odometer is to start tracking your distance with the GPS on your phone (or mile markers on the freeway) and drive 5 miles, then compare that to the odometer reading. That can give you a better idea than the door sticker.

I just use Waze through Android Auto to get my actual speed. I just wish there was an easier way to recalibrate the speedo than re-gearing or that little converter box. Maybe if I go with 4.88s my speedo will end up correct again.
 
I just use Waze through Android Auto to get my actual speed. I just wish there was an easier way to recalibrate the speedo than re-gearing or that little converter box. Maybe if I go with 4.88s my speedo will end up correct again.
If you have ABS then any gear ratio changes will have no effect on your speedometer.
 
Once I finally got the front diff drain plug out I was able to reboot the driver side CV axle and inner axle seal, replace driver side outer wheel bearing seal and replace diff drain and fill bolts with the Lexus versions.

Everything seems good but I'm hearing a squeaking noise when driving. It doesn't increase/decrease with speed and seems to be more prevalent at speeds below 10mph. It's present both when driving straight and turning. It was not there this morning.


iSOhafk.jpg


WLOqltL.jpg
 
...reboot the driver side CV axle and inner axle seal...

Guess I won't be doing the passenger side tomorrow. Way to think it through, genius. I was so concerned with not forgetting to refill the diff fluid before a test drive it somehow didn't occur to me that I'd have to drain it to do the other side. Hell, I even have extra washers. At least the passenger side doesn't need to be done.
 
Status
Not open for further replies.

Members online

Forum statistics

Threads
278,309
Messages
3,554,071
Members
248,016
Latest member
Advally Service

Trending content

Back
Top