1998 3.4 Timing Belt Woes - Misfire - Wrong Belt or Installation?

Sounds like a solid game plan. Ah ok, maybe double check in case.

Only real time I came across a issue where timing wouldn't line up was from excessive decking from either the head, Block or both.

I'd say maybe 1/16" or 1/8" off max might be ok. But it should line up. You can also lay the timing belt in the sun and maybe get a bit expansion out of it that way.

Oh are you checking the crank mark via the harmonic damper or the timing belt sprocket? Tomorrow when you try it again, I'd go off the crank sprocket timing mark and oil pump mark, as the outer ring on the damper might have spun a bit.
 
I think he means were the heads machined a lot. Were the heads machined and a lot of material removed from the heads or did you machine a lot of material off the block.
 
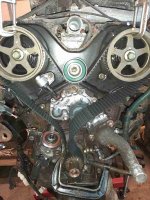
This is a photo of the last 5VZ-FE I did. Granted its on an engine stand. But you can see how I do it with C claps. I have all the play at the water pump so its a lot easier to put on this way.. Small C Clamps work great in the vehicle. Maybe it will help you maybe it wont. But with the c clamps locking the belt... It cant jump doing it this way...;-)
 

Attachments

  • 5vz-FE_Timing_Belt_On.jpg
    5vz-FE_Timing_Belt_On.jpg
    117.4 KB · Views: 259
Correct, it could be a mixture of a machine shop mess up and machined to much material off the heads or the block or both, or it has been done a few times before, and the engine is at its end of its service life. But I've only seen it 3 times in my auto career (20+ years).

I hope tomorrow you can get it nailed down. Keep us updated!
[MENTION=164664]brillo_76[/MENTION] yes c clamps work fantastic, just don't clamp them to hard.
 
Last edited:
But you can see how I do it with C claps. I have all the play at the water pump so its a lot easier to put on this way..It cant jump doing it this way...;-)

Clamping the crank is a brilliant solution. Thanks for posting and cheers to 2TH4IST for continued support. Will update for sure.
 
Correct, it could be a mixture of a machine shop mess up and machined to much material off the heads or the block or both, or it has been done a few times before, and the engine is at its end of its service life. But I've only seen it 3 times in my auto career (20+ years).

I hope tomorrow you can get it nailed down. Keep us updated!
[MENTION=164664]brillo_76[/MENTION] yes c clamps work fantastic, just don't clamp them to hard.

Exactly.. Just used to hold the belt in place... That is the best way I found to do this. Can put a belt on in like less then 5 minutes this way. Also those really big black paper clips work on the cams as well. You do need to use common sense doing this. Just tight enough to lock the belt to the pulley.
 
Clamping the crank is a brilliant solution. Thanks for posting and cheers to 2TH4IST for continued support. Will update for sure.

I also use a metal bicycle tire iron. Once that belt starts on the water pump pulley you got it made..:D It will go. Its so much easier this way because the water pump is smooth so the belts slides onto that pulley with ease.. The sliding on the crankshaft can be done... Its just easier and faster this way I have found.. :-) I did one that way and it had to mess with it a while. :)
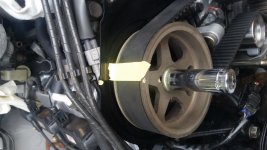
 
I managed to get the belt on using the [MENTION=164664]brillo_76[/MENTION] method but because there isn’t enough stretch in the belt it pulled both cams and couldn't realign them perfectly.


I liked this method because for first time I had tension on the driver side and slack on the tensioner side. The problem I had with using the Toyota procedure or working from crank up is there would be too much slack on the wrong side so when wrestling the belt over the tensioner it pulled the cams or crank or both off their marks. Offsetting the marks beforehand to try and compensate for this movement resulted in one or both moving when the tensioner was bolted up. It’s not rocket science once the cams are lined up and clamped you pull and keep the belt tight around the water pump and over the crank. My issue was the crank teeth were off with the belt rib by a lot so there was slack. I would have to have moved the LH cam significantly to get tension. If the belt is tight between crank and RH cam there is no real give to move it back to TDC.
I’ve watched and rewatched about dozen YT videos. Some use the Toyota procedure, Faye Hadley, Timmy’s cylinder head video (with a small cam tweak) and the belt slips over the tensioner relatively easily as they have tension on the driver side and slack on the tensioner side. Other videos, like Timmy’s TB belt, require significant prying to get the belt on, and some cases you can clearly see the crank is pulled off it’s mark.
To recap I used an OEM belt and crank belt mark was never going to reach the crank pulley dimple no matter how hard I pulled down. The consensus is just to ignore this mark and proceed. Why would Toyota have the belt mark in the wrong place? Maybe some aftermarket one yes. Hasn’t Toyota calculated the distance between LH cam and crank and positioned the marks exactly for initial installation, like they have for LH and RH cam marks. Why was my belt not reaching it’s mark/correct crank tooth for tension on driver side. Is the problem the rubber water pulley diameter or it’s position is off centre? I can’t fathom out why what should be a simple procedure have so many installation variables and techniques, like slacken this, remove that, turn it slightly this way etc. Did the Toyota engineers get it wrong? Are some people just lucky when installing?

Anyway as my cam marks are off I will pull it off and try again if [MENTION=164664]brillo_76[/MENTION] has any further guidance it would be appreciated. I’m really pissy sick of this.
 

Attachments

  • 20250126_154506 (1).jpg
    20250126_154506 (1).jpg
    130.7 KB · Views: 95
I had really similar issues when I did my timing belt last year...
It might be an unpopular solution, but after fighting and fighting to get things aligned correctly I just decided to try a NAPA belt for kicks. 50$ figured it was worth to identify if it was a belt issue or other. Removed the top pulley, and lined everything up, pulley back on. It lined up. I decided to just run the napa belt. It would have been nice to run the one from the toyota kit but my rig already has 260k, I personally don't think the timing belt will be the limiting factor anymore.

No codes, misfires, anything
 
I personally don't think the timing belt will be the limiting factor anymore.

No codes, misfires, anything
The NAPA belt may be fine - depends on who made it... That said, the 5vz is non-interference. As long as you can tow it back, you can slap on a new belt and be on your way.

-Charlie
 
I have used gates, continental, oem and aisin. I have aisin on there now and it fit fine. But then again I paid no attention to the marks on the belt, YMMV.
 
I have used gates, continental, oem and aisin. I have aisin on there now and it fit fine. But then again I paid no attention to the marks on the belt, YMMV.

Interesting. I only use OEM mfg belts from the air cabin kits. I believe they contain the original OEM belts. I don't see why other belt wouldn't work. I just loved the lines on the belt. Makes it so much easier to just clamp on the marks and slide it over the water pump and be done.

I seen other belts don't have the timing marks lines or they are wrong locations. I just replace all the seals when I do timing belts along with the water pump thermostat. New idler timing belt tensioner with cam seals and new front main seal as well. As I don't know what previous owners did. But that's just me.

I don't see why if the crank is in the proper position along with the 2 camshafts are in position why it wouldn't work without the belt marks. 6 manual engine turn overs would verify the engine is in time ( less would too) I just never did it without new belts with line marks on the 3 points. :-)
 
Ignoring the belt marks makes no difference. Across cams under top pulley is fine but always end up with slack LC-WP-CP. Can't be pulled taut if belt rib doesn't reach the ideal spline on CP. Brillo's method is the closest I've got it.
 
When I did seat covers it was much easier to stretch them over the seat when they were warm. Maybe putting the belt in a warm place before you try fitting it could help.

I've put interference engine together that was off that much. Though it was a single cylinder motorcycle engine with no computer and I probably set the points ignition to match. Crazy how exact it needs to be.
 
Last edited:
Just out of curiosity? Did you remove the crankshaft pulley and slide the belt on that way? Or just trying to put the belt on without removing the bottom cover?

Will the belt go into position with the timing belt tensioner reset and barely bolted in? How about for testing can you get it on with the tensioner out?

I am just trying to think as to why this wont go on and aligned. I know doesn't take much to have a cam sprocket move to the next position. I had that happen the first time I tried. Until I started using the c-clamp method. Then I didn't have that issue again.

Does this original belt still have the 3 timing marks on it? and is it facing the correct way? I think i recall you saying its a original belt if I am remembering correctly. As if they are still on the belt. You can aligned it all that way. If gone. I really don't know what else to suggest. I showed how I accomplish the belt changes.
 

Attachments

Crankshaft pulley was exposed and has movement. I pulled it forward like your photo and put belt halfway on. Have ried tensioerr out and also very loosely engaged. Same for top pulley. Old belt has no marks but I'm using a new belt. I could try reftting it to see if the problem is replicated but not sure what that proves. It was a real struggle fitting over water pump pulley but cam movement was minimal compared to other methods. Also, because the slack was on tensioner side it bolted up with no knock on effect.
Odd that no one has an explanation for some slipping on belt with no issue and others using levers. The "dark arts"
 
Crankshaft pulley was exposed and has movement. I pulled it forward like your photo and put belt halfway on. Have ried tensioerr out and also very loosely engaged. Same for top pulley. Old belt has no marks but I'm using a new belt. I could try reftting it to see if the problem is replicated but not sure what that proves. It was a real struggle fitting over water pump pulley but cam movement was minimal compared to other methods. Also, because the slack was on tensioner side it bolted up with no knock on effect.
Odd that no one has an explanation for some slipping on belt with no issue and others using levers. The "dark arts"

So longer temp tensioner bolts aren't going to help you. Those are a real PITA in vehicle due to their location.

So your slack is somehow on the other side instead by the tensioner. And your not off a tooth or 2 on the crankshaft belt mark? The first 2 times that what would get me that belt teeth on that crankshaft. Its snug onto the water pump pulley. That why I use the metal bicycle tire iron. As once it starts on. It will loosen some in complete place then your tensioner will hold the tension on it when fully in place with the pin pulled.
 
I removed AC compressor and bracket but yes longer bolts won't help doing install as per FSM. The crank belt mark is off by a tooth and a bit on the pulley (with pink dot at 12), and there isn't enough give in belt to pull it down to reach That's my issue. If I use the closest tooth that will engage it's too slack and why it takes a herculean effort to wrestle over tensioner or WP pulley's.

Can you clarify your comment
"The first 2 times that what would get me that belt teeth on that crankshaft?"
Cheers man.
 
All went well until fitting the timing belt. Everything at 12, Toyota belt marks (arrows pointing to front and held with binder clips) aligned with cams. CR belt mark wouldn’t reach, 1 tooth short on the pulley with a some slack between. No matter how hard I kept it tight I couldn’t get the mark to reach the pulley indentation, so tried doing it first, same result on RH cam – 1 tooth short. Ignored the CR mark. The cams were at 12 but the CR would be off by a tooth or the CR aligned and the cams didn’t or all would be off. I spent two days fighting this. Slackening or removing top idler only pulled the alignment out. Same for tensioner. I eventually got it on by rotating cams and CR to compensate for them moving when prying belt over bottom pulley whilst simultaneously holding RH cam with wrench to try and stop it moving, but it was so tight all round pulling the pin made no difference. The cam marks were still slightly off.
Rig was off the road for weeks as I did oil cooler gasket, replaced all the coolant hoses, engine mounts (more fun times) and valve cover gaskets so in my haste I just buttoned everything up and hoped for the best.
Needless to say, it misfired badly and I fear I’ve done damage.
Why does no one talk about this fight? I watched about a 6-7 YT videos and they all say it it’s a little tough to slip over the bottom pulley but jeez!!

The genuine Toyota belt had a 13568-69095 sticker on the sealed bag but the belt was printed 13568-62050 is this the same thing?? Google can’t confirm for sure.
I used a Aisin water pump, Koyo LAT 200B top pulley and NSK 62STD67T12DDWA18 tensioner pulley and a new Toyota tensioner.

Where did I go wrong? Is the belt the correct one? Have I damaged anything? I did everything possible to install correctly

I foolishly didn’t compare the old belt with new and am tempted to put it back on when I pull apart again.
Help and thanks if you got this far!

A "Toyota" label doesn't guarantee its Toyota OEM. When I did the full install on my 98 I paid the big bucks for the complete kit from a dealer. All the parts fit and I am happy I avoided the terrible scenario you are experiencing. Forget ebay, rock auto etc and get an OEM belt and do it again. Just doing the belt is pretty easy and fast.
 

Members online

No members online now.

Forum statistics

Threads
278,315
Messages
3,554,125
Members
248,016
Latest member
Advally Service

Trending content

Back
Top