2010,2011,2012 4runner Dual Battery (Tray$25, no Power Steering Reservoir relocation)

2010,2011,2012 4Runner Battery Tray Installed (Tray$25, Screws$6)

Hi Guys,

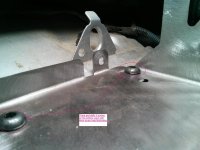
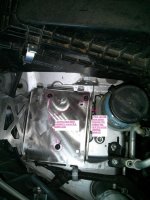
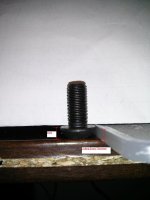
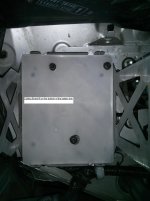
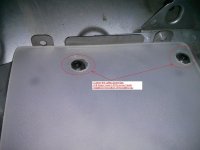
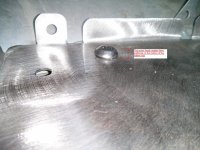
I finally order screws (M8X1.25, length 20mm, Qty=6, $6) from Ebay. I used a piece of transparent sheet (those toy packing material) to map the screw holes position. I then use my home tools (Dewalt drill) to drill 3 holes on the bottom of the tray. Please refer to the attached photos and would be appreciated to give your insights :

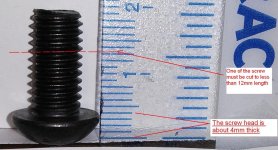
1. One of the screw must be cut to about 12mm in total length in order to screw in.

2. These screws (qty=3) created additional 4mm thickness at the bottom of the tray. Please give ideas, is 4mm too much? Shall I order other screws (with thinner screw heads or plastic screws instead) ?

3. I would like to proceed with minimum cost investment (current, I only spend $31 on the tray and screws). Before I buy the expensive battery (Odyssey PC1200), what is the best way to go from this point to make sure I can successfully install the battery? I was wondering if I could insert the battery from the top since there is a metal clip (the in-take air filter box) which could block the way.

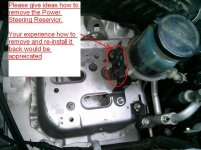
4. I also notice that the power steering reservoir has to be removed in order to slide in the battery. Is it easy to un-click it ? Any potential issue of unplug this reservoir from its mount? Shall I asked a mechanic to do this instead?
 

Attachments

  • Screw Head on Tray Photo 1.jpg
    Screw Head on Tray Photo 1.jpg
    134.7 KB · Views: 1,019
  • Screw Head on Tray Photo 2.jpg
    Screw Head on Tray Photo 2.jpg
    130.1 KB · Views: 1,213
  • Screw Head on Tray Photo 3.jpg
    Screw Head on Tray Photo 3.jpg
    135.7 KB · Views: 1,000
  • Screw Head Thickness.jpg
    Screw Head Thickness.jpg
    145.6 KB · Views: 818
Home Depot carries M8x1.25 bolts in various lengths if you want to source local. Bud Built solved the bolts sticking up by having his tray be in two parts. One part bolts down like yours the other then bolts to the first.

Edit: fixed typos, stupid phone.
 
5th Gen 4runner Power Steering Reservior

Anyone has experience to pop out the power steering reservoir. My intention is just to pop this out so that it allows me to insert the battery into the battery tray. Then I just reinstall the power steering reservoir:

1. Any tools require to pop it out?

2. Is this a mechanic job (professional garage person)? Or a normal person (like me, no mechanical knowledge) can do it easily?

3. Please share your actual experience how to remove, handle and reinstall it back.
 

Attachments

  • Power Steering Reservior.jpg
    Power Steering Reservior.jpg
    133.4 KB · Views: 1,285
The Aussie battery tray requires relocation of the reservoir. You should be able to find some instructions on the thread that covered the group buy.
 
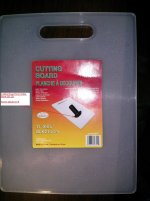
2010,2011,2012 4Runner Battery Tray Installed (Tray$25, Screws$6, Cutting Board$1.25)

Dear folks,

In order to install the battery, I have to find something which can raise the bottom floor of the tray after installing the screws.

I finally found a cutting board from dollar stores ($1.25) which the thickness, size and its plastic material looks pretty fit this purpose. I custom the size and drill holes on it and install in the battery tray.

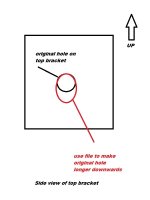
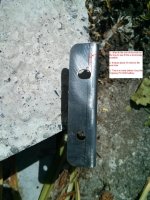
The next step would be filing the bracket mount holes (because of the raised 4mm floor after adding the cutting board.) Please recommend the tools and easiest way to go for a non-technical person like me.

Thanks
 

Attachments

  • Cut 1.jpg
    Cut 1.jpg
    139.5 KB · Views: 751
  • Cut 2.jpg
    Cut 2.jpg
    139.7 KB · Views: 773
  • Cut 3.jpg
    Cut 3.jpg
    142 KB · Views: 948
  • Cut 4.jpg
    Cut 4.jpg
    147.4 KB · Views: 810
  • Cut 5.jpg
    Cut 5.jpg
    136.2 KB · Views: 701
  • Cut 6.jpg
    Cut 6.jpg
    45.6 KB · Views: 763
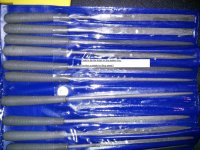
Those files may take for ever depending on the thickness of the bracket and number of holes. A rotozip or dremel would cut down on the time and probably provide better looking results.
 
Thank you for the valuable ideas. I bought this battery tray from ebay supplier with the description below. I will need to file 10 holes on this 16ga cold rolled mild steel, they have to be raised around 4mm level.

I only have simple hand file tools and a setup of Dewalt drills at home. Is this a difficult task for a non-technical person?

Shall I buy the battery first in order to mark the actual dimension ?
Or
I better file the battery tray first (minimize investment on battery cost) ?


PC1200 Odyssey Battery Box Hold Down Tray Mount Steel Construction | eBay

"This Battery box or tray is designed to fit the metal encased PC1200 Odyssey battery. This battery box is CNC plasma cut from 16ga cold rolled mild steel and then bent using a box pan brake. Each one of these boxes comes with four 3/8 holes in the bottom so you can weld it down or you can hammer down the four tabs on the side for a bolt down application. The lid is bolted down using 1/4" hardware, not included in this auction. These boxes are perfect for your custom Hot rod, tractor, trailer, weekend warrior or just to replace your already rotted existing unit. You will receive your box as unpainted bare steel. Please note: Battery and mounting hardware are NOT included!"
 
File Battery Tray Hole (Steel, hand tools)

I used hand tools to file a hole. It takes about 10 mins to file one hole.

This is to verify technical possibility before I purchase the Odyssey PC1200 battery.
 

Attachments

  • File Hole.jpg
    File Hole.jpg
    137.2 KB · Views: 717
Antman in regards to the fuse box u put it would u say using a high end type amp wiring kit work for the install in regards to the positive wire and negative wire. If u don't mind giving me ur opinion that would be great. Thanks

Yes, and no. :biggrin1:

"High end amp kit"- is what worries me; what size wire/ fuse holder?

Just make sure the gauge of wiring you use is sufficient. I would say an 8 gauge or lower (numerically) power feed would cover most of your needs for that fuse box- which has a 100a capacity. Be sure to fuse the wire as close to the battery as possible!
 
Diehard Platinum 31M Batttery

Yes, and no. :biggrin1:

"High end amp kit"- is what worries me; what size wire/ fuse holder?

Just make sure the gauge of wiring you use is sufficient. I would say an 8 gauge or lower (numerically) power feed would cover most of your needs for that fuse box- which has a 100a capacity. Be sure to fuse the wire as close to the battery as possible!


Dear guys,

It is noticed that some guys replace the stock battery with a Diehard Platinum 31M battery. This big monster would possibily an alternative solution as a dual battery system.

http://www.toyota-4runner.org/5th-g...ard-group-31m-battery-cage-8.html#post1923088

I would like to seek your comments about a single big monster is better or really need to build a dual battery system?

Looks like a single battery has already good enough for tought applications.

Thanks
 
Yes, and no. :biggrin1:

"High end amp kit"- is what worries me; what size wire/ fuse holder?

Just make sure the gauge of wiring you use is sufficient. I would say an 8 gauge or lower (numerically) power feed would cover most of your needs for that fuse box- which has a 100a capacity. Be sure to fuse the wire as close to the battery as possible!
Antman,

I was thinking of a 8 or 4 gauge amp kit from lighting audio or kicker which come with a fuse. Is there any fuse that your recommend?
 

Members online

Forum statistics

Threads
278,317
Messages
3,554,129
Members
248,016
Latest member
Advally Service

Trending content

Back
Top