Additionally while thinking about this job again - if you don't have a press - one option someone might consider is taking the axle assembly out and to a shop to have the bearing swapped - and then having them assemble everything EXCEPT FOR the last ring. The ring can be tapped down with a pipe over the axle shaft and set into the correct position at home fairly easily. Just know that its easier to tap the ring down than it is to bring it back up... so when you get close to the correct position just use light taps.

You are using an out of date browser. It may not display this or other websites correctly.
You should upgrade or use an alternative browser.
You should upgrade or use an alternative browser.
A possible solution to leaking axle seals
- Thread starter Drcoffee
- Start date

Boom Headshot
New member
Alright so it's well past 2am on a Tuesday morning and for whatever reason, I decided to read every post in here. Man, what a great thread. Coffee is way outside the box with great results, respected longtime vets of the forum are calling BS, Coffee is sticking to his guns, the vets are butthurt, Coffee is rather defensive, noobs are sh*t-owning Toyota dealerships and out of nowhere, fake penis videos start... ah... popping up.
THIS is why I read this forum.
Seems like everything has been covered but I wanted to add something for anyone using this method of installing the inner retainer:
No press? No problem, cheapass. Rule of thumb seems to be that the inner retainer needs to be 1mm from the ABS ring. Sitting there using your wifes metal salad tongs to hold a hot metal ring in it's precise location while it cools down isn't what I'd call easy or fun, and a couple of other posters mentioned a spacer. So I hauled my butt out of bed, grabbed my caliper and started measuring common household items. At 2:30am.
It turns out that the thickness of a dime is 1.34mm. So before you slide your retainer down the axle shaft, place a few dimes flat on the ABS ring. Once you do, you'll have proper spacing without buying or machining your own spacer, or using something that will melt to your project. Then, when the retainer cools off, just grab a needlenose and yank the dimes out. At worst, you're giving up 3/10ths of a millimeter of seal position. WGAF.
I will be trying this on my 2000 SR5 on Saturday and I'll report back after the grease test.
THIS is why I read this forum.
Seems like everything has been covered but I wanted to add something for anyone using this method of installing the inner retainer:
I have seen another post recently by a member who had heated the inner retainer to expand it. And rather than pressing it, he slid it into place and let it cool to tighten back to the axle. Whatever works for you.
Originally Posted by engifineer
Wanted to add to this thread (and thanks for creating it).
As a note (I almost found this out the hard way). With a little bit of heat from a small propane torch, the retainer will go on with almost no effort. I put mine on the shaft and it literally fell all the way down. I luckilly yanked it back off before it cooled and shrunk into placeBut if you had something in place as a stop, you could heat the ring and drop it right on.
No press? No problem, cheapass. Rule of thumb seems to be that the inner retainer needs to be 1mm from the ABS ring. Sitting there using your wifes metal salad tongs to hold a hot metal ring in it's precise location while it cools down isn't what I'd call easy or fun, and a couple of other posters mentioned a spacer. So I hauled my butt out of bed, grabbed my caliper and started measuring common household items. At 2:30am.
It turns out that the thickness of a dime is 1.34mm. So before you slide your retainer down the axle shaft, place a few dimes flat on the ABS ring. Once you do, you'll have proper spacing without buying or machining your own spacer, or using something that will melt to your project. Then, when the retainer cools off, just grab a needlenose and yank the dimes out. At worst, you're giving up 3/10ths of a millimeter of seal position. WGAF.
I will be trying this on my 2000 SR5 on Saturday and I'll report back after the grease test.

mtbtim
Elite Member
Just to clarify, I never indicated the bent axle caused an oil leak. See post 122 (posted again below)
My thoughts: Hey there's nothing wrong with ignoring the FSM and doing a job 4 times to try and get it right (on your own car, of course). But really, this entire thread is dedicated to you figuring something out that Toyota had posted probably when they designed the rear ABS axle... I'm guessing sometime in the 90's??
Do you always scoff at factory published specs before you even read or try them? You did it twice when I mentioned them for two different jobs in this thread.
By now you should know my method for doing this job (per FSM), which is the way I did it last year and also in 2008. From my post #122 in this thread:
There is more than one way to skin a cat, and ultimately the goal is to get the ring in the correct location and prevent an axle seal leak. And while an axle leak is definitely a PITA, it typically isn't a show stopper.
But my issue here now is that you're encouraging others to "stick their head in the sand" (to use your words) when it comes to the FSM. Service manuals are there for a reason - so you don't have the do the same job 4 times. I strongly encourage people (I'm referring to non-technicians, pro-techs already will) to reference the proper materials any time they're doing a job for the first time, rather than rely solely on "procedures" posted by "forum experts" (that goes for crap I post too, hahahaha).
:focus:
I just did this job for the 7th time yesterday. I think it's fair to say I know this repair very well now. Every time I used the Dr. Coffee method and flipped the orientation of the inner retainer. His method is smart and it works great. Why bother measuring to the flange when you know that 5mm of polished axle showing above the retainer pretty much gets the seal lip dead center on the 10mm polished shoulder of the retainer. Plus, the FSM measurement numbers are out the window now because of the new seal design. Shop mechanics blindly following numbers out of the FSM are why this is probably the #1 repair that is screwed up by the supposed professionals. It happened to me. My local Toyota dealership botched the repair on my rig. The mechanic didn't even know what a grease test was. Every axle seal job I do for a local 3rd Gen owner is redeeming me for being stupid and letting myself get bent over for dealership labor rates. My local dealer charges $150/hr.
I would never just take a measurement to the flange and call it good. Doing the grease test verifies you got the axle seal in correctly without creasing it and moving the seal lip in further and it also lets you know you got the inner retainer in the proper spot on the axle. The grease test is simple and quick to do and gives you the peace of mind you've done it right. I've done the grease test for everyone I've helped so they can see for themselves it's been done right.
The pictures below show where the new seal design will ride on the inner retainer if somebody blindly follows the FSM. The middle witness mark is from the original seal from the factory. The witness mark close to the bevel is from the new design. With a little axle play from a worn out bearing, that seal is going to ride on the bevel and fail. Ideally, you want the seal to be riding closer to the middle of the polished shoulder. Whether you keep the retainer in the original orientation and move it in closer (3mm of polished axle showing) or you flip the orientation and keep it in the original spot on the axle (5mm of polished axle showing) you need to address the inner retainer due to the new seal design. With a new bearing, the seal riding close to the bevel will last for a quite a while before axle play from a worn bearing will cause it to fail. With the seal riding near the center of the retainer, it's going to allow for lots of axle movement and will thus last longer before the seal eventually fails from the strain of the axle movement.
Anyway, that's my two cents.
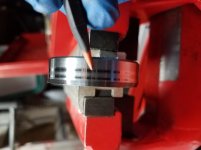
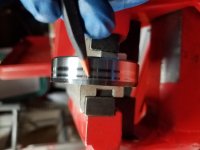
Attachments


Last edited:
rear seals
my hat is off to you Dr Coffee.You saved me a lot of head pounding.2nd time around I followed your advise after 1st time leaked in 2 weeks.it has been 3 yrs no leaks.I should have thanked you then.I don't post or type on the site I just read and learn, and you are the man.belated thanks.I just happendto see this tonight. I would like to say thanks.:usa2:
my hat is off to you Dr Coffee.You saved me a lot of head pounding.2nd time around I followed your advise after 1st time leaked in 2 weeks.it has been 3 yrs no leaks.I should have thanked you then.I don't post or type on the site I just read and learn, and you are the man.belated thanks.I just happendto see this tonight. I would like to say thanks.:usa2:

Drcoffee
Senior Member
Just to clarify, I never indicated the bent axle caused an oil leak. See post 122 (posted again below)
My thoughts: Hey there's nothing wrong with ignoring the FSM and doing a job 4 times to try and get it right (on your own car, of course). But really, this entire thread is dedicated to you figuring something out that Toyota had posted probably when they designed the rear ABS axle... I'm guessing sometime in the 90's??
Do you always scoff at factory published specs before you even read or try them? You did it twice when I mentioned them for two different jobs in this thread.
By now you should know my method for doing this job (per FSM), which is the way I did it last year and also in 2008. From my post #122 in this thread:
There is more than one way to skin a cat, and ultimately the goal is to get the ring in the correct location and prevent an axle seal leak. And while an axle leak is definitely a PITA, it typically isn't a show stopper.
But my issue here now is that you're encouraging others to "stick their head in the sand" (to use your words) when it comes to the FSM. Service manuals are there for a reason - so you don't have the do the same job 4 times. I strongly encourage people (I'm referring to non-technicians, pro-techs already will) to reference the proper materials any time they're doing a job for the first time, rather than rely solely on "procedures" posted by "forum experts" (that goes for crap I post too, hahahaha).
:focus:
Maybe its too early and I didnt read your post correctly, but are you saying I did not use the FSM when I started the task of fixing my axle leak?
Let me assure you that I did. And after swearing a blue streak after the axle seal leaked 3x, I pulled my "head out of the sand" and investigated why.
And you may have missed the post that explained and illustrated how the FSM written for The 3rd gen wasnt modified for the newly designed seal that was made from 2003 on.
You may also have missed Me saying, "its your truck, do what you want"
Why do a-holes feel the need to hijack threads because they have a keyboard in front of them. Go start another thread on why my method is bad bad bad. But please dont post here on why you disagree. The info is here for those who have Not had success using the FSM or stealership.
Please be respectful of the forum members who dont see the world through your eyes. If you disagree, dont read the thread. Its that simple :lmao:
Drcoffee
Senior Member
It turns out that the thickness of a dime is 1.34mm. So before you slide your retainer down the axle shaft, place a few dimes flat on the ABS ring. Once you do, you'll have proper spacing without buying or machining your own spacer, or using something that will melt to your project. Then, when the retainer cools off, just grab a needlenose and yank the dimes out. At worst, you're giving up 3/10ths of a millimeter of seal position. WGAF.
I will be trying this on my 2000 SR5 on Saturday and I'll report back after the grease test.
No disrespect intended, but thats a Bad idea. There is no way to know if the ABS ring is in the correct position. You are overthinking this. Work from the specs I posted. If the retainer is too inboard, it will rub the housing, and if its too far outboard, it will miss the target spot. The ABS can be out of place and still function correctly. But its not a reference point. Good luck with it
:thumb3:
Drcoffee
Senior Member
And for anyone who knows an FJ Cruiser owner, Toyota didnt get any smarter a decade later, because the FJC suffers the same axle seal design flaw. I just replaced both axle seals on my '07 FJ and the bevel is still too close the seal lip.
The mod is effective here as well. And a plus is that you dont have to measure the retainer position. Simply flipping it gets it done.
But dont believe your Lying eyes. The FSM is the gospel and the engineers are infallable. <= (Sarcasm)


The mod is effective here as well. And a plus is that you dont have to measure the retainer position. Simply flipping it gets it done.
But dont believe your Lying eyes. The FSM is the gospel and the engineers are infallable. <= (Sarcasm)
Last edited:

2ndhandyotaman
Member
I'll share what I did for locating the tone rings, it's super easy to do. I fully inserted the axle shafts back into the housing, inserted a black Sharpie into the hole for the ABS sensor and rotated the axle shaft. This left a tell-tale mark for the location of the tone ring. From there, I used a tape measure and got that distance from the back side of the drive flange to the black Sharpie line.
Using that measurement, I pressed on the tone ring until the center of the ring hit that measurement. This put the tone ring dead center inside of the bore for the ABS sensor. Maybe this level of precision isn't really necessary, but it made my OCD happy and it just looked good- like I had half of an idea of what I was doing.
Using that measurement, I pressed on the tone ring until the center of the ring hit that measurement. This put the tone ring dead center inside of the bore for the ABS sensor. Maybe this level of precision isn't really necessary, but it made my OCD happy and it just looked good- like I had half of an idea of what I was doing.
alwaysbored786
New member
Just reporting in, got 3k on my rear seals using the DrCoffee method for the collars, no leaks thus far!
Sent from my iPhone using Tapatalk
Sent from my iPhone using Tapatalk
OK. Finally getting around to this.
I think someone in here posted that they had to resurface the drums due to oil contamination. Can't I just clean the drums with a de-greaser? The drums (and unfortunately the factory shoes) were brand new a couple of years ago so they don't really need machining otherwise.
I think someone in here posted that they had to resurface the drums due to oil contamination. Can't I just clean the drums with a de-greaser? The drums (and unfortunately the factory shoes) were brand new a couple of years ago so they don't really need machining otherwise.
Drcoffee
Senior Member
OK. Finally getting around to this.
I think someone in here posted that they had to resurface the drums due to oil contamination. Can't I just clean the drums with a de-greaser? The drums (and unfortunately the factory shoes) were brand new a couple of years ago so they don't really need machining otherwise.
Its not the oil thats the issue, the grease causes the shoes to swell and grab the drums. The drums overheat and warp. Machining them brings them back to true.
Its not the oil thats the issue, the grease causes the shoes to swell and grab the drums. The drums overheat and warp. Machining them brings them back to true.
My shoes don't appear to have swollen much. I only noticed reduced braking performance on my last drive. What I did learn researching this is that apparently oil can penetrate iron and actually impregnate the drum.
https://www.cbsparts.ca/admin/bulletins/trouble_shooting_brake_drum_wear_by_meritor.pdf (page 5, figure 6.16)
I might call the local machine shop and see if they have any experience with this and if they think they could machine a fresh surface or worst case I'll have to replace the drum... which sucks because as posted above they were new factory drums and shoes just a couple of years ago, and I justified the premium for the factory parts thinking they'd last for many more years.
Drcoffee
Senior Member
My shoes don't appear to have swollen much. I only noticed reduced braking performance on my last drive. What I did learn researching this is that apparently oil can penetrate iron and actually impregnate the drum.
https://www.cbsparts.ca/admin/bulletins/trouble_shooting_brake_drum_wear_by_meritor.pdf (page 5, figure 6.16)
I might call the local machine shop and see if they have any experience with this and if they think they could machine a fresh surface or worst case I'll have to replace the drum... which sucks because as posted above they were new factory drums and shoes just a couple of years ago, and I justified the premium for the factory parts thinking they'd last for many more years.
The factory drums should last the life of the truck. Super heavy duty. Just have them trued and put them on again. If they cant be cut further, pull a set from a salvage yard. They dont do much of the stopping so they dont wear out.
A couple of thoughts:
1. Who has a compelling reason to remove the ABS sensor? Mine has been in there for 21 years and it's not really wanting to come out. The axle comes out fine with it in place, and it appears the seal will too. Why bother?
2. I think it's probably a good idea to replace the bearing retainer regardless if you can get it off without cutting it. The outer one and snap ring at least- that's the only thing holding the axle in place. I'm concerned its designed as a 1 time press fit and it's cheap enough to replace.
1. Who has a compelling reason to remove the ABS sensor? Mine has been in there for 21 years and it's not really wanting to come out. The axle comes out fine with it in place, and it appears the seal will too. Why bother?
2. I think it's probably a good idea to replace the bearing retainer regardless if you can get it off without cutting it. The outer one and snap ring at least- that's the only thing holding the axle in place. I'm concerned its designed as a 1 time press fit and it's cheap enough to replace.

JRZEE2000TR4LTD
Senior Member
What if you did not flip the cup and set it 5mm ?
Do the grease test. If your near the middle you'll be fine.
mtbtim
Elite Member
What if you did not flip the cup and set it 5mm ?
The stock location for the retainer is 5mm of polished axle showing above the retainer. With it in that location with the new seal design, your seal lip will be riding fairly close to the non-polished bevel. The picture below show a witness mark where the original seal was riding and where the newly designed seal rides when the position of the inner retainer goes unchanged. If you flip the retainer, you can keep the retainer in the same position on the axle and have the seal lip riding near the center of the polished shoulder because you gain back the 2mm seal lip difference between the old and new seal design because you don't first have to push past the bevel which is around 2mm wide. Hope that makes sense.
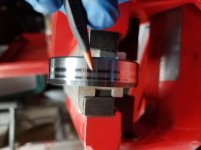
Attachments


BN-2B
Member

Add another patient to the good Doctors retainer reversal list.
I’m here to see if my grease test is a pass or a fail before completing the mission.
Thinking she could take another millimeter, but not sure.
Also, wondering if the outer seal (black) should be exposed this much.
Can’t remember if it was that way before...

...Thanks!
mtbtim
Elite Member
Add another patient to the good Doctors retainer reversal list.
I’m here to see if my grease test is a pass or a fail before completing the mission.
Thinking she could take another millimeter, but not sure.
Also, wondering if the outer seal (black) should be exposed this much.
Can’t remember if it was that way before...
...Thanks!
The retainer needs to be pressed on further. The seal lip is riding closer to back near the bevel. If you press the retainer on until you have 5mm of polished axle showing, the seal lip will be riding close to dead center on the 10mm polished retainer shoulder. To measure the distance while your doing the press work, release the bottle jack a liltle and then have a friend lift up the assembly while you get a 5mm allen wrench above the retainer to do a quick measurement. If it's not far enough, press it down a little further. You can do varying degrees of adjustment with the press depending on how much you move the jack handle. For a very small movement, lift the jack handle only a little before bringing it back down. By doing small movements and rechecking the distance over and over, you'll have a very good chance getting it perfect.
Similar threads
- Replies
- 3
- Views
- 5K


