a/t fluid overheat

Ah hah! That makes it crystal clear now. I mis-read the write-ups somehow.

OK, so going to attack this when I get home, and thanks to everyone's patience and very clear explanations, I'm going to:

-Attach the cooler to the driver's side using the zipties that run through the condenser and the radiator. I guess I just stick those on the cooler's 4 corners that are in contact with the condenser?

-If I can use a box wrench and reorient the L-shaped return port on the radiator to clear the lower rad hose, I can mount the cooler with the ports facing the driver's side.

-Buy some more 3/4" coolant tubing (I don't know why I keep saying 3/8) to run from the driver's side radiator port and on up to the bottom port on the cooler. The last time I was at Autozone, the only thing I could find (without asking) was just a little 4' section of pre-cut tubing. I have one of those already that I used for the transmission flush, but if it doesn't reach for some reason, is there a better way to go about sourcing this that I can get tonight? Hardware store maybe?

-I'll take the included tubing (hoping that it's the correct diameter) and connect the top port on the cooler and run it all the way back to the hard return port on the transmission. This might be where the length of the included tubing comes into to play though.

-I'll ziptie all of the tubing to secure it.

Any thoughts on the order of operations here? I'm thinking that if I mount the cooler with the hoses connected and free hanging, I can get a better idea of where I should mount it without interference from other stuff.


Is yours mounted on the drivers side? I can't tell from that sentence, but if so, that's what I'll be attempting too!

Another way to run it is having the intake/outtake pointing up on the cooler. I ran the line from the radiator through the passenger side to the intake on the left side of the cooler and ran the outlet on the right going to the driver side to a inline filter and back to the tranny. I would take pictures of it, but it's in the shop getting re-geared. For this, you don't need to change anything coming off the radiator.
 
Another way to run it is having the intake/outtake pointing up on the cooler. I ran the line from the radiator through the passenger side to the intake on the left side of the cooler and ran the outlet on the right going to the driver side to a inline filter and back to the tranny. I would take pictures of it, but it's in the shop getting re-geared. For this, you don't need to change anything coming off the radiator.

Yeah, that crossed my mind but I'm going to stick with the tried/true/recommended side-ways mounting. If there is a .01% chance of something bad happening, it'll happen to me.
 
-Buy some more 3/4" coolant tubing (I don't know why I keep saying 3/8) to run from the driver's side radiator port and on up to the bottom port on the cooler. The last time I was at Autozone, the only thing I could find (without asking) was just a little 4' section of pre-cut tubing. I have one of those already that I used for the transmission flush, but if it doesn't reach for some reason, is there a better way to go about sourcing this that I can get tonight? Hardware store maybe?

3/8" is the inner diameter of the transmission hose. 3/4" tubing is wrong. Just go to the auto parts store and you'll be able to find some 3/8" transmission hose. It fits a little tighter on the fittings but if you use some ATF to lubricate it first, they will slide right on.

Just watch the video I provided and you should understand the order of how to do it.
 
Yeah, that crossed my mind but I'm going to stick with the tried/true/recommended side-ways mounting. If there is a .01% chance of something bad happening, it'll happen to me.

There is nothing wrong with mounting it facing up, per instructions, up or to the side is the same thing. It's when you direct in facing down is where they do not recommend. Either way will work, for anyone else considering it.
 
There is nothing wrong with mounting it facing up, per instructions, up or to the side is the same thing. It's when you direct in facing down is where they do not recommend. Either way will work, for anyone else considering it.

Ah! Got it. I remember seeing some sort of danger with a vertical orientation and air bubbles or something, but I couldn't quite remember. Cheers!
 
Ah! Got it. I remember seeing some sort of danger with a vertical orientation and air bubbles or something, but I couldn't quite remember. Cheers!

And depending on what company you buy it from, the installation recommendations are different. True cool, who have their coolers manufactured at the same place as B&M, say you can mount it any way you want, even upside down and you can make either fitting the inlet or outlet. It doesn't matter.

Here's a question and answer from the True Cool website frequently asked questions area. Frequently Asked Questions | Tru-Cool

How should I mount the oil cooler fittings?

"Fittings can be located up, down or sideways. Combine that flexibility with a compact design and it’s clear that Tru-Cool offers distinct advantages that enable quick, easy design."

Now, is there a chance air could get trapped in there in an upside application. Maybe. Is it going to be enough air to have a huge affect on the cooling efficiency. Possibly. Don't really know.

It's still my theory that the fluid pressure will push most of the air out of the cooler, but I did talk to a guy from B&M that said air can definitely get trapped in the coolers and have a negative effect.

I just find it interesting how one company can say one thing and the other can say the total opposite. Maybe it's just a marketing strategy for True Cool to say their coolers have more installation flexibility than their competition.

Here's another interesting question and answer in regards to bypassing the radiator cooler:

Should I disconnect the radiator in-tank oil cooler when I install a Tru-Cool cooler?

"Do not disconnect the in-tank oil cooler if you can avoid it. Your in-tank cooler offers additional cooling and helps preheat the transmission. In colder climates the in-tank cooler should never be disconnected from the system."
 
Ok, so this is going as I expected. I sprayed coolant everywhere because I kept unscrewing the drain plug until it finally all came gushing out.

The I tried catching as much as I could in the clean bucket but as I was starting to pour it back in I realized that I caught the stuff spraying everywhere and it picked up a ton of crap with it. There's a film of oil on top of the coolant in the bucket. Soooo I'm guessing I have to trash that now, right? I'm going to drain what I just put in too since I let half a quart get away from me before I realized I should stop.

I have 3/4 of a gallon of new pre diluted SLLC coolant, so that'll have to do for now and I won't be able to drive it until the next gallon(s?) come in from Amazon. I forget how much goes in the rad, so I'll just look at my order history.

I tried "rotating" the driver's side rad port by loosening that nut. It wasn't budging. I tightened the nut and it was moveable. Then I realized I was just bending the damn thing, and that's not ok.

So, it's zip tied to the passenger side since that port doesn't rotate on my denso rad.

What a mess. I'm calling it for today. Thanks for the help all. I'm cursed.
 
Ok, so this is going as I expected. I sprayed coolant everywhere because I kept unscrewing the drain plug until it finally all came gushing out.

The I tried catching as much as I could in the clean bucket but as I was starting to pour it back in I realized that I caught the stuff spraying everywhere and it picked up a ton of crap with it. There's a film of oil on top of the coolant in the bucket. Soooo I'm guessing I have to trash that now, right? I'm going to drain what I just put in too since I let half a quart get away from me before I realized I should stop.

I have 3/4 of a gallon of new pre diluted SLLC coolant, so that'll have to do for now and I won't be able to drive it until the next gallon(s?) come in from Amazon. I forget how much goes in the rad, so I'll just look at my order history.

I tried "rotating" the driver's side rad port by loosening that nut. It wasn't budging. I tightened the nut and it was moveable. Then I realized I was just bending the damn thing, and that's not ok.

So, it's zip tied to the passenger side since that port doesn't rotate on my denso rad.

What a mess. I'm calling it for today. Thanks for the help all. I'm cursed.


Sounds like you need to cleanse the bad juju on your rig. Go sacrifice a chicken, dip a crow's foot into the blood and draw whatever symbols you need to to ward off the evil spirits.

And, go get yourself a tasty high alcohol content beer and forget your truck troubles for a while. Doctor Timmy's orders.
 
Ok, so this is going as I expected. I sprayed coolant everywhere because I kept unscrewing the drain plug until it finally all came gushing out.

The I tried catching as much as I could in the clean bucket but as I was starting to pour it back in I realized that I caught the stuff spraying everywhere and it picked up a ton of crap with it. There's a film of oil on top of the coolant in the bucket. Soooo I'm guessing I have to trash that now, right? I'm going to drain what I just put in too since I let half a quart get away from me before I realized I should stop.

I have 3/4 of a gallon of new pre diluted SLLC coolant, so that'll have to do for now and I won't be able to drive it until the next gallon(s?) come in from Amazon. I forget how much goes in the rad, so I'll just look at my order history.

I tried "rotating" the driver's side rad port by loosening that nut. It wasn't budging. I tightened the nut and it was moveable. Then I realized I was just bending the damn thing, and that's not ok.

So, it's zip tied to the passenger side since that port doesn't rotate on my denso rad.

What a mess. I'm calling it for today. Thanks for the help all. I'm cursed.

My Pep Boys has red and pink coolant. Matches the exact specifications as the toyota stuff.

https://www.pepboys.com/product/details/879899/00053

https://www.pepboys.com/product/details/879901/00053
 
Sounds like you need to cleanse the bad juju on your rig. Go sacrifice a chicken, dip a crow's foot into the blood and draw whatever symbols you need to to ward off the evil spirits.


And, go get yourself a tasty high alcohol content beer and forget your truck troubles for a while. Doctor Timmy's orders.

Seriously. Thanks for the orders, doc! A friend,who knows about Toyota wrenching because of his 84 supra, came over, saw the the mess, and promptly handed me a beer. He reminded me it's not my daily, it's Friday, I don't need to get to work tomorrow, and to "know when to fold 'em, know when to walk away, know when to run!"

Did I mention Kenny Rogers is my friend? Jk.

So, yeah, things learned yesterday;
-Using a vice grip on those damn spring clips for the rad hoses isn't a good idea. Long needle nose pliers work way better.
-That butterfly screw for the radiator drain plug isn't hollow on the denso rad like I think the OEM one was. So, don't keep unscrewing it hoping it'll start a little stream to drain into your clean bucket. Oh, and probably leave the radiator cap on when you're draining from the bottom?

Always learning.

The included 5/16 hose does reach from the transmission return line (driver's side) to the cooler with a couple feet to spare. It's OK to use that diameter right? There aren't any complicating issues from using a slightly smaller diameter as far as pressure on the system or anything? I'm going to order 5 feet of 3/8" transmission/oil hose from Amazon for the cooler return to metal hardline on the transmission. Does this stuff look OK to you all? https://www.amazon.com/Derale-13016-Transmission-Engine-Hose/dp/B004XONNTE Oh and since I'm ordering, I'm getting the filter you recommended too.

Thanks!
 
Last edited:
Is yours mounted on the drivers side? I can't tell from that sentence, but if so, that's what I'll be attempting too!
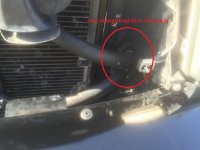
The cooler is mounted in the middle of my AC condenser with the ports facing the driver side.

I was also thinking of going that route but when I read a write-up from [MENTION=78997]Drcoffee[/MENTION] saying he had to bend the driver side L-shaped cooler fitting a little to clear the fan shroud, I decided to run the lines to the passenger side. I didn't like the idea of cranking on that fitting, because any time you bend metal, you fatigue it and increase the chances of it cracking. You obviously just can't point the fitting towards the 3 o'clock position because the lower radiator hose connection is in the way. Did you have to bend the fitting to clear the fan shroud to have it at the 2 o'clock position?

Any chance you could share some pictures of how you ran your lines? I'm sure people would appreciate seeing how you did it.
I did not bend the L shaped fitting. In the 2 o'clock position, it give me just enough clearance from the lower radiator hose and fan shroud.


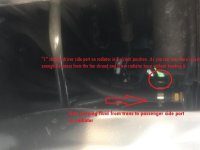
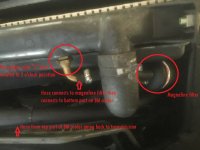
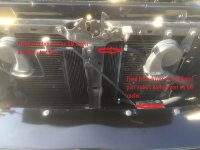
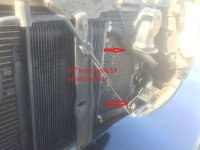
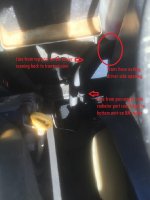
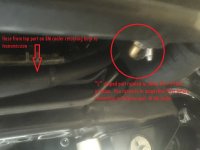
Some pics of how I mounted my B&M cooler and how I ran my lines. I mounted it in the middle of the condenser in order to give my ac condenser a little more exposure for airflow coverage. The drawback is that the bar in the middle is blocking some airflow to my B&M cooler. I used the supplied zip ties and as mentioned earlier it is mounted only to the condenser and not radiator + condenser but it is still very secure.

1 trans to passenger side radiator port.jpg

2 L fitting 1.JPG

3 cooler mount on ac condenser.JPG

4 cooler mount lines on through driver side.JPG

6 cooler lines through driver side hole.JPG

5 cooler lines under hood.JPG

7 fitting 2.JPG
 

Attachments

  • 2 L fitting 1.JPG
    2 L fitting 1.JPG
    132 KB · Views: 226
  • 3 cooler mount on ac condenser.JPG
    3 cooler mount on ac condenser.JPG
    117.9 KB · Views: 221
  • 4 cooler mount lines on through driver side.JPG
    4 cooler mount lines on through driver side.JPG
    109.3 KB · Views: 198
  • 5 cooler lines under hood.JPG
    5 cooler lines under hood.JPG
    126.8 KB · Views: 205
  • 6 cooler lines through driver side hole.JPG
    6 cooler lines through driver side hole.JPG
    118.8 KB · Views: 197
  • 7 fitting 2.JPG
    7 fitting 2.JPG
    127.9 KB · Views: 193
  • 1 trans to passenger side radiator port.jpg
    1 trans to passenger side radiator port.jpg
    46.2 KB · Views: 206
The cooler is mounted in the middle of my AC condenser with the ports facing the driver side.


I did not bend the L shaped fitting. In the 2 o'clock position, it give me just enough clearance from the lower radiator hose and fan shroud.


Some pics of how I mounted my B&M cooler and how I ran my lines. [...]

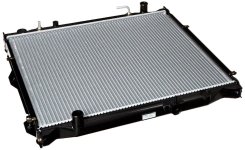
That is a very nice setup! I'm pretty convinced that our radiators are different though. I unscrewed that nut around the L-shaped port, and that thing wasn't rotating for the life of me. In fact, I could see the inlet port physically moving when I was trying to rotate the L-return port. I didn't want to break that section of the radiator, so I stopped. Once I replaced that nut and was trying to force on the 5/16 hose (yeah I know, too small) the L-shaped port moved toward the driver side. I figured maybe it only rotated with that nut on, so I kept pushing...until I realized I was physically bending the port.

To me it looks like I can see the difference in construction between my radiator's L-return and yours (attached the Amazon product photo). It's too bad though because I *really* like your install and how it's on the driver's side. There's so much less going on over there and more room for it to breathe. Ah well, the zipties have been tightened anyway, so it is where it is now (almost exactly where mtbtim's video shows).
 

Attachments

  • 81okdlt3JlL._SL1500_.jpg
    81okdlt3JlL._SL1500_.jpg
    139.9 KB · Views: 170
Well shoot...I started looking locally for the parts I'm about to order from Amazon one last time. Local dealership has the un-diluted SLLC coolant for $29/gal (compared to $33 and 3 days shipping even with Prime from Amazon).

It turns out NAPA has bulk transmission oil hose in 3/8" inner diameter (https://www.napaonline.com/napa/en/p/NBGH1937/NBGH1937) for $3.33 a foot, which isn't that bad right? NAPA also carries the Magnefine filters for about $10 cheaper than Amazon.

Edited to remove a bunch of crap because I'm an idiot who didn't think to check if there's a NAPA near the dealership that might have all of this in-stock, instead of driving all over town.

Ok, this is happening, dammit!

:crybaby:
 
Last edited:
[MENTION=116877]fourfive[/MENTION], thanks for posting the pics of your install. Should be very helpful to others wanting to mount it in a similar fashion.
 
I echo the last statement. You my friend are a great candidate for a cooler. Since you've replaced your radiator, I (and the cooler manufacturer) recommend installing it in series with the radiator per the installation instructions.
33.gif
6.gif

4.gif

The stupid Spam Bot strikes again.
 
Ok, so I'm taking a break because it's almost 100 out, and Euro 2016 and air conditioning are a good break.

I realized I bought the 3/8 filter not realizing that I was hooking it up between the rad and cooler. I already have the 5/16 hose that was included with the cooler attached to the radiator return port because it seemed like a decent enough fit and it was a way to save some money.

I was able to wrestle the 5/16 hose on to the filter ports, but I just want to make sure there won't be any issues with this.

cde54807afcf66b92a7f295348f68a85.jpg


Yes, I'll be replacing the zip ties that secure the hose to the filter with hose clamps, but I just wanted to see how it would look for now.

So far today;
-filled up the rad with a coolant. I got the concentrate this time because it seems like it's more cost effective than the pre-diluted. However, it's definitely a different and darker red color even after I diluted it. I know the pre-diluted stuff I got was SLLC and it seems like the concentrate is only LLC. Are these different? Is it ok that I just mixed a gallon of the LLC (50/50) with the pre mixed SLLC? (UPDATE; yes, they are different, but it's ok if they're mixed. Pink SLLC change interval is 100k and the red LLC is 50k)

-I ran the 3/8 hose to the transmission. I was able to reuse the hose abrasion protectors and hose clamp from the original hose I removed. Removing the hose from the hardline was a pain until I realized I should use a screw driver to push it off instead of pulling it. It seems like these hoses act a bit like Chinese Finger Traps, and pulling just tightens them
159a9c6479c45ea3c9f3969202572d12.jpg


I have to add some more abrasion protectors here and there but otherwise it's coming together!
 
Last edited:
Ok, so I'm taking a break because it's almost 100 out, and Euro 2016 and air conditioning are a good break.

I realized I bought the 3/4 filter not realizing that I was hooking it up between the rad and cooler. I already have the 5/16 hose that was included with the cooler attached to the radiator return port because it seemed like a decent enough fit and it was a way to save some money.

I was able to wrestle the 5/16 hose on to the filter ports, but I just want to make sure there won't be any issues with this.

cde54807afcf66b92a7f295348f68a85.jpg


Yes, I'll be replacing the zip ties that secure the hose to the filter with hose clamps, but I just wanted to see how it would look for now.

So far today;
-filled up the rad with a coolant. I got the concentrate this time because it seems like it's more cost effective than the pre-diluted. However, it's definitely a different and darker red color even after I diluted it. I know the pre-diluted stuff I got was SLLC and it seems like the concentrate is only LLC. Are these different? Is it ok that I just mixed a gallon of the LLC (50/50) with the pre mixed SLLC? (UPDATE; yes, they are different, but it's ok if they're mixed. Pink SLLC change interval is 100k and the red LLC is 50k)

-I ran the 3/4 hose to the transmission. I was able to reuse the hose abrasion protectors and hose clamp from the original hose I removed. Removing the hose from the hardline was a pain until I realized I should use a screw driver to push it off instead of pulling it. It seems like these hoses act a bit like Chinese Finger Traps, and pulling just tightens them
159a9c6479c45ea3c9f3969202572d12.jpg


I have to add some more abrasion protectors here and there but otherwise it's coming together!

I think you are misspeaking a little here. As far as I know, Magnefine doesn't make a 3/4" filter. That would be a huge fitting. From looking at their website, they sell 3/8" and 1/2". SO, I'm guessing your mistaken with the size. Maybe you bought the 1/2" instead of the recommended 3/8".

I do see a problem with using a 1/2" filter and 5/16" hose because the next time you go to change the filter, it's going to be a pain in ass to get off. You're also adding extra stress to the hose at that point so it may be more inclined to fail there.

You again mentioned using 3/4" line to run to the transmission but I'm guessing you're talking about the outer diameter of the hose and not the inner diameter. This does make it confusing for others reading about what you're doing with your install. I know this might sounds a little knitpicky but I try my best to give accurate information in my posts so I don't end up giving people bad information or steering them in the wrong direction.

With getting the rubber hoses off the metal transmission lines, you can either trying getting a good grip either with your hand or a tool to twist the line to break it free or you can always just cut it off with a razor blade. The tool I'm talking about that I've found works great for removing hoses is a Spark Plug Wire Puller. Here's a link to what I'm talking about:
https://www.amazon.com/Lisle-51750-..._SR160,160_&psc=1&refRID=79ACA2E92MZAEY4GDT2P

You're getting there dude and kudos for taking the challenge and doing the work on your rig yourself instead of paying somebody else to do it for you.
 
I think you are misspeaking a little here. As far as I know, Magnefine doesn't make a 3/4" filter. That would be a huge fitting. From looking at their website, they sell 3/8" and 1/2". SO, I'm guessing your mistaken with the size. Maybe you bought the 1/2" instead of the recommended 3/8".


I do see a problem with using a 1/2" filter and 5/16" hose because the next time you go to change the filter, it's going to be a pain in ass to get off. You're also adding extra stress to the hose at that point so it may be more inclined to fail there.


You again mentioned using 3/4" line to run to the transmission but I'm guessing you're talking about the outer diameter of the hose and not the inner diameter. This does make it confusing for others reading about what you're doing with your install. I know this might sounds a little knitpicky but I try my best to give accurate information in my posts so I don't end up giving people bad information or steering them in the wrong direction.


With getting the rubber hoses off the metal transmission lines, you can either trying getting a good grip either with your hand or a tool to twist the line to break it free or you can always just cut it off with a razor blade. The tool I'm talking about that I've found works great for removing hoses is a Spark Plug Wire Puller. Here's a link to what I'm talking about:

https://www.amazon.com/Lisle-51750-..._SR160,160_&psc=1&refRID=79ACA2E92MZAEY4GDT2P


You're getting there dude and kudos for taking the challenge and doing the work on your rig yourself instead of paying somebody else to do it for you.


I just can't stop saying 3/4 when I mean 3/8. Good god, this brain of mine. I'm going to edit that post too so as to not cause any confusion.

So, now that I am clear on it being 3/8", it probably won't be a big deal other than a slight pain to change the filter, right? At that point I'm probably going to cut it off to remove it and then just get a 5/16 filter...and as I type this out I realize how absurd this is. I should just go to NAPA, spend $20 and get some more 3/8 hose, more hose clamps, and be done with it.

Still too hot and not in the shade to work out there. This soccer game just won't end either.
 
Yes, just get the right size hose and be done with it. The 3/8" hose will also come off the radiator fitting and metal transmission line a little easier too since it's a little wider. If you use a little ATF to lubricate the fitting and the inside of the hose before you try to connect, it makes it much easier to slide on.

Also, try to make cleaner cuts of your hoses. One of the lines connected to the magnefine filter is pretty crooked. I used a PVC pipe cutter to cut my hose and it made perfect cuts every time.

Sent from my XT1060 using Tapatalk
 
I believe the hose included with the cooler is 11/32. Read that somewhere. Someone called BM and that's what they told them.

I thought 3/8 hose fit pretty good. Obviously on 1/32" larger. Shouldn't be a big deal.

I like these for cutting ANY hose.

Finger Release Ratcheting PVC Cutter

EDIT Didn't see Tim mentioned the PVC cutters. They work very well and are cheap and you can replace the blade.
 
Last edited:

Members online

Forum statistics

Threads
278,312
Messages
3,554,089
Members
248,016
Latest member
Advally Service

Trending content

Back
Top