Advice requested from those of you who have mounted tires & balanced wheels at home

Status
Not open for further replies.
Yeah a monkey can mount a tire, but can said monkey understand road force and know what way to move a tire to make it smooth?

Who can argue with someone who suggests road-force balancing?

Not I.
Especially if, after I mount and balance the tires, the vehicle vibrates.

However ... if the car doesn't vibrate after I mount and balance the tires, do you still think it needs a Hunter Road Force Dynamic Balance?
 
You would be correct. You could mount and balance a tire and have little to no vibration. The only reason I mentioned road forcing is I've yet to mount a tire and not have some, and sometimes excessive, road force issues. To the average person, this may not be felt or noticed. But its there. Sometimes it's as easy as spinning the tire a bit on the wheel to correct it, and sometimes the tire is just plain bad. In the end it's what you are willing to accept.
 
You would be correct. You could mount and balance a tire and have little to no vibration. The only reason I mentioned road forcing is I've yet to mount a tire and not have some, and sometimes excessive, road force issues. To the average person, this may not be felt or noticed. But its there. Sometimes it's as easy as spinning the tire a bit on the wheel to correct it, and sometimes the tire is just plain bad. In the end it's what you are willing to accept.

I understand everything you say and can't disagree.

BTW, the tires arrived this morning, so I'd just like to ask a couple of questions about these specific tires, from those of you who know tires.

Bearing in mind that the owner has never gone off road and never will, these were el-cheapo stock-spec tires at about $70 each, but I wonder what you think of them?
  • ~$70 Nexen NPriz AH5
230391d1481561333-advice-requested-those-you-who-have-mounted-tires-balanced-wheels-home-toyota_mounting_tires_01.jpg

  • Stock size: P225/75R15 102S
230392d1481561337-advice-requested-those-you-who-have-mounted-tires-balanced-wheels-home-toyota_mounting_tires_02.jpg

  • Treadwear 460, Traction A, Temperature A
230395d1481561348-advice-requested-those-you-who-have-mounted-tires-balanced-wheels-home-toyota_mounting_tires_05.jpg


Is anyone here running these tires?
 
That's the breaker I was talking about, the extra 30$ in expense would be well worth it in my opinion. Passenger wheels have by far the most well seated beads, the bars and hammers are mostly used for truck tires and 16.5s with no safety bead. That extra push from the shovel is what you need to get past that back bead.

I need your advice.

Time and time again, I "think" I understand someone, but, when I try it myself - I realize I don't know what I'm doing (yet).


Fact is, I didn't even realize that I (still) don't know how to break the bead until I just now tried to break the bead using the HF tire-changing tube.

The puny bead-breaking tool just slipped off the bead time and time and time again.
230397d1481561357-advice-requested-those-you-who-have-mounted-tires-balanced-wheels-home-toyota_mounting_tires_07.jpg


So I got out the bead breaker you had recommended:
230396d1481561353-advice-requested-those-you-who-have-mounted-tires-balanced-wheels-home-toyota_mounting_tires_06.jpg


But, um, which way does it go?

Am I supposed to slip it under the rim this way?
230398d1481561366-advice-requested-those-you-who-have-mounted-tires-balanced-wheels-home-toyota_mounting_tires_08.jpg


Or do I squish it under the rim so as to catch the bead in the other direction?
(there is no way I'm gonna get it under the bead?)
 
I just do it with the old farmer's trick. Put the bottom edge of a snow plow just inside the rim and let it drop. Easy peasy. Also, nobody bothers to balance tractor and implement tires. Those I can do.

Sorry for the unhelpful post.
 
I need your advice.

Time and time again, I "think" I understand someone, but, when I try it myself - I realize I don't know what I'm doing (yet).


Fact is, I didn't even realize that I (still) don't know how to break the bead until I just now tried to break the bead using the HF tire-changing tube.

The puny bead-breaking tool just slipped off the bead time and time and time again.
230397d1481561357-advice-requested-those-you-who-have-mounted-tires-balanced-wheels-home-toyota_mounting_tires_07.jpg


So I got out the bead breaker you had recommended:
230396d1481561353-advice-requested-those-you-who-have-mounted-tires-balanced-wheels-home-toyota_mounting_tires_06.jpg


But, um, which way does it go?

Am I supposed to slip it under the rim this way?
230398d1481561366-advice-requested-those-you-who-have-mounted-tires-balanced-wheels-home-toyota_mounting_tires_08.jpg


Or do I squish it under the rim so as to catch the bead in the other direction?
(there is no way I'm gonna get it under the bead?)
You've got it right in your picture. If the bead is stuck you can try putting a small amount of air (like 3 psi) and it will give you more to push against. Start with the back bead and get it started before you pop the front.

PB blaster or a similar penetrant will loosen any rust that may be holding the tire and wheel together.

Sent from my Z958 using Tapatalk
 
OK, take this for what it's worth.... the $ spent on mount/balance at a good shop (Hunter GPS9700) (pick your level of satisfaction, it's what I have) is worth it's weight in gold. The ride will be perfect! I've mounted and balanced the most obnoxious wheel/tire combos and have no complaints after work done. I didn't read through all the posts, but seems the $ spent on trying to avoid a shop to do the work just didn't make sense. Do it once do it right. I guess what I'm trying to say is there is certain things that can be done at home to a respectable level, and there are those that should be left to professionals. Yeah a monkey can mount a tire, but can said monkey understand road force and know what way to move a tire to make it smooth?


While the Hunter GSP9700 is a great machine...it can't fix a severely out of round tire. I've had several sets of Swampers that were calling for over 84 oz. (7 lbs!!!) on different tires/wheels. JFYI.
 
I need your advice.

Time and time again, I "think" I understand someone, but, when I try it myself - I realize I don't know what I'm doing (yet).


Fact is, I didn't even realize that I (still) don't know how to break the bead until I just now tried to break the bead using the HF tire-changing tube.

The puny bead-breaking tool just slipped off the bead time and time and time again.

But, um, which way does it go?

Am I supposed to slip it under the rim this way?

Or do I squish it under the rim so as to catch the bead in the other direction?
(there is no way I'm gonna get it under the bead?)

Just noticed you've got the Hankook Optimos on there. We sell those, they are easily one of the softest tires on the market, you'll definitely want a bit of air in those to break them down, they're a pain to do flat even on a tire machine. Once you get it started that makes them easy to work with since they hardly ever pop back on.
 
Just noticed you've got the Hankook Optimos on there.
Thanks for letting me know that the sidewall on the Hankook Optimis is "soft", which means, I think, that it won't apply much pressure to the bead (it will just bend, which is exactly what it did).

By the way, the tread is soft also, so to speak, in that they wore rather quickly according to the owner (she has the miles written down but I don't know them offhand but they are only about 2 years old and she can't drive more than average which is something like 12K miles to 15K miles per year).

She felt that they didn't get anywhere near their treadwear government ratings of 700 (which is supposed to be something like 700% of a some super secret "nominal" wear of about 10K miles) and, yes, I know, inflation and type of driving matter (but she "is" a little old lady, so, she drives just like one).

She had the Hankook Optimo H727s which were rated at:
  • Load Range & Speed 108T
  • Treadwear 700 (supposedly that's roughly equivalent to 7x10K=70K miles)
  • Traction A
  • Temperature B (this is really speed, which is already in the "T" rating)

The new tires are Nexen NPriz AH5 rated at:
  • Load Range and Speed 102S
  • Treadwear 460 (supposedly 4.6x10K=46K miles)
  • Traction A
  • Temperature A (this is really speed, which is already in the "S" rating)

As always, you'll notice some inconsistencies here, which is that the traction is A in both tires which one might presume is a "soft" tire, but if you look at the treadwear ratings, they're vastly different and even the speed ratings are inconsistent because an S is "slower" than a T but the S-rated tire has a temperature of A while the (higher-rated) T tire has a temperature of B.

So, as always, YMMV when it comes to UTQG system interpretation to expected reality.
you'll definitely want a bit of air in those to break them down, they're a pain to do flat even on a tire machine. Once you get it started that makes them easy to work with since they hardly ever pop back on.

Thanks for that practical advice to keep some air in the tire to remove it, because it seems I NEED as much practical advice as is possible!

I just hope someone else reads this thread BEFORE they try the job so that they can learn what NOT to do (which I'm only learning by making the mistakes).

I've given up, for example on using the swan-neck bead breaker bar that someone recommended, which, it turns out, is absolutely useless because it's for a DIFFERENT type of tire (so whoever recommended it, never used it on a SUV tire because it's impossible for it to grab anything).
230539d1481641722-advice-requested-those-you-who-have-mounted-tires-balanced-wheels-home-wrong_tool_bead_breaker_1.jpg


And, I'm going to give up on the bead-breaker attachment to the HF tire-changing tool, because the steel is so soft it bent like a butterknife when I tried to do the one spare tire that I have (the SUV isn't mine so I can only get a hold of the other four wheels when the owner isn't using it).
230540d1481641820-advice-requested-those-you-who-have-mounted-tires-balanced-wheels-home-wrong_tool_bead_breaker_3.jpg


I removed the bent beadbreaker attachment and will straighten it out but it really (really) needs to be reinforced. Either that, or my technique is atrocious.
230541d1481641830-advice-requested-those-you-who-have-mounted-tires-balanced-wheels-home-wrong_tool_bead_breaker_2.jpg


As with many tools, the all-in-one often doesn't do any job well, so I may have to go back to HF to get the single-purpose bead-breaker tool instead:
230542d1481641844-advice-requested-those-you-who-have-mounted-tires-balanced-wheels-home-breaking_bead2.jpg
 
Last edited:
break out the hi-lift jack. that will pop the bead.

I have done many tires at home. mostly larger off road tires, those can be extra tough..
we have never had the luxury of a tire machine, or any bead breakers. we used good old fashioned tire spoons. you are well ahead of the game.

don't get discouraged, keep at it. you will get it figured out.
its not easy work, and takes a fair amount of manipulation, and body English to get things to go smoothly.


I do recommend getting that $8 valve stem tool. you have all the other, more expensive tire changing gear, its very likely this wont be the last set you do. skimping on that very handy tool seems silly.
 
While the Hunter GSP9700 is a great machine...it can't fix a severely out of round tire. I've had several sets of Swampers that were calling for over 84 oz. (7 lbs!!!) on different tires/wheels. JFYI.

I agree there is a time and place for dynamic road-force balancing, but if you read the advertisements, you'd think every tire on the road needs it.

If there is no vibration, I don't see why anyone needs dynamic balance.

I could be wrong (because the vibration can be so minor as to be not noticeable) but, given that I've never once in my life seen a tire guy mount a tire by the book, I doubt that the guys running the Hunter GSP9700 give a hoot about my tires so the real problem is the laziness of the tech and not the accuracy of the equipment (IMHO).

Well here's how you DIY get a bead on the tire and inflate it yourself
https://www.youtube.com/watch?v=bywA5apAkbw

Please don't waste our time with that drivel.

If you're not doing the job yourself, then you can afford to waste everyone's time but if you were actually doing the job yourself, like I am, you'd not be in the mood for your time to be wasted with redneck videos which we've all seen umpteen times (last time I saw a joke like yours I fell off my dinosaur type of childish stuff).

If you've never unmounted, mounted, and balanced a tire yourself, then you almost certainly don't know how and therefore you won't be able to help me do it.
 
I just do it with the old farmer's trick. Put the bottom edge of a snow plow just inside the rim and let it drop. Easy peasy. Also, nobody bothers to balance tractor and implement tires. Those I can do.

Sorry for the unhelpful post.

Thanks for the advice to basically drive over the bead (which we all know many people do), but I'm hoping to use a bona-fide bead-breaker tool, since that's the "right" way to do it at home (or so I think).

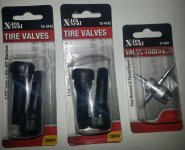
I did take someone's advice to get shorter tire valves and to buy the cheap tire-valve screw-on puller. I also have the lever-type tire valve removal-and-replacement tool on backorder.

As a practical note to anyone reading this who contemplates doing their own tires, I found nowhere where this was mentioned but the 2 inches of the other tire valves seems to be the amount sticking out, and not the total length. I guess that's obvious, but not all specs are what you'd think they'd be.

The current tire valves stick out 1-1/4 inches, which is a tad too short, so these are 1-1/2 inches (0.453-inch rims, max 65PSI, TR414 style).
 

Attachments

  • tirevalves.jpg
    tirevalves.jpg
    67.5 KB · Views: 753
Please don't waste our time with that drivel.

If you're not doing the job yourself, then you can afford to waste everyone's time but if you were actually doing the job yourself, like I am, you'd not be in the mood for your time to be wasted with redneck videos which we've all seen umpteen times (last time I saw a joke like yours I fell off my dinosaur type of childish stuff).

If you've never unmounted, mounted, and balanced a tire yourself, then you almost certainly don't know how and therefore you won't be able to help me do it.

While I was being a bit of a smart-ass, yes, this is still something that I've not seen you, or anyone else mention yet on this thread. Just how are you planning on getting the bead back? Seems to be a pretty important part of tire mounting. Simply getting it back around the rim won't get you far.

While you've not specifically mentioned it, I'm assuming that you're planning on using using the Pittsburg tire changer to help with this. It is very finicky on getting the bead back on, and often impossible depending on the type/ size of tire, etc, as is mentioned and shown by MANY reviews and online videos.
When I was unemployed 2 1/2 years ago, I actually DID look into this method, and damn near bought all the tools you did.
I researched like hell, just as you are doing now.
Then after seeing the 'failure rate' and not wanting to potentially waste money, I simply called around and found a little Mexican shop to mount and balance my tires with me watching at 5 bucks a pop.

I was not trying to start a flame war so I'm sorry for wasting your time, but my post was not ENTIRELY smart-ass.
 
Last edited:
tire that are properly sized to the wheel, will have no issue seating back on the bead.

most times, nothing other than a decent volume of air through the valve stem will be needed. sized correctly, the tire bead is resting against the wheel sealing area. perhaps not sealed, but hold back enough air, to allow the tire to inflate properly, thusly popping the bead on.

its when you get into larger, and mismatched tires and wheels, that a bit more trickery is required.
 
While I was being a bit of a smart-ass, yes, this is still something that I've not seen you, or anyone else mention yet on this thread.
I'm sorry for coming down hard on you, but I am actually doing the job and just need advice from folks who can help with the hard parts. I don't need jokes right now (maybe later, when it's all done though...).

I already learned a lot from people so that's great.

And I learned that just knowing the motions doesn't necessarily break the bead, as seen when my bead breaker arms bent like they were made out of rubber.

Just how are you planning on getting the bead back? Seems to be a pretty important part of tire mounting. Simply getting it back around the rim won't get you far.

That is a good question and the plan is very simple:
1. Once both beads of the new tires are loose on the rim & the new valve popped in
2. I remove the Schrader valve core from the new 1-1/2-inch long Schrader valve
3. I latch a self-attaching compressor chuck to the now-wide-open Schrader valve stem
4. As the air goes in, I wiggle and jiggle and knee the tire lifting up to ensure a momentary seal
5. Once I get a momentary seal, I let the compressor put as much air as it will take to pop both beads into place
6. Once the beads pop evenly into place, I will quickly screw in the Schrader core & deflate to 40psi

If necessary, I plan on kneeing the tire from the underside and tugging from underneath with both hands (keeping them well away from the bead-to-rim interface for obvious reasons) while it is filling up.

Afterward, I will be looking to see that the rubber ring around the tire shows that the bead is seated evenly.

While you've not specifically mentioned it, I'm assuming that you're planning on using using the Pittsburg tire changer to help with this. It is very finicky on getting the bead back on, and often impossible depending on the type/ size of tire, etc, as is mentioned and shown by MANY reviews and online videos.
When I was unemployed 2 1/2 years ago, I actually DID look into this method, and damn near bought all the tools you did.
I researched like hell, just as you are doing now.

Thanks for letting me know and sorry for coming down hard on the jokes.
I know exactly what "motions" to go through but knowing the motions doesn't really help if/when the motions fail us, which is, so far, what's happening with breaking the bead.

So, it may be that I will find it impossible to seat the bead and to remount the tires, but first, I need to take this one step at a time since I already researched all the tools and procedures (like you did).

I may need to buy the single-purpose bead-breaking tool, since, as you know, for SUV tires, the puny bead-breaker arms simply bend like putty on the 108T SUV tire I have in my possession (and there will be four more to go since I have to swap out the spare for her too).

Then after seeing the 'failure rate' and not wanting to potentially waste money, I simply called around and found a little Mexican shop to mount and balance my tires with me watching at 5 bucks a pop.

I didn't look up where you live, but I called this Tire-Rack recommended tire installer today who told me that they charge $7 per tire for disposal alone, so, wherever you live, stay there because you get new tires mounted and balanced for about 3/4 of what it costs us just to get a tire thrown away!

For mounting and balancing, it's upwards of 20 to 25 bucks here, so, you live in a different rate area (it's 200 per hour shop rate most dealers, and something like 125 to 150/hour for tire shops so they'd lose their shirts at 5 bucks a pop.

However, your question is a great one because if other people want to use this thread in the future to figure out if the tools are worth it and to figure out the break-even point, the cost per tire changed will have a tremendous effect on that calculation.

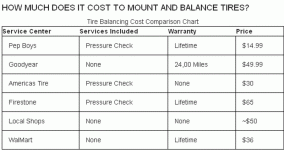
So to help others who read this thread in the future, I googled for tire mounting and balancing costs around the country.

Here is a so-called "The Complete Tire Balancing Cost Guide" which shows this chart:
 

Attachments

  • chart.gif
    chart.gif
    40.6 KB · Views: 924
Last edited:
Since this is intended to be a reference thread for others to benefit from, the cost equation is a valid point in that maybe it's not worth the trouble, from the cost perspective, of buying, mounting, and storing the necessary tools to change your own tires and balance your own wheels at home.

My rough calculation at the start put it at about $200 for the tools and $20 per mounting & balancing but that assumed that vibration didn't occur (hence no additional dynamic balancing needed), which pays for itself in just 10 tires which is about 2 years time for my two cars.

Others had said mounting and balancing was only $5, so that would take a prohibitive 40 tires to pay for itself, which is about 8 years time (at an average of 5 tires per two years per car for a two-car family).

So what you pay for tools and for a mounting/balancing service might sway that return-on-investment calculation mightily!

About the only thing influencing the accuracy of that tool cost estimate is simply the wastage that occurs from buying the wrong tools because the price of the tools is going to be pretty much equal across the various states in the US, so, we can leave the tool cost at $200 for now.

For the mounting/balancing costs, we probably should defer to the professionals such as the Tire Rack Recommended Installer lookup tables.

To give others an idea of what they might find, I just plugged in my zip code into the Tire Rack Recommended Installer Zip-Code-Based Search Engine but maybe a few of you can plug in your zip code so that others get an idea of the average costs in their area?

Unfortunately, when I clicked on the first five in the list, none had prices but all had phone numbers with the instructions to ask for the Tire Rack Price.

Doing that for the team, so that folks could get an idea of the average price for tire mounting and balancing, I came up with:
  1. Palo Alto Shell (Contact: Ravi or Kyle (650) 857-1313) $18 per tire (includes mount,balance,valve,& disposal)
  2. Menlo Atherton Auto Repair (Contact: Mario, Tony or Dan (650) 325-1280) Mario says it's $154 for 4 tires out the door which is $38.50/tire
  3. Custom Alignment (Contact: Joe or Alan (650) 961-5311) the line was busy every time I called so I gave up
  4. Wheel Works (Contact: Store Manager but I talked to Chuck (650) 961-2800) $20.50 per tire mounted,balanced,valve,& disposal
  5. California Concepts (Contact: Noah or Brian (650) 260-2375) Noah says it's $24.75 per tire (he also said $100 out the door)

This is a pretty fair test since I simply took the first five out of Tire Rack for my zip code and the price came up nowhere near five dollars a tire (disposal alone was $3.50 at the least expensive place and $7 at the second shop in the list).

Given that, I think my initial estimate before I started this thread of about $20/tire is still pretty accurate.
But to help others, it would be nice if folks can quote standard prices in their area.

NOTE: Don't quote sales prices (unless they are "perpetual" sales prices, which aren't sales); this is because when you need tires, there will rarely be a sale at that exact time, so please just quote their "normal" prices so people get an idea when the $200 investment in tools can pay itself off.

Note: I had forgotten about disposal costs until I called these guys (some of whom charge $7 per tire for disposal plus 70 cents sales tax on that disposal); but then I called a few local autoparts stores who all had prices similar to the above - until I called Costco, who will dispose of any tire for $1 per tire plus sales tax (so about $1.10 per tire). That's as cheap as you'll ever get it.
 

Attachments

  • zipcode.jpg
    zipcode.jpg
    49.7 KB · Views: 655
Last edited:
I'd definitely go for the large single purpose bead breaker, it could save a lot of hassle.

Thanks for that advice.
I'm not going to disagree with you because I found that the bead breaker attachment to the tire-mounting tool is basically far too weak for these strong-walled 108T tires.

Nonetheless, since I didn't have the fancier bead breaker with me, I made do with what I had (after some quick popsicle-sticks American ingenuity temporary repairs)...

Since this isn't my SUV, I only have one wheel at the moment, so I took my time to document what I learned so that the next person who uses the same equipment can benefit from the 20/20 hindsight this tutorial provides them for how to use the harbor freight tire changer to:
a. Break the lower bead of the old tire away from the wheel
b. Break the upper bead of the old tire away from the wheel
c. Remove the upper bead of the old tire from the wheel
d. Remove the lower bead of the old tire from the wheel
e. Remove the old Schrader valve and stem assembly
f. Insert the new Schrader valve and stem assembly
g. Place the lower bead of the new tire on the wheel
h. Place the upper bead of the new tire on the wheel
i. Align the red (or yellow) dot to the valve stem (or to the wheel match-mounting mark)
j. Seat the beads by filling the tire with air
k. Check the valve stem clearance, match mounting marks, and adjust pressure to normal psi

The goal is that they start knowing all the things that I just learned today, which make the job far easier and which makes the tools work far better.

The first thing I did was straighten out the bent bead-breaking wedge bars, which was so easy to do one might conclude that they're actually made of rubber.
230640d1481685748-advice-requested-those-you-who-have-mounted-tires-balanced-wheels-home-01_straighten_tire_wedge.jpg

What the bead breaker shovel needs, from the start, is a bit of support, which is shown here (but after using it, I realized it needs to be about 2 inches from the top of the wedge to leave clearance for the rim of the wheel when breaking beads).

Luckily this wedge simply moved out of the way because it was just press fit in and wrapped with solid 120V copper wire. (Given more time, I would not weaken the bars any further by drilling bolt holes - but - I would strap in a rectangular block of wood instead of this fence post, which just happened to be handy.)
230641d1481685904-advice-requested-those-you-who-have-mounted-tires-balanced-wheels-home-02_strengthen_tire_wedge.jpg

I started on the inside bead, which I'm told, is the harder one to break.

By moving the Clovis pin to the outside adjustment hole (making the angle about 90 degrees to the tire), and with this artificially strengthened wedge, I was (finally) able to apply (far) more force on the 108T tire bead without the wedge slipping off the bead itself.
230642d1481686090-advice-requested-those-you-who-have-mounted-tires-balanced-wheels-home-03_strengthen_tire_wedge.jpg

The fence post got in the way of the rim as shown in this photo, so, if you permanently mount it, make sure it's shorter by about 2 or 3 inches than the space allotted, and make sure it's mounted up high and not low where mine is now.

Notice how the wooden block hits the rim?
You don't want that.

You want the block to stay higher up, away from the rim by a couple of inches.
But, in this case, it didn't matter because the block moved when pressure was placed on it.
230643d1481686214-advice-requested-those-you-who-have-mounted-tires-balanced-wheels-home-04_strengthen_tire_wedge.jpg

The stronger wedge plus the 90 degree angle from using the furthest-out of the 3 adjustment pin holes allowed me to apply enough force to finally pop the inside-rim bead of the admittedly strong 108T tire sidewall.
230644d1481686321-advice-requested-those-you-who-have-mounted-tires-balanced-wheels-home-05_finally_popped_the_lower_bead.jpg

Only after I popped the underside tire bead did I try to remove the lever arm, where I found that it bent at about a 10 or 15 degree angle. It took that much force, but you have to also realize that this harbor freight metal is soft as rubber.
230645d1481686479-advice-requested-those-you-who-have-mounted-tires-balanced-wheels-home-06_bent_tire_iron.jpg

After straightening the bent tire iron as much as I could, and after moving the clovis pin to the center hole to get more of an angle, and using a tire iron to keep a depressed bead down, I easily popped the upper bead.
230646d1481686695-advice-requested-those-you-who-have-mounted-tires-balanced-wheels-home-07_moving_bolt_holes_and_popping_upper_bead.jpg

Placing the tire iron flat step with the step side up, allowed me to start spinning the top bead off the wheel rim without lubrication:
230648d1481687073-advice-requested-those-you-who-have-mounted-tires-balanced-wheels-home-08_using_the_right_edge_and_up_of_the_tire_iron.jpg

Adding dish detergent helped a lot to spin the top bead off, where I'd say it's a requirement to have lubrication but everything gets slippery, even the tools, so try to keep it off the tools.
230650d1481687318-advice-requested-those-you-who-have-mounted-tires-balanced-wheels-home-09_adding_dish_detergent_and_water_helped.jpg

You repeat the process for the lower bead, with the tire iron again going in step-side up as in the first bead (the same way as it did for the upper bead).
230651d1481687424-advice-requested-those-you-who-have-mounted-tires-balanced-wheels-home-10_tire_iron_goes_step-side-up_for_the_bottom_bead.jpg

Once the tire was off the rim, I cut off the old 1-1/4 inch tire valve from the underside with a utility knife, where the old valve was in surprisingly good shape, so I might have kept it had I not wanted to test out the 4-way valve-seating tool and the fit of the longer new 1-1/2 inch long tire valves.
230652d1481687580-advice-requested-those-you-who-have-mounted-tires-balanced-wheels-home-11_cut_off_the_old_tire_valve.jpg

After lubricating the new 1-1/2 inch valve with dish soap, I threaded on the 4-way tool and pulled it through so easily that it was shockingly simple.

Later you'll see I have a much better idea for a 4-way tool that I already have in my compressor toolbox, so I never needed the 4-way tool in the first place, but I didn't realize that until later.
230653d1481687756-advice-requested-those-you-who-have-mounted-tires-balanced-wheels-home-12_install_new_valve_with_4way_tool.jpg

Only later, when I was filling the tire with air, did I realize that a handy tool for pulling the valve would have been my compressor football/soccer-ball needle-valve tool, with the needle valve removed, which spins onto the valve threads with ease and which has a nice trigger handle to grab onto so that the valve can be pulled into place.

But I didn't think of this at the time I was seating the first valve, so, it's just a lesson learned for the future, and for someone else who happens to read this for hints on how to do the job if you don't have the 4-way valve seating tool (which is never needed but which is probably handy in an emergency and which is small enough to go into your compressor-tools' drawer).
230654d1481687982-advice-requested-those-you-who-have-mounted-tires-balanced-wheels-home-13_install_new_valve_with_soccer_ball_filling_handle.jpg

The bottom bead of the new tire went on 3/4 of the way by hand, and then with a two-foot tire iron, the last quarter went on relatively easily.
230655d1481688129-advice-requested-those-you-who-have-mounted-tires-balanced-wheels-home-14_the_bottom_bead_goes_on_easily.jpg

It's important to remember to flip the tool and set the hook side appropriately because you're not going to seat the top bead unless you have the tool oriented this way exactly.
230656d1481688456-advice-requested-those-you-who-have-mounted-tires-balanced-wheels-home-15_the_tool_has_to_be_flipped_for_the_top_bead.jpg

You'll want to ensure you seat the bead at the tire-valve first because that last quarter gets dicey where you have to use the most strength in the whole job, and where a slippery bar gets obnoxious.

I had to vise grip the end of the bar that I was holding because it kept twisting off the bead but with vise grips, it was manageable.

At the very least, you'll want to use vise grips to hold the slippery upper bead from slipping off as you try to force the last 1/4 of the upper bead onto the rim.
230657d1481688661-advice-requested-those-you-who-have-mounted-tires-balanced-wheels-home-16_the_last_quarter_of_the_top_bead_is_harder.jpg

This is the point where you're extremely glad the tool is firmly bolted to cement, as the force is as much as you can give it.

Even so, I found I had to ditch the slippery but huge red pry bar and resort to two 24-inch tire irons to leverage the remaining upper bead over onto the wheel rim.
230658d1481688802-advice-requested-those-you-who-have-mounted-tires-balanced-wheels-home-17_tire_irons_help_with_the_last_quarter_of_the_top_bead.jpg

It's at this point, before you fill the tire with air, that you line up the red dot to the match-mounting marks, or, the yellow dot to the valve stem (if there is no red dot) or if there is a red dot but no match mounting marks, then you line up the red dot to the valve stem.

After doing that, I first removed the inner valve stem of the Schrader valve and tried to use my latching air chuck, but without the valve stem, the darn chuck wouldn't pass any air (so I gave up on this method).
230659d1481688934-advice-requested-those-you-who-have-mounted-tires-balanced-wheels-home-18_the_latching_chuck_would_not_let_air_in_without_the_valve_stem.jpg

It was dark and drizzly when I just decided to put the valve stem back in and put the latching chuck back on (although later I found a neat trick that I will try with the next tire).

It turns out that having the valve stem in or out really made no difference whatsoever, it seems, with respect to getting the air inside and getting the bead to seat.

The trick to seating the bead is really to have two hands free to hold the tire edges and jiggle, wiggle, coerce, tug and jerk the tire as it's loose when you're trying to get the bead to seat.

Once you get the tire in a certain position, you can just feel it starting to blow up, where it seats and finally pops a few times as you work up the pressure to 40, 50, and 60 psi.
230660d1481689227-advice-requested-those-you-who-have-mounted-tires-balanced-wheels-home-19_latch_chuck_with_valve_stem_in_place.jpg

The 4-way tool could have been useful here had it a blunt end instead of what they call a (sharp) pick, but that 4-way tool doesn't have a pin for letting the air out of the valve to drop the pressure down from 60 psi back to 40 where it belongs (which makes it less useful than it could have been).

Rummaging around in my compressor kit, I found this needle-valve which is normally used to inflate footballs and soccer balls, but which deflates the tire without sharp points like those that are on the silly and useless 4-way tool.
230661d1481689503-advice-requested-those-you-who-have-mounted-tires-balanced-wheels-home-20_dropping_the_pressure_back_to_40_psi.jpg


You can only have 20 pictures in a post so I had to break the post up into two parts.

 
Last edited:
You can only have 20 pictures in a post so I had to break the post up into two parts.


It was at this point that I realized that the football/soccerball inflator handle can be used for the next tire to inflate the tire quickly without the schrader valve being in place, so I will try it this way on the next tire to see if it works.

(It may require a third hand to press the trigger, but I can probably wire the trigger pressed because both hands will be needed to coerce the tire into momentarily seating while the air is filling it up.)
230662d1481689703-advice-requested-those-you-who-have-mounted-tires-balanced-wheels-home-21_idea_for_inflating_tire_without_schrader_valve.jpg

At this point it's time to make two checks of the valve stem.

Ensure the red (radial runout) dot is at the valve stem
Ensure with a straight edge that the valve doesn't stick out past the rim


Since it was dark, I didn't bother looking for match mounting marks on the old rim, so, I simply lined up the red dot with the tire valve since the red dot indicates the tire's high point for radial runout and radial force variation, which takes precedence over the yellow dot which indicates the tire's light spot which would have been paired with the valve stem on the wheel which is the wheel's heavy spot had the red dot not existed.
230663d1481690003-advice-requested-those-you-who-have-mounted-tires-balanced-wheels-home-22_red_dot_next_to_valve_stem_and_ruler_on_rim_for_valve.jpg

left the tire outside, at 42psi, where I will check it in the morning before starting to balance it.

One question is what tool you use to remove the old clip on wheel weights?
230667d1481691403-advice-requested-those-you-who-have-mounted-tires-balanced-wheels-home-23_remove_old_clip_on_wheel_weight.jpg
 
Last edited:
Status
Not open for further replies.

Members online

Forum statistics

Threads
278,315
Messages
3,554,126
Members
248,016
Latest member
Advally Service

Trending content

Back
Top