
You are using an out of date browser. It may not display this or other websites correctly.
You should upgrade or use an alternative browser.
You should upgrade or use an alternative browser.
aemravan's build thread - project TacoRunner
- Thread starter aemravan
- Start date
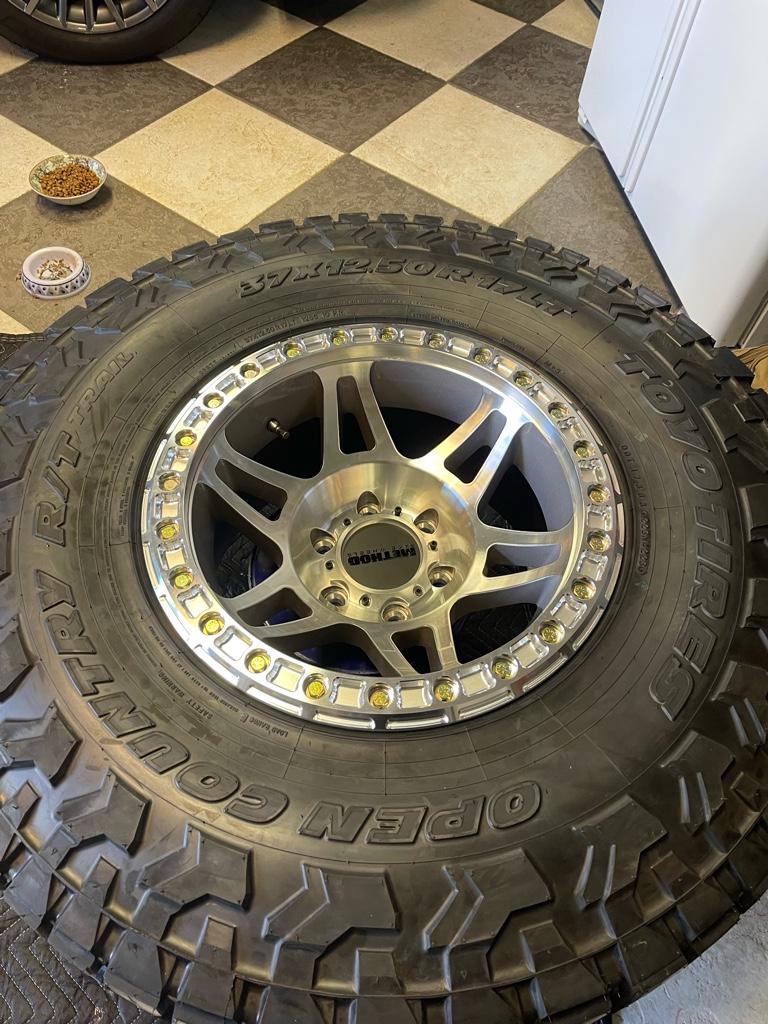
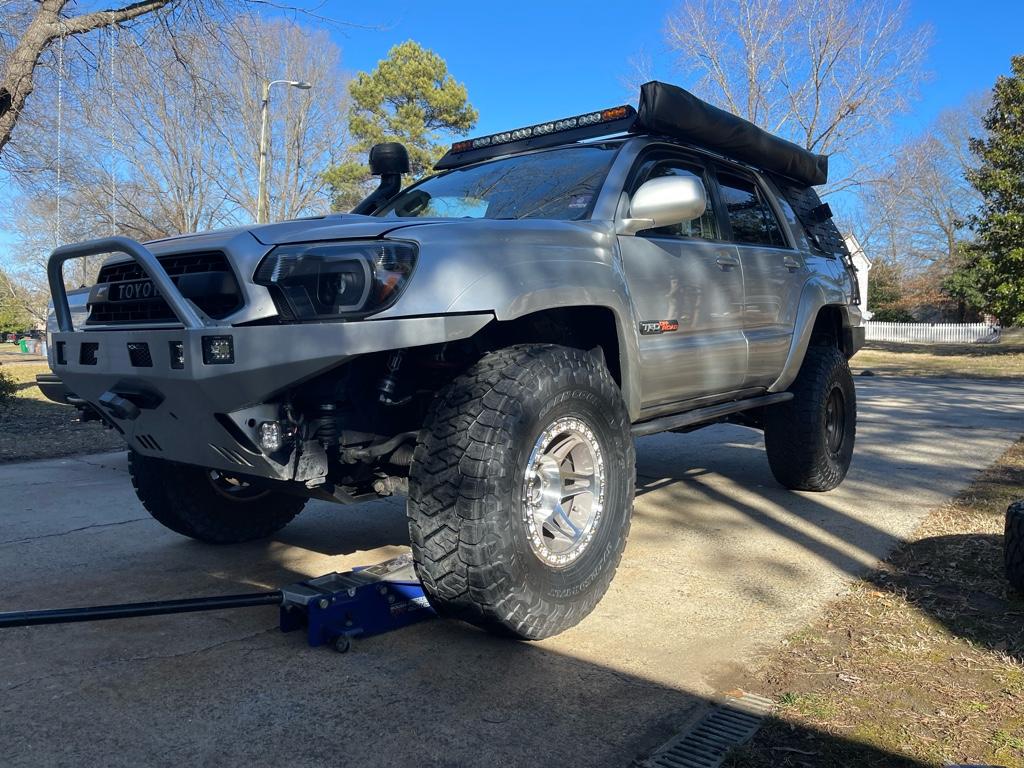
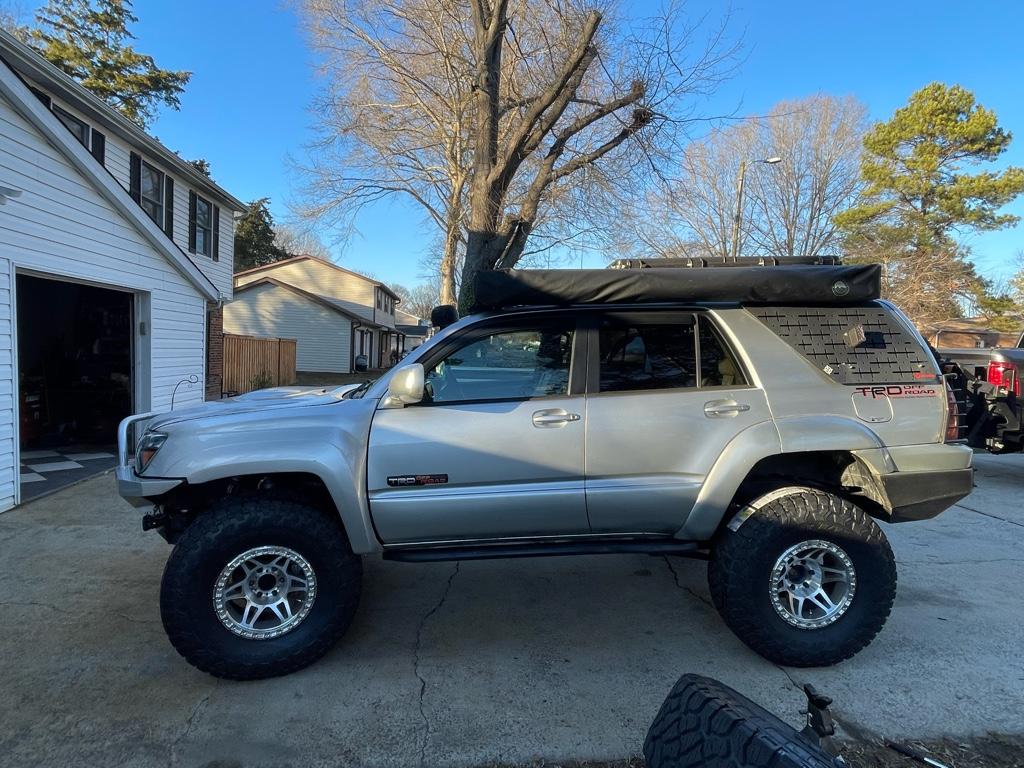

spent some more time looking at various firewall tub jobs.. feeling motivated.. but it'll take some work for sure lol. There is some serious structure to cut out of the a-pillar area in the bottom corner.
Step one will be to pull a Toe measurement as it sit now from center to center of tire so I can lift the front end up probably 1.5 inches. It's sitting REALLY raked right now and I just didn't get around to lifting it up due to my bump-steer pulling toe way in.
after I get the ride height situated I'll make some time to get it back over to my parent's house while they're out of town and pull the shocks out and remove the wheel spacers.. I like the aggressive look, and it helps with some clearance.. but I don't know how conformable I feel running a 1" spacer with a giant 37" wheel/tire combo..
Once that is off... it's mount, check, mark and chop .. :vader:
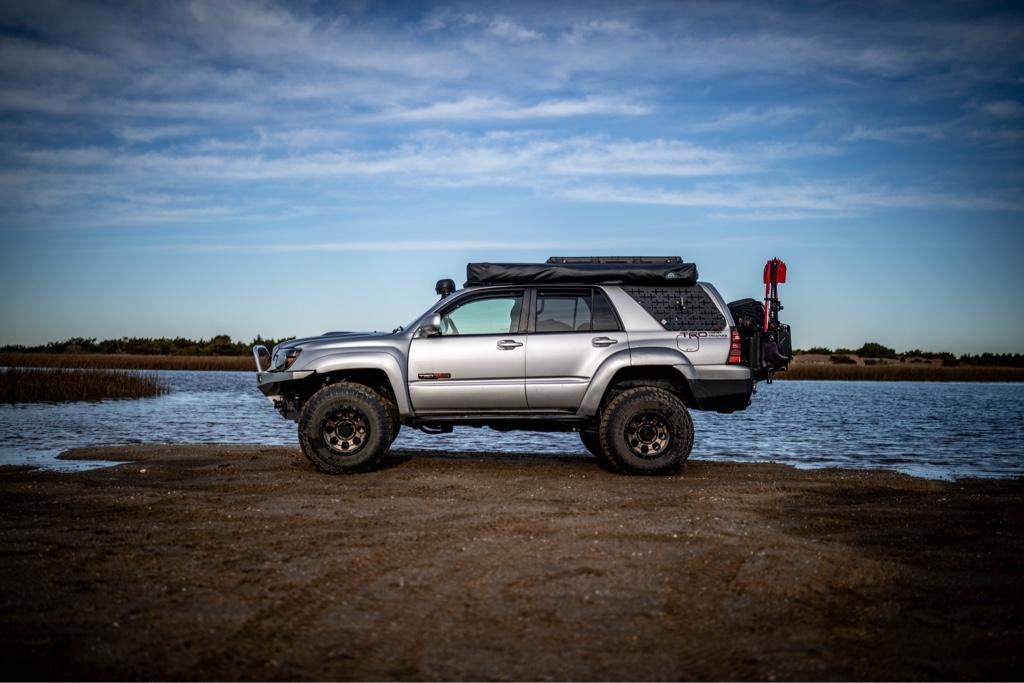
Almost wish I didn't get all the awesome pictures of the rig this past weekend with the great lighting... ALMOST making me second guess myself on switching to a different looking setup :decision: lol
Step one will be to pull a Toe measurement as it sit now from center to center of tire so I can lift the front end up probably 1.5 inches. It's sitting REALLY raked right now and I just didn't get around to lifting it up due to my bump-steer pulling toe way in.
after I get the ride height situated I'll make some time to get it back over to my parent's house while they're out of town and pull the shocks out and remove the wheel spacers.. I like the aggressive look, and it helps with some clearance.. but I don't know how conformable I feel running a 1" spacer with a giant 37" wheel/tire combo..
Once that is off... it's mount, check, mark and chop .. :vader:
Almost wish I didn't get all the awesome pictures of the rig this past weekend with the great lighting... ALMOST making me second guess myself on switching to a different looking setup :decision: lol
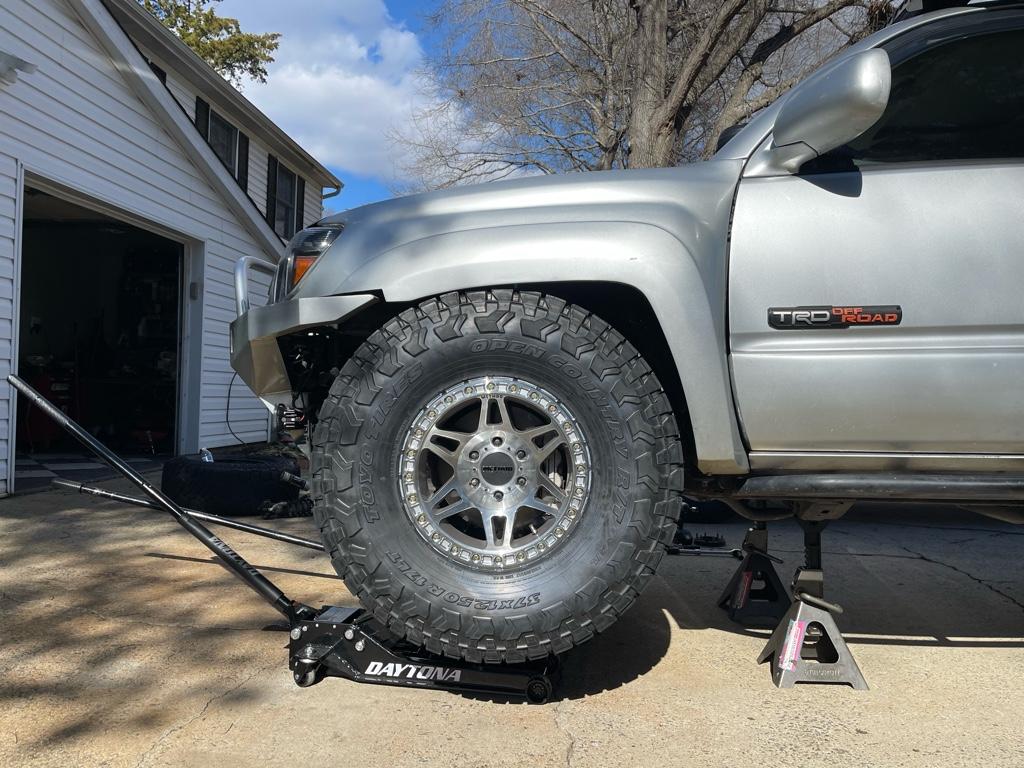
Started phase one of the 37s last night. Needed to raise the front coil overs a bit. Too much rake and the bigger tire looks funny with too little fender gap.
In the process I once again confirmed how much bump steer this damn lc200 has at near full droop
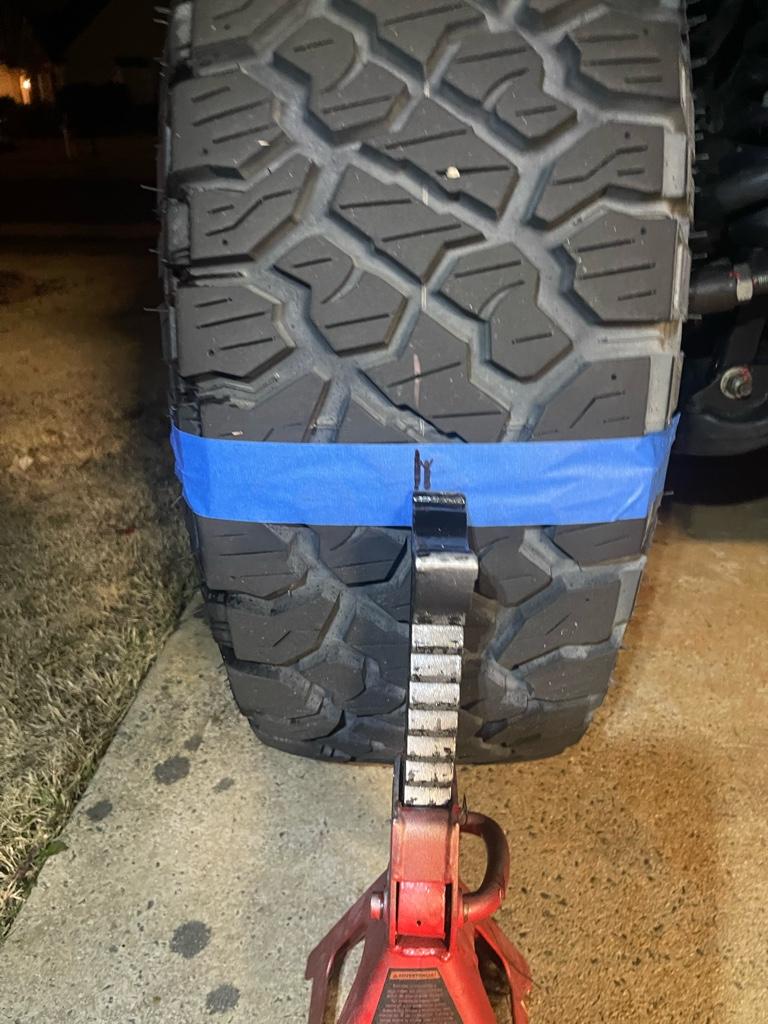
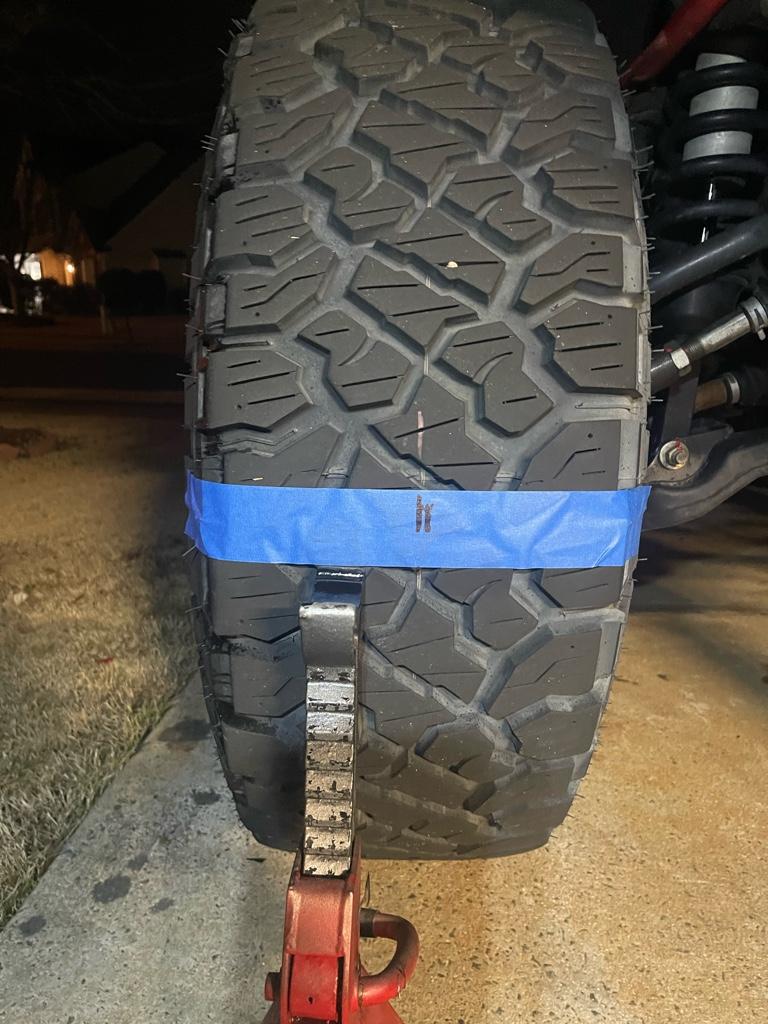
2.5 inches, PER side , from previous ride height to full droop lol.
Don’t get me wrong .. if I actual wheeled it it’s not a terrible thing to live with .. but since I literally haven’t hit the trails since I went through the trouble of putting this in it’s coming out in March for a factory rack :facepalm:
I think I got a bit more up I can go, the angles on the CV axles don’t look bad at all as it sits right now .. but also I know they’ll be struggling just with the added 37s so I want to keep them alive as long as possible lol.
I hate to get rid of so much steering beef … but I don’t think I can get it to look how I want while retaining reasonable streetability …. Perhaps I should just throw a tundra rack in it ….? But even there , though much better, I don’t know how close to factory the geometry would be ..
This is how it currently sits , might raise it a tad bit more but for now it should do.
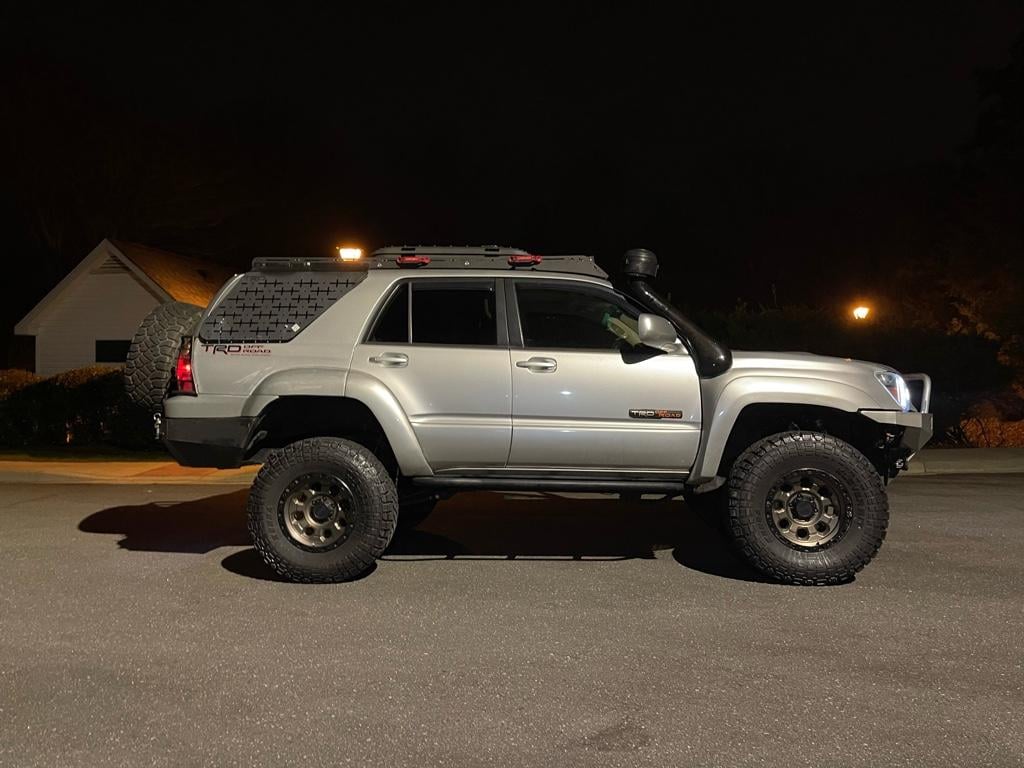
Compared to before .. probably an inch or inch a half difference ..?
In the process I once again confirmed how much bump steer this damn lc200 has at near full droop
2.5 inches, PER side , from previous ride height to full droop lol.
Don’t get me wrong .. if I actual wheeled it it’s not a terrible thing to live with .. but since I literally haven’t hit the trails since I went through the trouble of putting this in it’s coming out in March for a factory rack :facepalm:
I think I got a bit more up I can go, the angles on the CV axles don’t look bad at all as it sits right now .. but also I know they’ll be struggling just with the added 37s so I want to keep them alive as long as possible lol.
I hate to get rid of so much steering beef … but I don’t think I can get it to look how I want while retaining reasonable streetability …. Perhaps I should just throw a tundra rack in it ….? But even there , though much better, I don’t know how close to factory the geometry would be ..
This is how it currently sits , might raise it a tad bit more but for now it should do.
Compared to before .. probably an inch or inch a half difference ..?
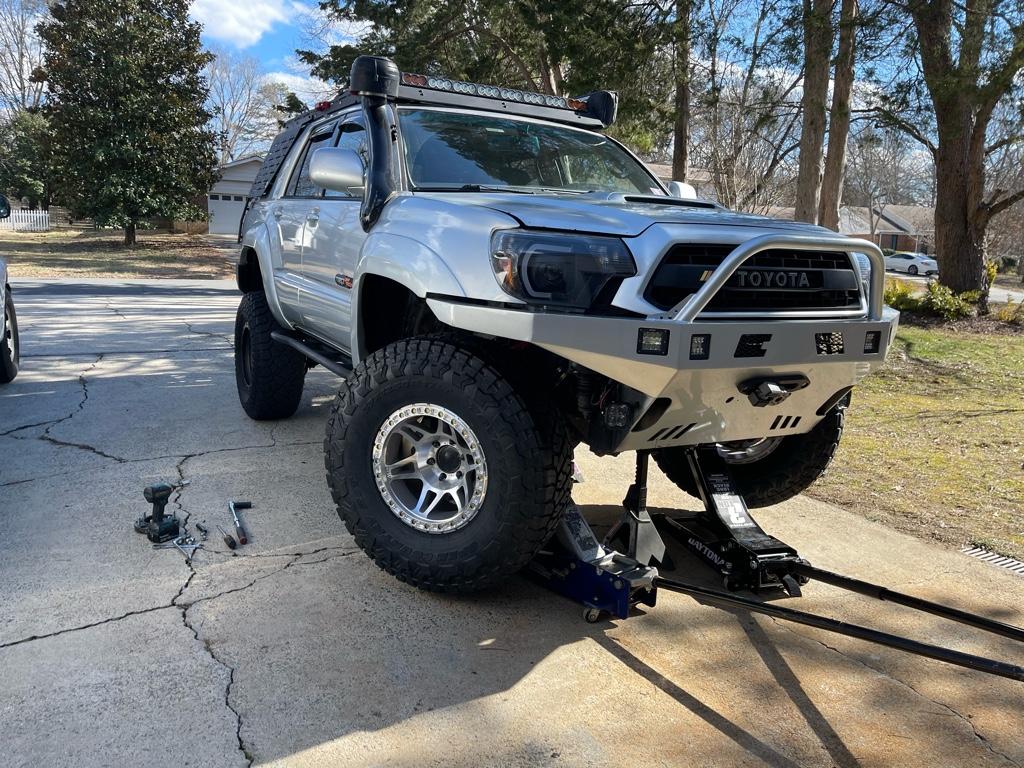
A bit ahead of schedule … and every bit as involved as I expected .. though I will say it probably took me just as long to get it to the point of cutting as it did to actually get to cutting start to finish.
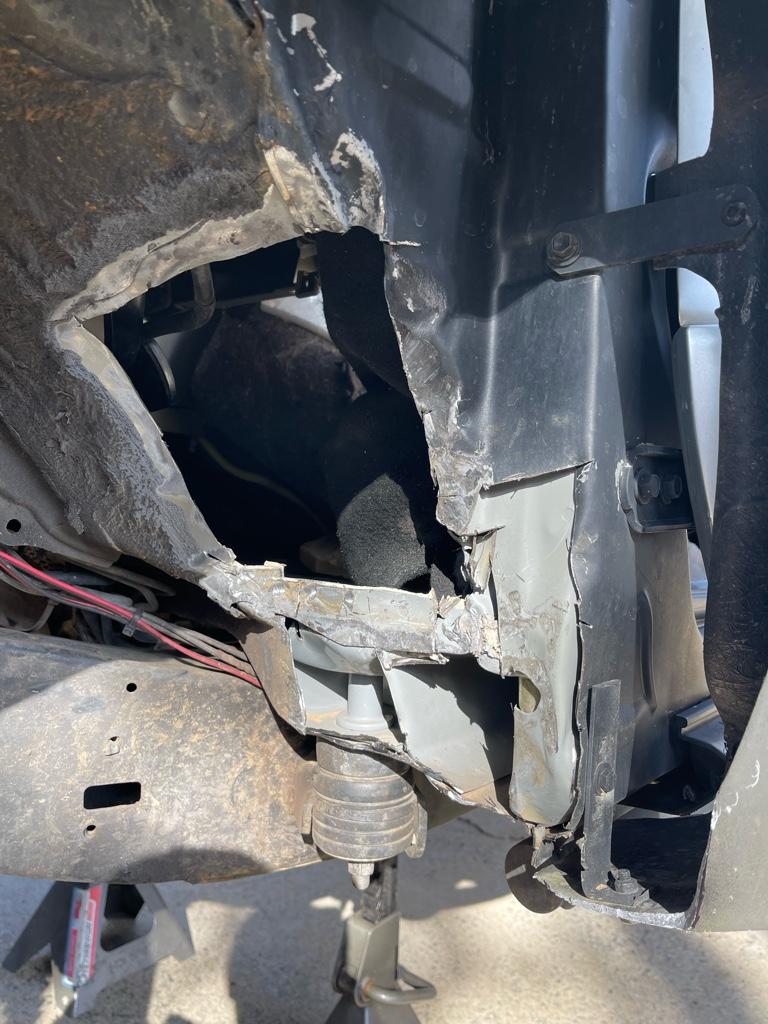
As it sits now, the drivers side is fully clearanced. It fits full lock to lock, no spacer on the wheel. It fits lock to lock ALMOST at full pump too .. I car cut the fender apron up some … but it rubber more with my 35 and I just let it be .. I’m planning to just drop the bump stop down like a quarter inch and see if that keeps it from ever contacting. My bigger concern is the rubbing I’ll see on the side of the sway bar since the 35 did it also , and I think this may be worse .. so all in all , it fits and I’m not really losing steering angle or articulation [emoji16]
I went a bit too aggressive on the size of the hole .. it probably didn’t need to go so far into and up on the inside .. main point of contact was the pinch weld area where the firewall, floor, rocker and A pillar meet.
I plan to throw a thicker gauge piece across the structural members with some slots cut into it so I can tack it to each piece of exposed member , the rest will just take a light massaged sheetmetal sheet cut to size, possible on structural adhesive and rivets so I’m not welding all around the perimeter.
Pretty god damn stoked about it actually fitting relatively easy
Sent from my iPhone using Tapatalk
As it sits now, the drivers side is fully clearanced. It fits full lock to lock, no spacer on the wheel. It fits lock to lock ALMOST at full pump too .. I car cut the fender apron up some … but it rubber more with my 35 and I just let it be .. I’m planning to just drop the bump stop down like a quarter inch and see if that keeps it from ever contacting. My bigger concern is the rubbing I’ll see on the side of the sway bar since the 35 did it also , and I think this may be worse .. so all in all , it fits and I’m not really losing steering angle or articulation [emoji16]
I went a bit too aggressive on the size of the hole .. it probably didn’t need to go so far into and up on the inside .. main point of contact was the pinch weld area where the firewall, floor, rocker and A pillar meet.
I plan to throw a thicker gauge piece across the structural members with some slots cut into it so I can tack it to each piece of exposed member , the rest will just take a light massaged sheetmetal sheet cut to size, possible on structural adhesive and rivets so I’m not welding all around the perimeter.
Pretty god damn stoked about it actually fitting relatively easy
Sent from my iPhone using Tapatalk
After a long day , with the help of my brother it’s all sealed up.
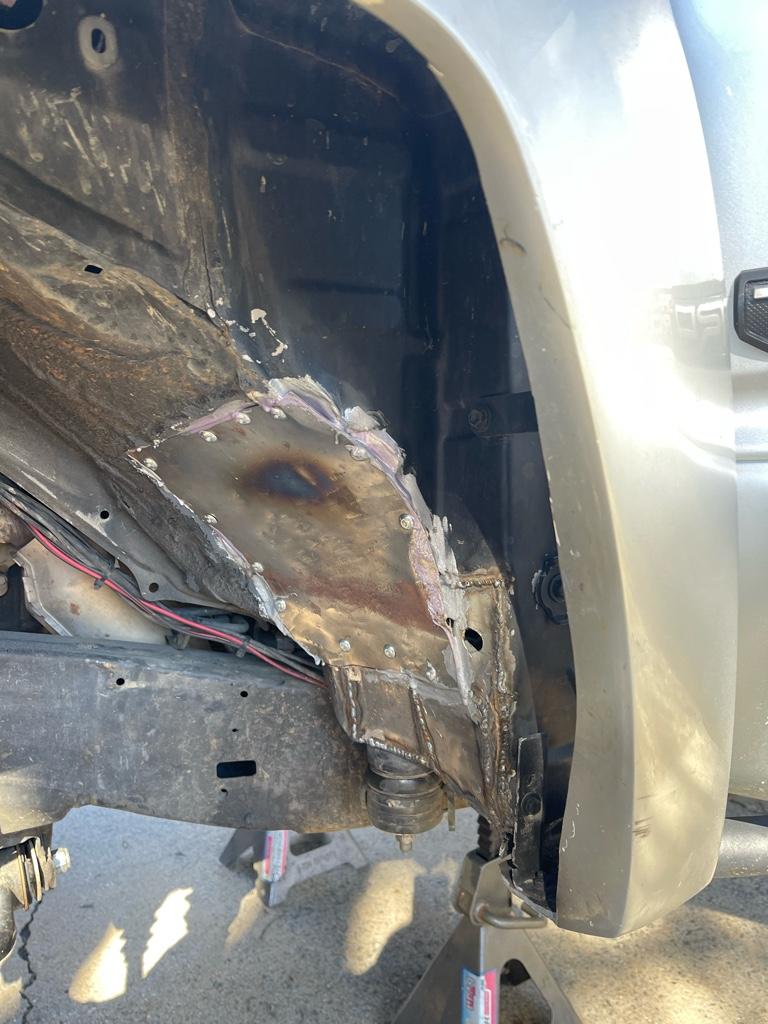
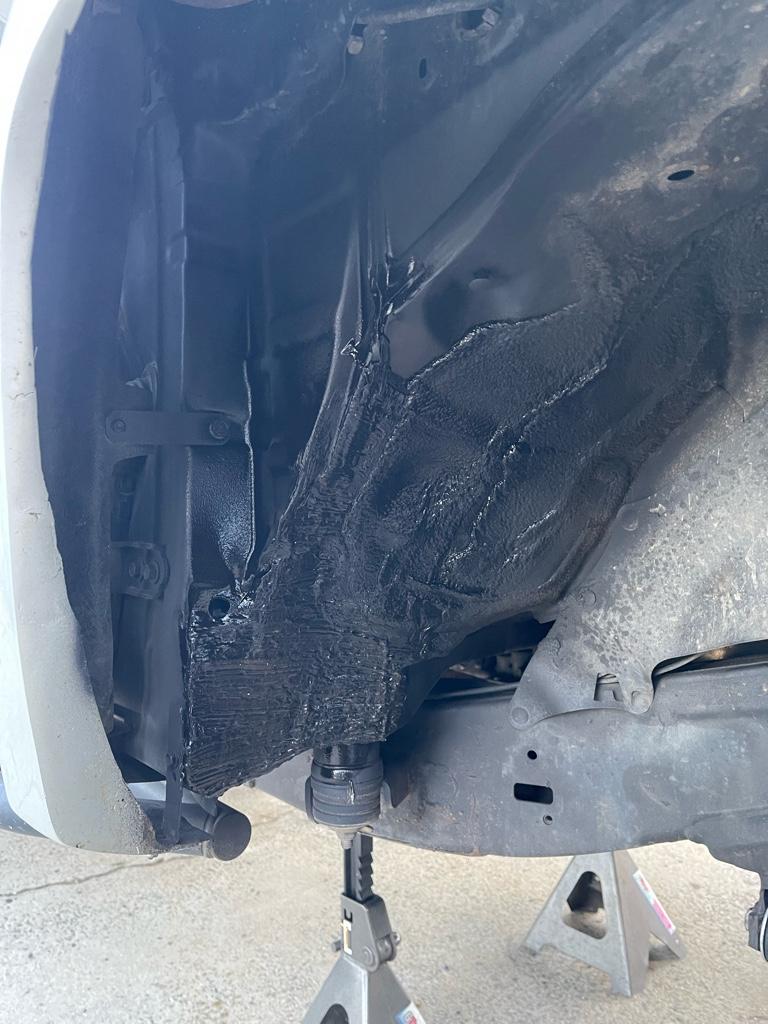
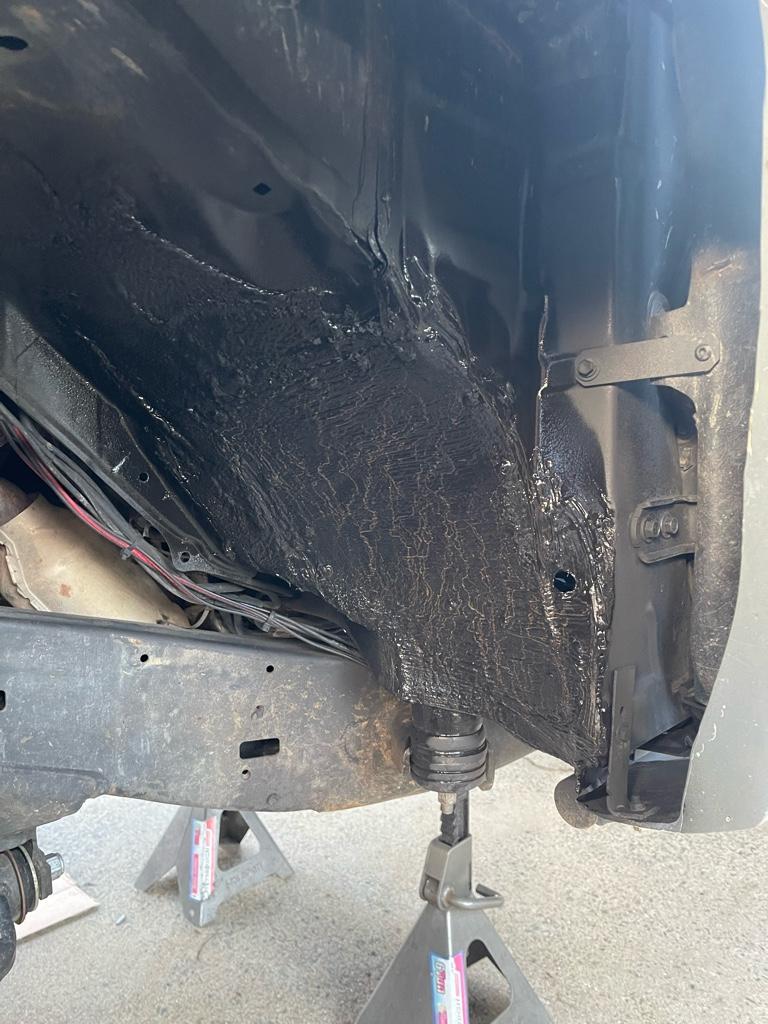
Everything is drying and ready to be reassembled.
I think we got literally everything to clear .. full bump and lock. The sway bar rubs a little.
I have a set of ARP extended studs on the way and will try out a small half inch spacer plate just to maximize clearance, but even without the spacer I should be good. No telling what the rear will do .. hopefully that clears lol
Sent from my iPhone using Tapatalk
Everything is drying and ready to be reassembled.
I think we got literally everything to clear .. full bump and lock. The sway bar rubs a little.
I have a set of ARP extended studs on the way and will try out a small half inch spacer plate just to maximize clearance, but even without the spacer I should be good. No telling what the rear will do .. hopefully that clears lol
Sent from my iPhone using Tapatalk
Forgot to mention that in the process of cutting and closing things back up, we decided it was best to slightly improve the factory sunroof drain design and NOT have it spill out into the rocker and weep out of the pinch weld (which no longer exists) to keep rusting possibility to a minimum. We elected to put the drain hole right into the wheel well. Now I just need to source some tubing that work with the factory size hose to feed out and seam seal it in.
Last night I found the extended 60 (or 66mm?) ARP studs for the lexus that i'll be swapping onto the front bearings. The rears are already decent and i'm not running a spacer so i'm letting those be (primarily because I'm not pulling axles and all that happy jazz to redo the studs )
)
I'll try to run a 1/2" spacer, and since this isn't one that mounts to factory studs and then has studs to mount the wheels to I'm not concerned. The ARP studs and wheel should sandwich it nicely and really give me the final clearance I need to not rub (at least from the static testing and with the tire not aired down :cowboy: )
My next area of concern is my tire carrier. I feel like it was on the limit before.. and now, with the extra weight, it really feels like it's struggling.. not that I expect a weld to fail.. but it's definitely has some twist to it with the tire mounted. Granted I gained an entire inch of backspacing with these, so i have a minimum of 1 inch that I can cut the arm back and suck the tire back closer to the rig.. but I'm afraid I might have have to do some additional reinforcement of some sort ... you know.. just in case.. lol.
Oh, and silly me... I just went ahead and ordered a brand new factory steering rack while I was at it as well ... :boom: I pretty much already pre-sold my lc200 rack, with the double-shear spindles, and the gentleman will be pulling his reinforced spindles to ship to me when we do the swap.. I figured I would maybe source a used rack.. but just adding up what it would cost for new bushing and outer tie rods alone puts the rack at like $300 minimum.. and IF the inner tie rods also need to be replaced with OEM ones you're talking another $200 add... and that's not replacing any seals and having worn internals... I figured what's another $200 for a brand new, from toyota rack..? No hassle with trying to clean it up and replace parts.. just throw it in and go. (and be REALLY easy on it so I'm not replacing brand new tie rods a month in )
a part of me almost went into looking into the tundra rack.. and I think if i did it from the get go I would still be running it but at this point.. it is what it is.. and I really just want my factory reliability and geometry back .:banplease:
Last night I found the extended 60 (or 66mm?) ARP studs for the lexus that i'll be swapping onto the front bearings. The rears are already decent and i'm not running a spacer so i'm letting those be (primarily because I'm not pulling axles and all that happy jazz to redo the studs
) I'll try to run a 1/2" spacer, and since this isn't one that mounts to factory studs and then has studs to mount the wheels to I'm not concerned. The ARP studs and wheel should sandwich it nicely and really give me the final clearance I need to not rub (at least from the static testing and with the tire not aired down :cowboy: )
My next area of concern is my tire carrier. I feel like it was on the limit before.. and now, with the extra weight, it really feels like it's struggling.. not that I expect a weld to fail.. but it's definitely has some twist to it with the tire mounted. Granted I gained an entire inch of backspacing with these, so i have a minimum of 1 inch that I can cut the arm back and suck the tire back closer to the rig.. but I'm afraid I might have have to do some additional reinforcement of some sort ... you know.. just in case.. lol.
Oh, and silly me... I just went ahead and ordered a brand new factory steering rack while I was at it as well ... :boom: I pretty much already pre-sold my lc200 rack, with the double-shear spindles, and the gentleman will be pulling his reinforced spindles to ship to me when we do the swap.. I figured I would maybe source a used rack.. but just adding up what it would cost for new bushing and outer tie rods alone puts the rack at like $300 minimum.. and IF the inner tie rods also need to be replaced with OEM ones you're talking another $200 add... and that's not replacing any seals and having worn internals... I figured what's another $200 for a brand new, from toyota rack..? No hassle with trying to clean it up and replace parts.. just throw it in and go. (and be REALLY easy on it so I'm not replacing brand new tie rods a month in
) a part of me almost went into looking into the tundra rack.. and I think if i did it from the get go I would still be running it
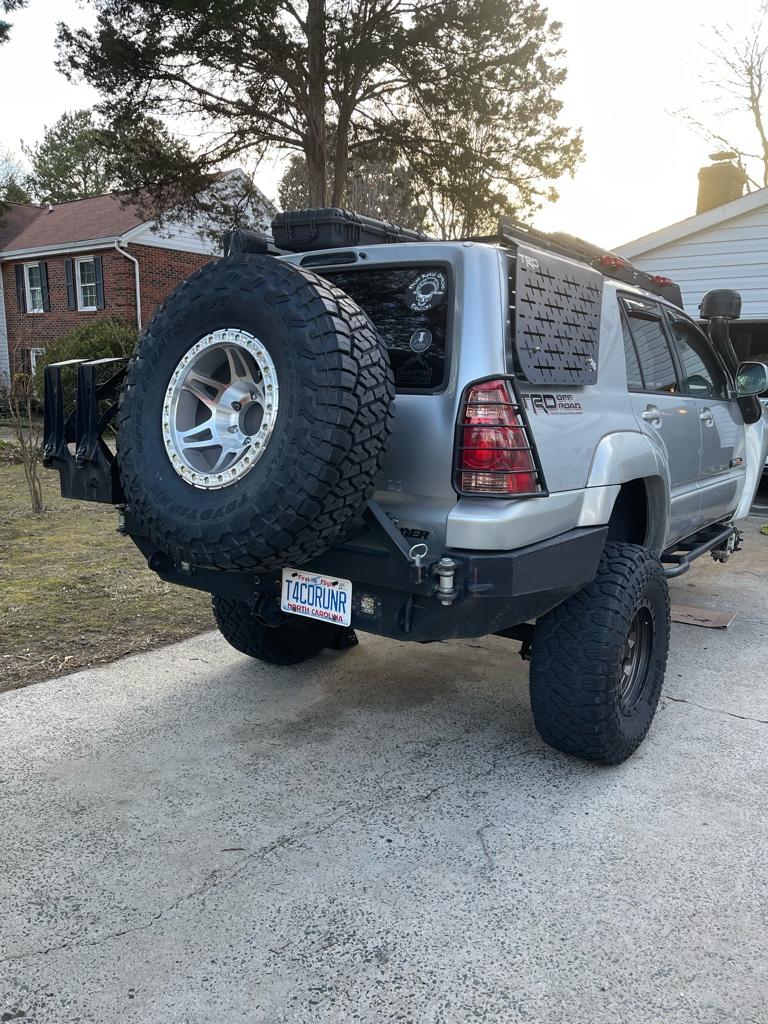
but at this point.. it is what it is.. and I really just want my factory reliability and geometry back .:banplease:Have to say it ... looks silly with that giant tire on the back.
:laugh::laugh::laugh:
I thought the same exact thing man... :doh: Though I will mention that I think a part of it is the weird wide angle picture from the phone. It looks a bit different in person. Though I am currently looking at options of maybe... just maybe.. not having to carry a spare.. or at least not on the swing out.. though I can't even begin to imagine having to stick this up on the roof rack :crutch::crutch::crutch:

No rearward visibility and questionable strength of my swingout lead me to lay the spare tire down inside the hatch. I think it works well inside. Keeps the weight low and rear bumper high clearance/ tucked in.
yea.. i have an electronic mirror/camera setup in the swing out so visibility isn't an issue, but I do worry about the strength of the swingout... Unfortunately for me, inside the rig is not an option since that's where all my camping/drawer setup is and this would literally consume every bit of space inside.. I have a few different ideas on how to reinforce the swing out and get the sag out of the arm.. might be a long shot.. but I see a few 4th and 5th gens running around with 37's for a spare and supposedly with no issues :shrug:
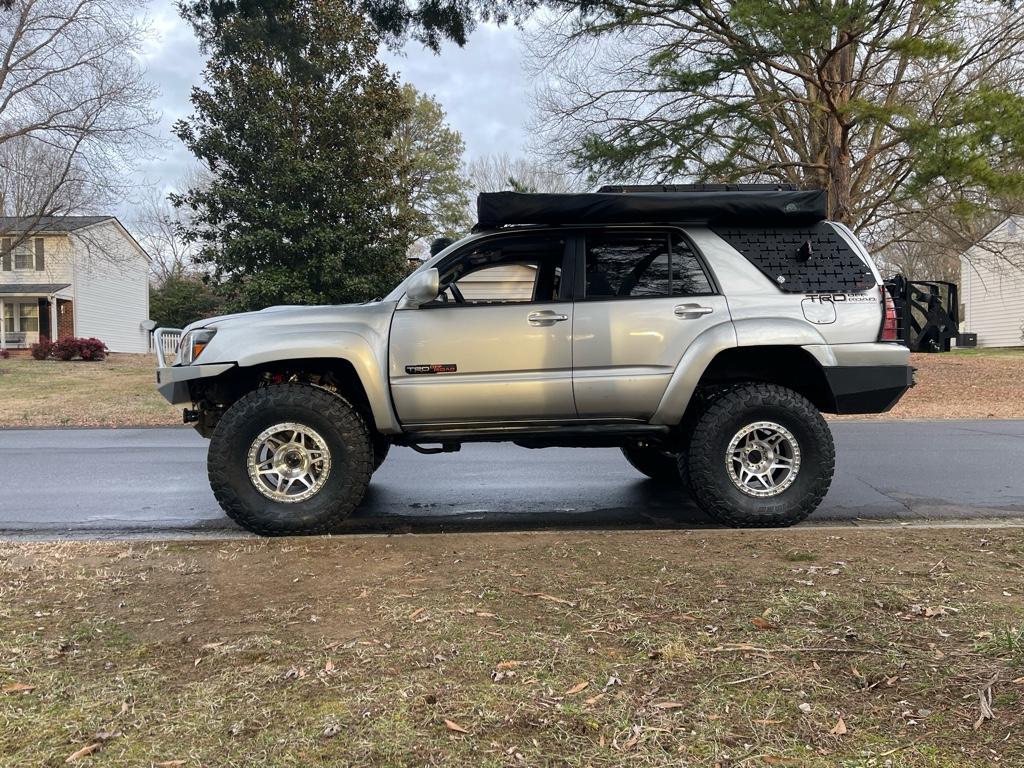
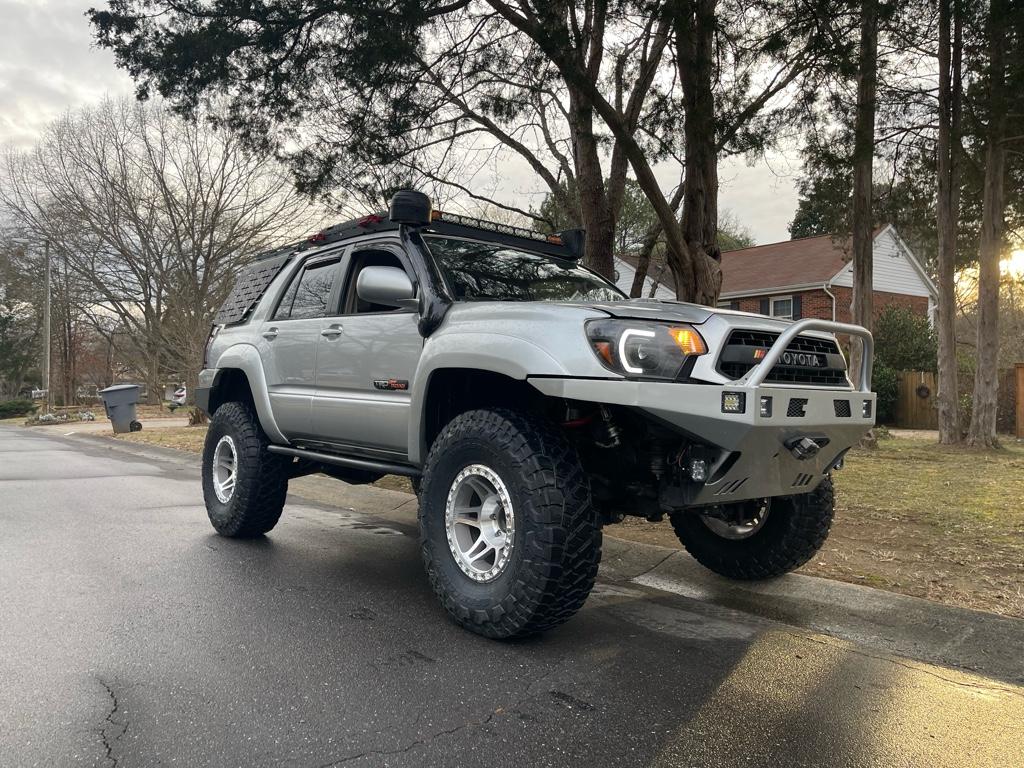
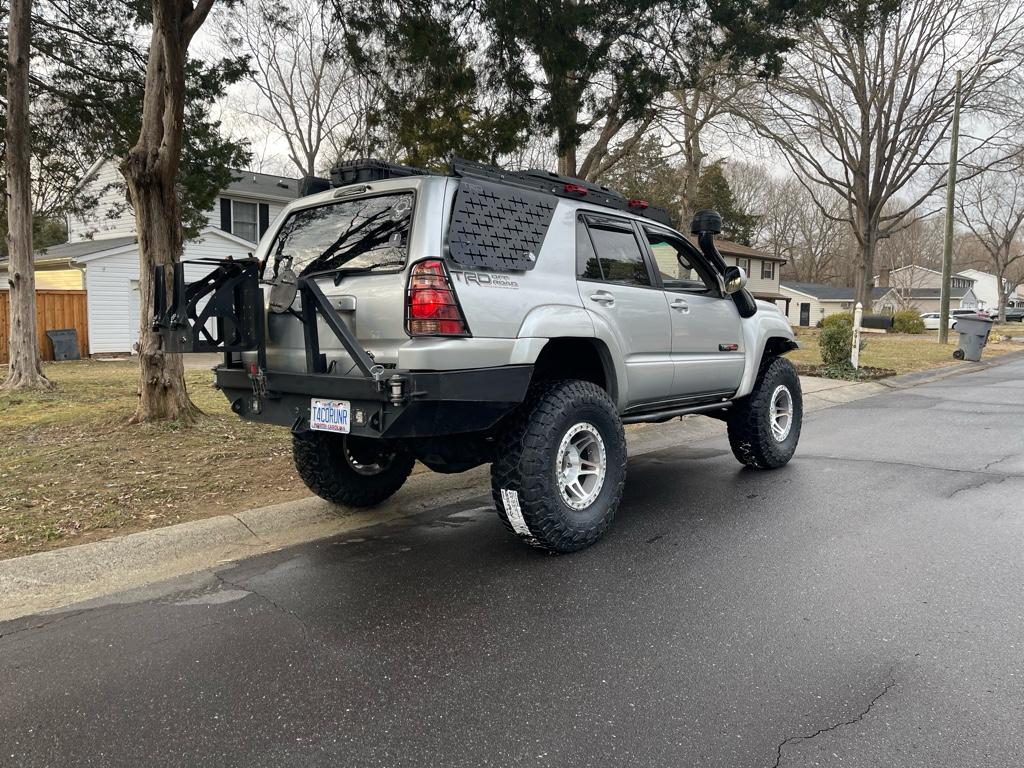
Well I think it’s done … (other than reselling the tire carrier a bit I guess) did a quick re alignment, not too shabb.. but the bumpsteer at this ride height is pretty gnarly .. when I hammer down a bit it squats, lifting the front end and toeing wayyy in and scrubs the tires across making it sound like I’m spinning… I have the factory rack sitting waiting to go in .. already took a deposit in the lc200 rack .. but having second thoughts with someone else making my mistake.. the only way to keep the rack and make it work would be the RCLTHD kit .. that’s a ton of money to keep the rack haha. But I’m having. A hard time walking away from all the work I did to make it fit though [emoji2359]
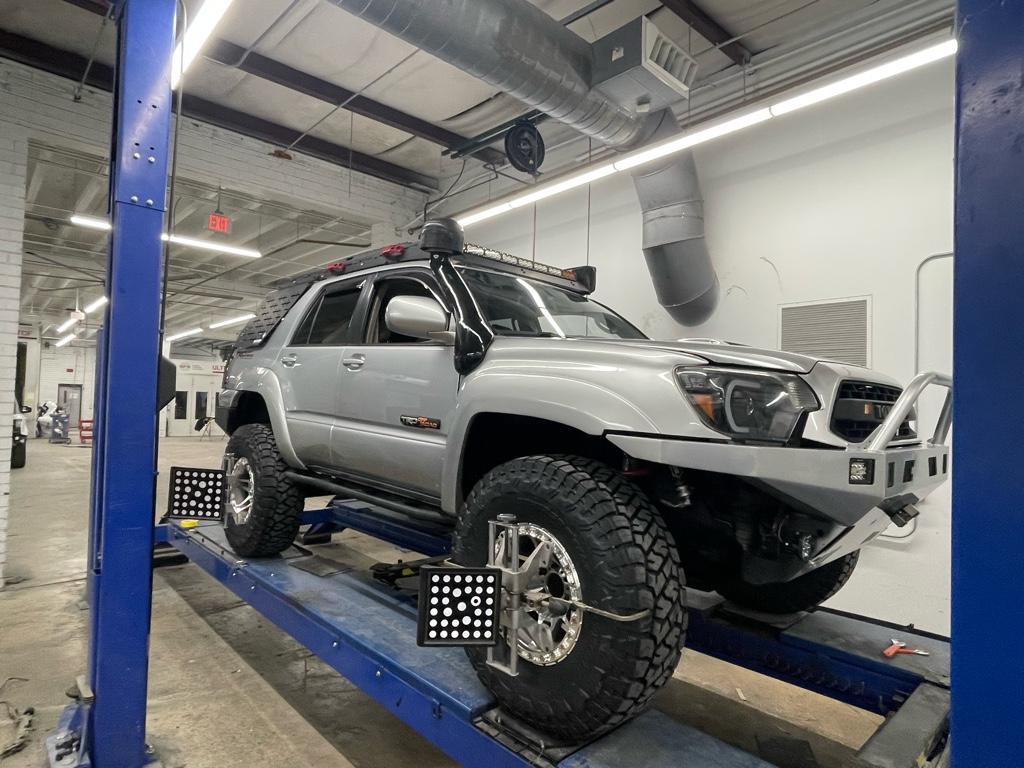
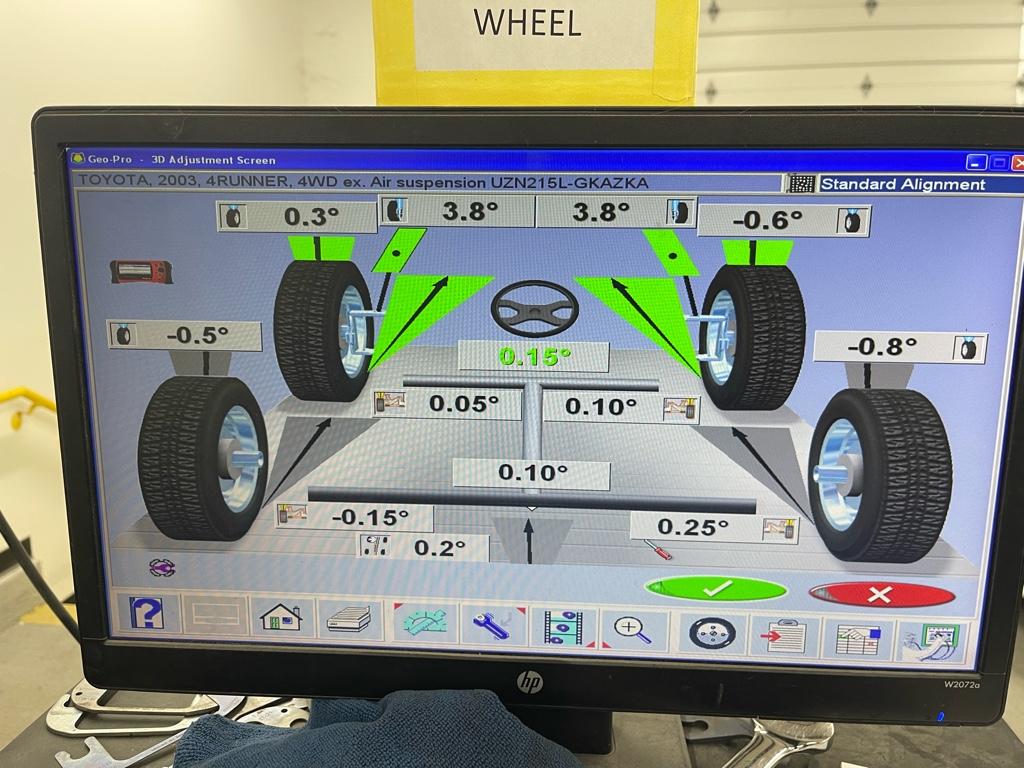
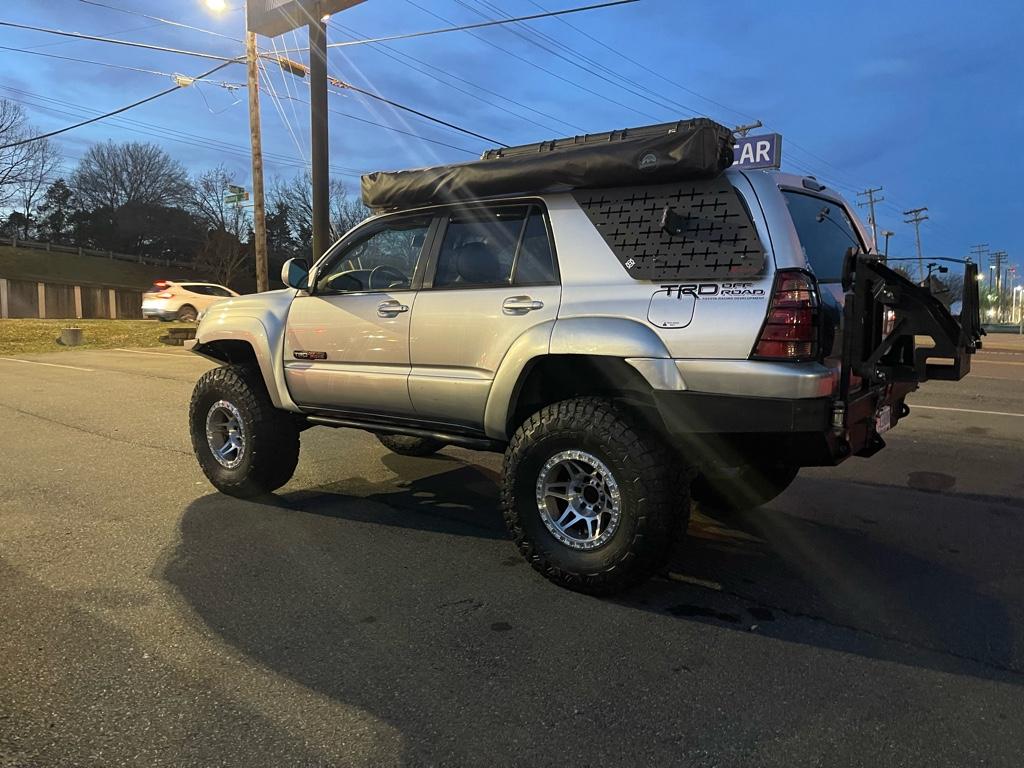
Sent from my iPhone using Tapatalk
Sent from my iPhone using Tapatalk
Well.. flip-flop is back at it again! Now that I have my brand new $740 OEM rack sitting in the garage.. I am second-guessing myself ripping out the LC200 rack..
Long story short.. while sitting on my ass in the drive after yet again trying to get the proper compromise of toe-out that keeps me from having 4" of toe-in under acceleration I got to looking at how the tie rods are mounted and the space that I have..
I went back and looked at the originally discussed numbers..
LC200:
Stroke: 6.22"
Length between ITREs: 29 7/8
4th gen 4Runner:
Stroke: 6.25"
Length: 28.5"
If I'm understanding this correctly.. the LC200 rack tie rods really are about .6875" shorter than stock if the tie rod to tie rod length difference really is only 1.375"...
what IF I could shift the pick-up point on the spindle outboard, even by say .500" ? and possibly also shift it up .5" inches to account for the rack sitting a bit higher than stock.. Does that take out enough bump steer to actually make this thing usable at the ride height I want???
If so.. my initial thought is that I will likely need to start with new spindles anyway (possibly) because the 3/4" hardware I decided on is overkill... and leaves less room to move the point due to brake rotor interference.. if I went with 1/2" hardware instead, it would free up, what, an 1/8" that I could shift it? Effective growing the outer wall by 1/8" i guess.
All of these are big what-ifs.. and obviously there is way more to steering geometry than just bump-steer.. so I'm only 10% confident at this point that it's a path forward.. but hell... RCLT HD kit MUST be moving the pickup point in their spindles since they literally only work with the lc200 rack and explicitly say they won't work with the cut down tundra rack, which further reinforces that point.. I just wish I had an easy reference point from their design on how much forward and outward the pick-up is moved lol
Long story short.. while sitting on my ass in the drive after yet again trying to get the proper compromise of toe-out that keeps me from having 4" of toe-in under acceleration I got to looking at how the tie rods are mounted and the space that I have..
I went back and looked at the originally discussed numbers..
LC200:
Stroke: 6.22"
Length between ITREs: 29 7/8
4th gen 4Runner:
Stroke: 6.25"
Length: 28.5"
If I'm understanding this correctly.. the LC200 rack tie rods really are about .6875" shorter than stock if the tie rod to tie rod length difference really is only 1.375"...
what IF I could shift the pick-up point on the spindle outboard, even by say .500" ? and possibly also shift it up .5" inches to account for the rack sitting a bit higher than stock.. Does that take out enough bump steer to actually make this thing usable at the ride height I want???
If so.. my initial thought is that I will likely need to start with new spindles anyway (possibly) because the 3/4" hardware I decided on is overkill... and leaves less room to move the point due to brake rotor interference.. if I went with 1/2" hardware instead, it would free up, what, an 1/8" that I could shift it? Effective growing the outer wall by 1/8" i guess.
All of these are big what-ifs.. and obviously there is way more to steering geometry than just bump-steer.. so I'm only 10% confident at this point that it's a path forward.. but hell... RCLT HD kit MUST be moving the pickup point in their spindles since they literally only work with the lc200 rack and explicitly say they won't work with the cut down tundra rack, which further reinforces that point.. I just wish I had an easy reference point from their design on how much forward and outward the pick-up is moved lol
just looking through some old conversations we already had on this and dropping as a point of reference.. Mason over here killing dreams from the past lol.
So the rack total difference also has to account for the larger inner tie rod balls.
33.5" clevis bolt to clevis bolt LC200 with heims
32.5" stock LC200 ball joint to ball joint
29.75" stock ball joint to ball joint
So thats where I got my 2.75" difference overall or 1.375" each side. Stock rack to stock rack.
So the rack total difference also has to account for the larger inner tie rod balls.
33.5" clevis bolt to clevis bolt LC200 with heims
32.5" stock LC200 ball joint to ball joint
29.75" stock ball joint to ball joint
So thats where I got my 2.75" difference overall or 1.375" each side. Stock rack to stock rack.
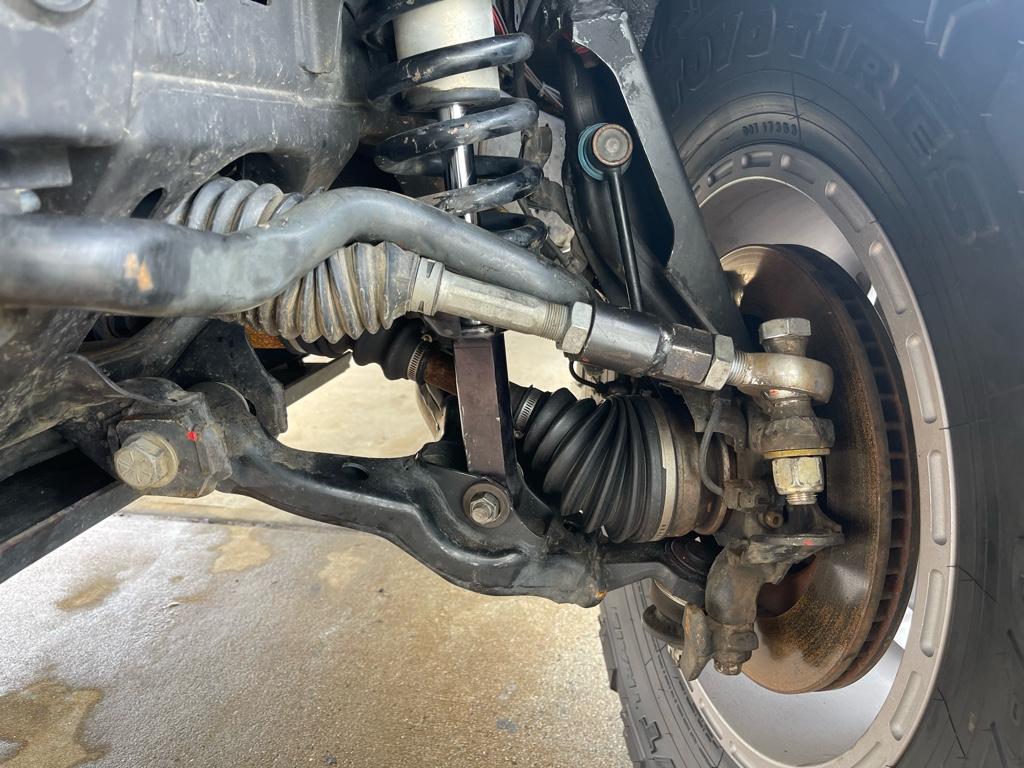
I have NO idea if this is even remotely close to potentially working .. but I can physically mount the tie rod up at the upper section of the spindle pickup. I need to pull the shock again to actually cycle it and see where it shifts the bumpsteer range to .. and maybe .. just maybe , it will make it somewhat usable as is in the ride height to full droop section of travel [emoji2371]
The sway bar will need shorty links to get to swing up and out of the way as well if I want to run this as is ..
Something tells me me bc of the angles this won’t just be an easy flip over and use thing .. but does give me hope that maybe I can modify the spindle a bit by knocking grown a half inch in the top surface to drop the link just a little. More testing tomorrow when I can pull the shock out ..
Sent from my iPhone using Tapatalk
The sway bar will need shorty links to get to swing up and out of the way as well if I want to run this as is ..
Something tells me me bc of the angles this won’t just be an easy flip over and use thing .. but does give me hope that maybe I can modify the spindle a bit by knocking grown a half inch in the top surface to drop the link just a little. More testing tomorrow when I can pull the shock out ..
Sent from my iPhone using Tapatalk
quick findings from this morning..
Yea, I can probably have sat down and reasoned it out on paper and came to the same conclusion.. but I decided a real-life test was better for a visualization process..
Just flipping the the mounting point from the bottom to the top of the knuckle pick-up seems to do the exact opposite of for toe in/out as it cycles.
Going about just this route, starting from ride height, as it goes to full bump I get right around 1-1.5 inches of toe in at the front edge of the tire. As it starts to droop down from ride height, it starts to toe-out around .75-1".
Not ideal, I know.. but... I think there is still something here... If just flipping between the low/high mounting positions gives me the flip-flop in toe characteristics... is there any hope that maybe some in-between height could achieve a sweet spot of bumpsteer (obviously the length isn't changing so it will still push/pull) to be able to live with decently for the street? It doesn't matter what it does at full bump for instance since I'll never see that on the street, and offroad, if it turns in or out, it turns in or out :shrug:
I currently don't have a very fast way of verifying this theory without chopping up the spindle and going to town with custom pick-up points...but.. I think with some time and a tape measure, what I could do it literally unbolt the outer tie rod from the spindle and free-float it in space at different heights to see how far in/out the hole would be offset.. :ballchain:
Hoping to put in some more investigation throughout today and see if I can determine this will be worthwhile to keep trying to figure out, or if I just wave the white flag and throw in the factory rack.. :target:
Yea, I can probably have sat down and reasoned it out on paper and came to the same conclusion.. but I decided a real-life test was better for a visualization process..
Just flipping the the mounting point from the bottom to the top of the knuckle pick-up seems to do the exact opposite of for toe in/out as it cycles.
Going about just this route, starting from ride height, as it goes to full bump I get right around 1-1.5 inches of toe in at the front edge of the tire. As it starts to droop down from ride height, it starts to toe-out around .75-1".
Not ideal, I know.. but... I think there is still something here... If just flipping between the low/high mounting positions gives me the flip-flop in toe characteristics... is there any hope that maybe some in-between height could achieve a sweet spot of bumpsteer (obviously the length isn't changing so it will still push/pull) to be able to live with decently for the street? It doesn't matter what it does at full bump for instance since I'll never see that on the street, and offroad, if it turns in or out, it turns in or out :shrug:
I currently don't have a very fast way of verifying this theory without chopping up the spindle and going to town with custom pick-up points...but.. I think with some time and a tape measure, what I could do it literally unbolt the outer tie rod from the spindle and free-float it in space at different heights to see how far in/out the hole would be offset.. :ballchain:
Hoping to put in some more investigation throughout today and see if I can determine this will be worthwhile to keep trying to figure out, or if I just wave the white flag and throw in the factory rack.. :target:
I'll apologize in advance if anyone read through the last 3 posts of blabber :focus:
I was struck with a profound realization after a question my brother asked... "how did you drive with this rack for the last 14 months..?" and then it hit me..
I have a 2-part problem that I've created with a much easier solution... rear springs/shocks too soft but sit very tall, and the front end was just raised almost 2 inches.
If I just went back to my ride height I was at a couple of weeks ago, the bump steer is there, yes, but it's been manageable up to this point.. AND the biggest issue I have is under acceleration with the rear squatting excessively bring my toe-in to extreme degrees.
Reading through the coil specs for the dobinson progressive coils.. it makes perfect sense... it's a TALL coil.. 500mm free height (vs 390-420 on the regular side for other coils) WHILE also having a progressive spring rate of 198-300lbf/inch (approximately 270lb/in with a loaded rig). Vs a heavy duty iron man spring that has a 392mm free height and a constant rate of 354lb/in.
I think my solution here is not to further cut and weld and try to figure out a good pick-up point on the knuckle, but just lower the rear 1-2inches with a heavy springrate spring, that will resist the initial weight transfer/squat, and also allow me to lower the front to match the level setup and just send it..
Needless to say... Ironman was running a 25% off promotion... so I just ordered their foam cell shocks front and rear with the 2-3 inch heavy duty springs for both.. :dance:
so if anyone is looking for a long travel dobinsons rear setup or an icon 2.5 remote resi front, hit me up
I was struck with a profound realization after a question my brother asked... "how did you drive with this rack for the last 14 months..?" and then it hit me..
I have a 2-part problem that I've created with a much easier solution... rear springs/shocks too soft but sit very tall, and the front end was just raised almost 2 inches.
If I just went back to my ride height I was at a couple of weeks ago, the bump steer is there, yes, but it's been manageable up to this point.. AND the biggest issue I have is under acceleration with the rear squatting excessively bring my toe-in to extreme degrees.
Reading through the coil specs for the dobinson progressive coils.. it makes perfect sense... it's a TALL coil.. 500mm free height (vs 390-420 on the regular side for other coils) WHILE also having a progressive spring rate of 198-300lbf/inch (approximately 270lb/in with a loaded rig). Vs a heavy duty iron man spring that has a 392mm free height and a constant rate of 354lb/in.
I think my solution here is not to further cut and weld and try to figure out a good pick-up point on the knuckle, but just lower the rear 1-2inches with a heavy springrate spring, that will resist the initial weight transfer/squat, and also allow me to lower the front to match the level setup and just send it..
Needless to say... Ironman was running a 25% off promotion... so I just ordered their foam cell shocks front and rear with the 2-3 inch heavy duty springs for both.. :dance:
so if anyone is looking for a long travel dobinsons rear setup or an icon 2.5 remote resi front, hit me up
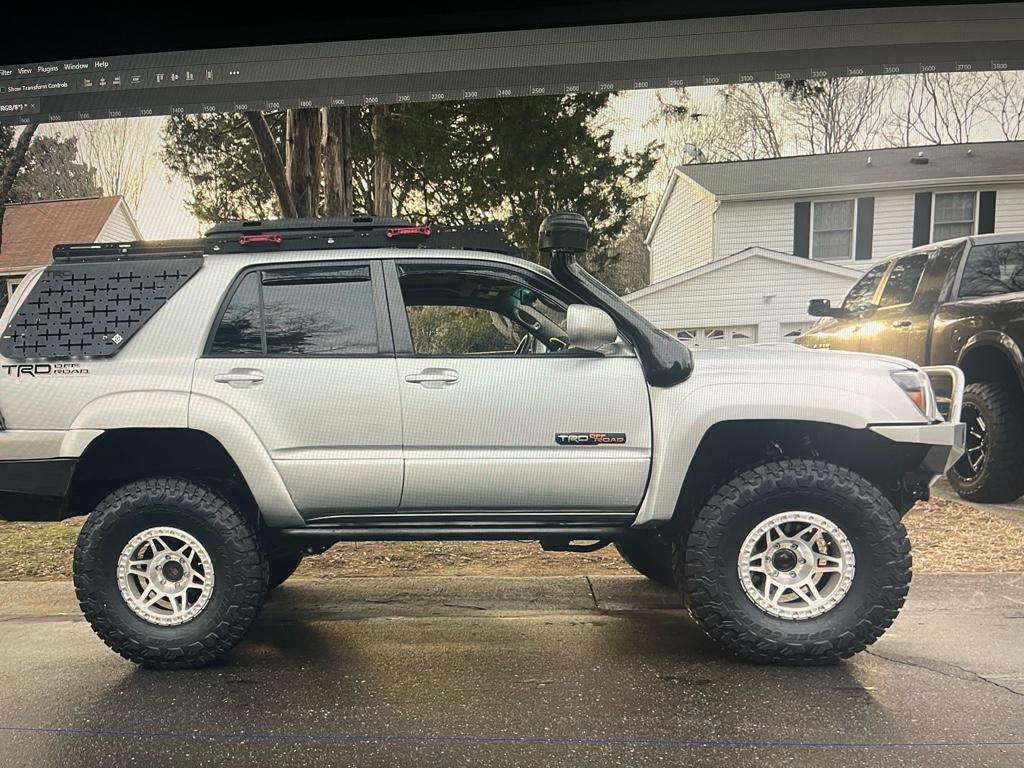
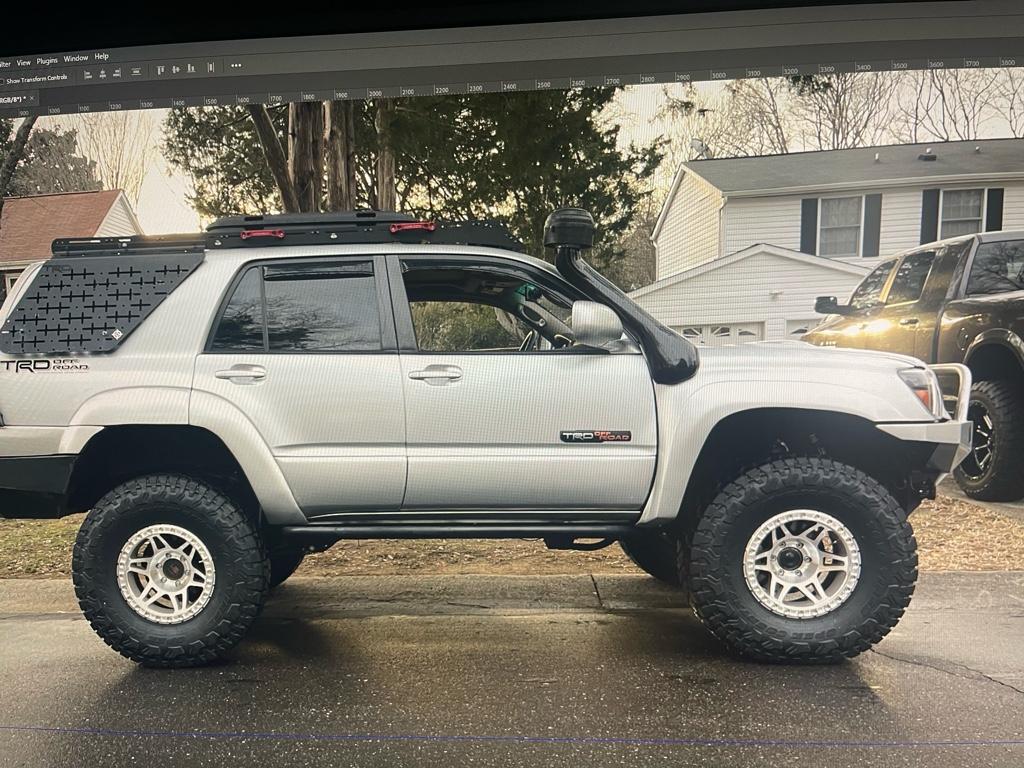
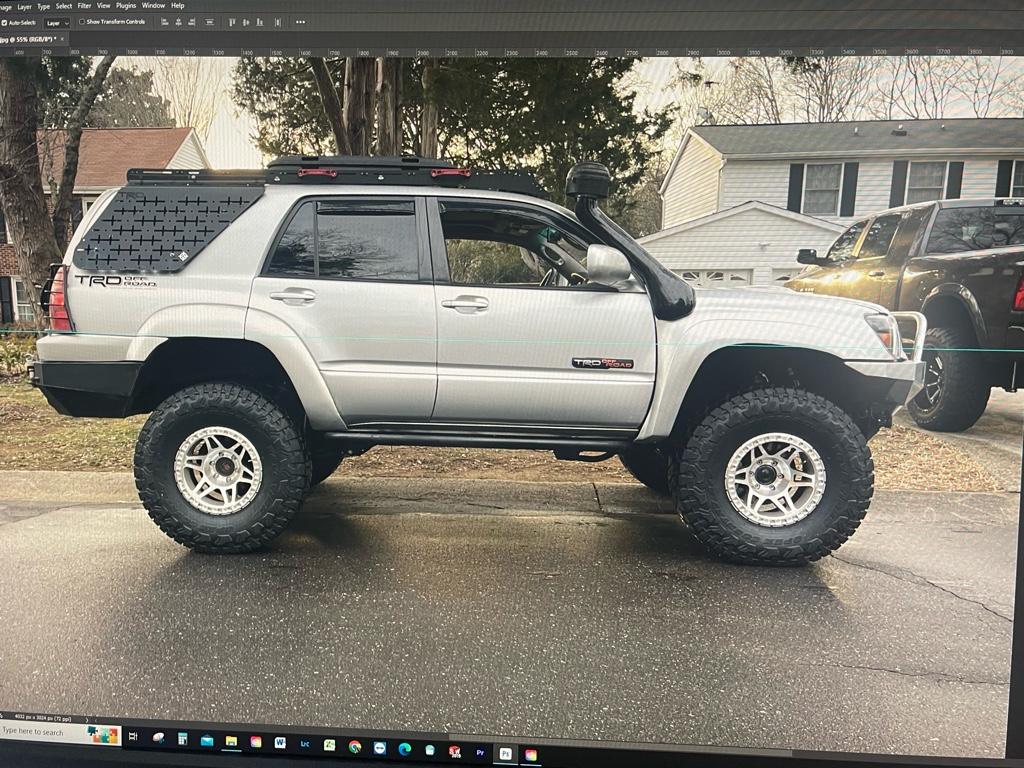
And with a little help from photoshop .. I determined that I can easily lower the front 1-2” and still keep the current fender/tire gap .. I just need to do a little trimming !
The fenders I’m running in the front now have a much lower arch than my stock rear .. so I could kill 3 birds with one stone … here’s a quick mockup of what it would look like taken up about 1-1.5”
Sent from my iPhone using Tapatalk
The fenders I’m running in the front now have a much lower arch than my stock rear .. so I could kill 3 birds with one stone … here’s a quick mockup of what it would look like taken up about 1-1.5”
Sent from my iPhone using Tapatalk
Similar threads

- Replies
- 2
- Views
- 482


