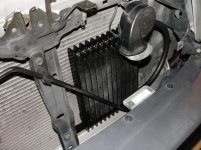
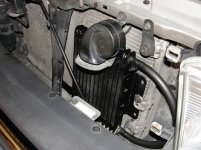
B&M 70268 SuperCooler Transmission Cooler Install on a 3rd Gen

I live in the north where cool temperatures are abound. So, adding a temp. gauge for me was just because I wanted to. Not because it was necessary. I wanted to go through the process to know if I could do it and I know I can now. I used the B&M 70268 model cooler. If it were warmer here, I would maybe use two coolers, add a pusher (not a tractor) style fan (or two), and then the temp. gauge definitely.

Did you get the B & M gauge? I've been doing a lot of looking around and am very sad to learn the scanguage 2 won't work with my '96. I've been debating about getting a gauge just for piece of mind. I just can't really tell if it's necessary. The B & M one on amazon isn't getting very good reviews. Just curious if anyone would recommend other models. Thanks -
 
Did you get the B & M gauge? I've been doing a lot of looking around and am very sad to learn the scanguage 2 won't work with my '96. I've been debating about getting a gauge just for piece of mind. I just can't really tell if it's necessary. The B & M one on amazon isn't getting very good reviews. Just curious if anyone would recommend other models. Thanks -

No, I definitely went with an Autometer brand temp gauge. I was upset to find out that my '97 was not going to read transmission temp. on scangauge II either.
Permalink 19, 20, & 22
http://www.toyota-4runner.org/3rd-gen-t4rs/107287-tranny-temp-guage-question-2.html
 
Last edited:
Great post, thanks OP. I decided to go with the Tru-Cool 4590 it's rated for 28k GVW and I do plan to bypass the radiator. I'm PCS'
ing to F.E Warren AFB, WY so I'm not too concerned with the heat and the the low temp bypass will work out great.

cooler1.jpg


cooler2.jpg


cooler3.jpg
 
Question: Is it redundant to route the fluid up through the cooler, then back down through the radiator/stock cooler and then back in to the trans? Has anyone tried this and would it offer any increased cooling benefit or am I over thinking it? It's hotter than hell in AZ and I'm trying to maximize.
 
Question: Is it redundant to route the fluid up through the cooler, then back down through the radiator/stock cooler and then back in to the trans? Has anyone tried this and would it offer any increased cooling benefit or am I over thinking it? It's hotter than hell in AZ and I'm trying to maximize.

The reason for the Trans cooler is to bypass the stock cooler all together to eliminate the risk of the "pink milkshake" I too live in AZ and have had no problems with my set up. I went with the 70264 because its a bit bigger.
 
Question: Is it redundant to route the fluid up through the cooler, then back down through the radiator/stock cooler and then back in to the trans? Has anyone tried this and would it offer any increased cooling benefit or am I over thinking it? It's hotter than hell in AZ and I'm trying to maximize.
It is recommended to run through the radiator if you live in cooler climates. I live in AZ and it is fine running it without the radiator connected. The main reason for getting an external cooler is to bypass the radiator to avoid the mixing of coolant and trans fluid. Some people get them because they tow and is beneficial to them. If you want both get a new radiator and external cooler and connect them.

Did you get the B & M gauge? I've been doing a lot of looking around and am very sad to learn the scanguage 2 won't work with my '96. I've been debating about getting a gauge just for piece of mind. I just can't really tell if it's necessary. The B & M one on amazon isn't getting very good reviews. Just curious if anyone would recommend other models. Thanks -
I have a B&M gauge and it works fine. I can get you a picture if you would like.
 
Question: Is it redundant to route the fluid up through the cooler, then back down through the radiator/stock cooler and then back in to the trans? Has anyone tried this and would it offer any increased cooling benefit or am I over thinking it? It's hotter than hell in AZ and I'm trying to maximize.

Since you are new to the scene and are not informed of the problem with the rad. cooler: most of us members would recommend never using the stock cooler incorporated into the rad., because it is a weak connection and fluid transfer to the cooling system and coolant leaking into the transmission will result in the dreaded 'pink milkshake'. All three components: engine, cooling system, and transmission would possibly need an overhaul...or replacement.

I would recommend you to use two remote coolers that are separate from the radiator altogether and use one, or two, pusher style fans in front of those coolers you can either manually turn on with a switch inside the passenger area, or hook them up to a thermo-couple switch to turn on automatically when the temp. rises. Also, get an autometer trans. temp gauge, like I did, so you can monitor the temp visually and know, without a doubt, that you are good to go.

Reference permalink #39 on page 3 of this thread. It is my 'Runner and the work I did to it myself through the recommendation of others that came before me. It takes some time, but the time and work spent completing it properly is well worth it, knowing you won't have to worry about the transmission overheating.

http://www.toyota-4runner.org/3rd-g...er-transmission-cooler-install-3rd-gen-3.html

permalink #19, 20, & 22:
A-pillar gauge pod install.
http://www.toyota-4runner.org/3rd-gen-t4rs/107287-tranny-temp-guage-question-2.html#post1054393

permalink #134 on page9
night time shot of illuminated gauge pod from 'Autometer':
http://www.toyota-4runner.org/3rd-g...er-transmission-cooler-install-3rd-gen-9.html
 
Last edited:
Great info and links fellas, thanks. 70264 should be here in a couple days, then I'll add a fan and a gauge in a few weeks i.e. whenever the hell I get around to it.
 
My 2c:
First mount it using the foam pads and zip mounts, then form/bend the brackets to hard mount it, then remove zip mounts.

Short version
I wanted to hard mount mine with brackets but also got frustrated and just wanted to get it finished so i used the zip mounts. I realized it was now securely in place and that this is the perfect scenario for hard mounting. I bent and formed the brackets as needed and now my tranny cooler is securely hard mounted.


Long version
Be careful with sharp metal tools like screw drivers. The aluminum a/c condenser is soft and fragile. Think of it as a virgin on prom night. Be gentle and respectful, it is delicate and sensitive and easily damaged.
Recently installed tru-cool 4544 LPD on 99 limited. I like the LPD bypass design. After spending 2-3 hours figuring out hose routing (because I was maniacally overthinking the thing), I spent another maniacal 2+ hours trying to hardmount using brackets. So frustrating. "Screw it," I says to myself and used the plastic zip tie things and foam pads. Works great, though I was concerned, perhaps without cause, about plastic zip mounts rubbing against a/c condenser tubes and eventually wearing a hole.
I read that the tranny cooler should be very close to (but not touching) the a/c condenser so it benefits from the air flow created by the fan. The further away from the a/c condenser, the less draw from the fan it experiences, as I understand it. The foam pads create just the right amount of space between the two.
I mounted mine as high as possible so it is behind the grill, not below it and blocked by the bumper. I centered it and made sure it is directly in front of the radiator fan. I want the maximum air flow.
My cooler was zip mounted in the exact place I wanted it and the ideal distance from the a/c condenser (thickness of the foam pads). There it was, fixed in place but not hard mounted.
This is the ideal scenario to hard mount it because it is secured in the exact position I want. I bent the brackets to the configuration needed to hold it securely exactly where it is. Then I removed the zip mounts. Now my new tranny cooler is held securely by 4 metal brackets. It is rock effing solid. Def more solid and secure than with the zip mounts and I need not worry about them rubbing a hole in the a/c condenser tubes. Even if it is a baseless concern, I have removed this variable from the equation so it is now a non issue. My mind is at ease.
tip: when hard mounting after zip mounting you will need to pull tranny cooler away from a/c condenser to make room to slip bolts through holes. one corner at a time: form bracket, cut zip mount, gently pull corner out and slip in bolt, secure bracket. foams pads will be sticking to a/c condenser but not enough to cause problems because they were just applied and have not fully adhered.
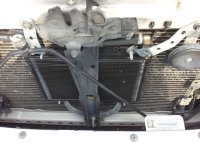
radiator.jpg
 

Attachments

  • radiator.jpg
    radiator.jpg
    60.9 KB · Views: 6,644
Last edited:
i zipped my 70264 to the radiator as BFAD did but did my zip ties in the opposite direction.
I struggled getting mine lined up and level try to guess and push the zip ties through from the fan side. Instead I put the zip tie radiator and foam on all 4 corners, leveled it up and pushed them through the radiator from the grill side then used the little square tighteners on the fan side. It looks a little nicer in my opinion too, if anybody happen to see it through the grill.
 
i zipped my 70264 to the radiator as BFAD did but did my zip ties in the opposite direction.
I struggled getting mine lined up and level try to guess and push the zip ties through from the fan side. Instead I put the zip tie radiator and foam on all 4 corners, leveled it up and pushed them through the radiator from the grill side then used the little square tighteners on the fan side. It looks a little nicer in my opinion too, if anybody happen to see it through the grill.

I just did my cooler yesterday, I probably would have mounted mine this way if I would have seen this post as well.

I would have to say the hardest part for me was getting the original transmission lines off of the lines coming from the transmission. After messing with them for a good 10 minutes, I was like, why the heck dont I just cut them off! So that is what I did. :heh: After that is was pretty smooth. I drained my pan to start and after mounting everything up I put almost 4 quarts back in. I noticed a difference today when driving to work, that it warmed up quicker but also shifted smoother as well. I wish I would have done this a long time ago! this was the oldest thing on my wish list on Amazon of things I want to get for my T4R. :clap2::popcorn::focus:
 
been installed a couple months now but i put mine here. 01 explorer cooler works great and the trans thanks me! i also have a tundra cooler for sale if someone needs one. :clap2:
DSC06763 (800x600).jpg

DSC06767 (800x600).jpg
 

Attachments

  • DSC06763 (800x600).jpg
    DSC06763 (800x600).jpg
    81.7 KB · Views: 8,064
  • DSC06767 (800x600).jpg
    DSC06767 (800x600).jpg
    71 KB · Views: 7,097
Just wondering ...

I have a 99 t4r limited with ( gasp ) 337k miles ......(542,350 km for the Canucks) and stock radiator. Everything is working fine except it is throwing the CEL for p0446 code.

Should I be looking at a new rad or just do the bypass cooler or just ride it out to the sunset? Thanks.

BTW, I have been telling everyone I am gonna make it to 500k miles with this baby!....
 
I have a 99 t4r limited with ( gasp ) 337k miles ......(542,350 km for the Canucks) and stock radiator. Everything is working fine except it is throwing the CEL for p0446 code.

Should I be looking at a new rad or just do the bypass cooler or just ride it out to the sunset? Thanks.

BTW, I have been telling everyone I am gonna make it to 500k miles with this baby!....

P0446 is an evap code, it has nothing to do with your radiator.

You can do whatever you want. Search here for radiator problems, namely the pink milkshake, and decide for yourself if you want to risk it. There are already tons of opinions on whether to bypass or replace the radiator, check them out.
 
i zipped my 70264 to the radiator as BFAD did but did my zip ties in the opposite direction.
I struggled getting mine lined up and level try to guess and push the zip ties through from the fan side. Instead I put the zip tie radiator and foam on all 4 corners, leveled it up and pushed them through the radiator from the grill side then used the little square tighteners on the fan side. It looks a little nicer in my opinion too, if anybody happen to see it through the grill.

I mounted mine like Big Fish.... Thank you sir for the write up.
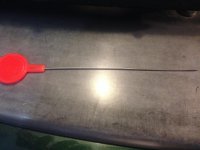
To line up the holes I went to the kitchen and had to ask my wife to use this. She says it's a cake teamster. It worked perfectly. I put the cooler where I wanted it then pushed the cake tester thru the mounting hole. I then pushed the zip thru the radiator exactly where the cake tester was.
I guess the way you did this would have been easier. Not sure how Big Fish did it.
I now have a new addition to the tool box.
 

Attachments

  • image.jpg
    image.jpg
    135.9 KB · Views: 2,230
Installed the trans cooler today!

I recently purchased my 97 4runner limited with 174K and have been spending hours and hours researching things to keep my baby running as long as possible. After seeing so many threads regarding the pink milkshake and/or transmission coolers, I decided to pull the trigger and install a transmission cooler to be free of the pink milkshake paranoia.

I decided to post this to encourage anyone who might be hesitant abut tackling this project on their own.
I went with the B&M 70268 Supercooler. I felt it had enough cooling power for my needs here in Colorado- I drive to and from work, take occasional trips up to the mountains, and see outdoor temps ranging anywhere from -5 to 100. So i figured that this will meet my needs.
I bought 8 feet of 3/8" ID transmission oil hose, some circular cinch clamps, a drain pain, and a bottle of ATF Dexron II fluid.
I fancy myself to be somewhat handy with tools and have an okay knowledge of mechanics, but I do admit that this job was a little daunting to me- working on such a vital part of my vehicle was a little scary.

I mounted the cooler on its side on the passenger side of the ac compressor, with the send line on the bottom and the return line on the top. The whole job, start to finish, took a little over an hour and a half- the toughest parts were getting the routing of the hoses just right, and removing the old hoses from the transmission send an return lines- they were really on there tight and there isn't much space for your hands and wrench to get at them.
Overall the job went well. after everything was finished, I started it up, replaced the lost fluid, ran it through the automatic gear settings, checked for leaks, took a 5 mile drive, and checked for leaks again.
Here's a pic of my setup:
293hpts.jpg

A big thank you to all of those who have written detailed posts on how to do this- it was a huge help!:thanks:
No more milkshake worries! :banana::driving:
 

Forum statistics

Threads
278,317
Messages
3,554,128
Members
248,016
Latest member
Advally Service

Trending content

Back
Top