Rad, Tranny Cooler, Filter, Condenser, Drier, Green to Red Notes
So since I have the bumpers off and awaiting some custom ones I decided (at 128k) to go ahead and put a new radiator in and to add a tranny cooler and filter. My AC condenser looked pretty beat up from the years so I also did a new condenser and drier. Here are my notes after all this to hopefully help others.
MY BILL: $640
OEM Rad from dealer: $200
B&M Tranny Cooler Kit: $81
Condenser $65
Drier: $16
Seal kit: $12 (the dryer came with new o-rings but the condenser did not for the two in/out lines and I wanted them.
New upper and lower rad hoses: $40 (Napa and yes they actually are exactly the same...I was shocked)
8' ATF hose: $20 (and I did use almost all of it)
Hose clamps: $4
Magnafine filter: $19
Toyota Red coolant: $50 (2 gallons...have some extra)
Distilled water: $10 (used 10 gallons to flush changing from green to red)
AC test and fill: $120
RADIATOR & TRANNY COOLER INSTALL NOTES:
-Find the tranny install video posted all over the forum. It's worth watching the entire thing. I watched it a few times. Thx to Tim the toolman!
https://www.youtube.com/watch?v=2nVbwe2t2T8
-You can trust the images on these threads for 3rd gen runners but STILL the BEST IDEA to visually chase them yourself. I even marked mine with painters tape and labels as I mapped it all out. Basically: OUT tranny hardline (Rear/low return hot > Radiator in (passenger side) > Radiator out (drivers side) > Magnafine in-line filter > in top of tranny cooler > out bottom of tranny cooler > back to IN tranny (front/upper) hardline.
http://www.toyota-4runner.org/3rd-gen-t4rs/63553-writeup-tranny-cooler-install.html
which transmission line heads to the tranny cooler? - YotaTech Forums
-The shroud is no problem and can be added after the radiator is back in. There's a comment in the video to put it in before the rad but I see no reason for that.
-OEM rads are on sale at most dealers now (less than what I paid.) I got mine for $200 and it was worth going the stealership route for this I felt so that IF it was damaged I could simply not take it. I did not want to deal with a damaged radiator as is common per many threads and amazon reviews of the Denso's etc.
-Check your input/output tranny lines on the rad before you put it in...make sure those nuts are tight. Mine were with OEM.
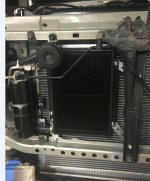
-The zip tie mounting method of the tranny cooler is fine but since my condenser and rad were brand new I just couldn't stand to bend any fins. But mounting it up with brackets was easy-breezy and should allow for even better condenser airflow. Plus, there's tons of room between the condenser and grill so why not? (If you drill that lower left hole put something behind! Don't drill your condenser!
-I simply bent my horn mounting bracket to bump out over the rad cooler. No prob.
-Consider doing your thermostat. I did not since it's working, since I have the SC pulley/tensioner in the way (not an issue on non-SC'd), and since it's something you can get to at any time without removing the radiator. But, it would be a little easier with the shroud and rad out of the way so something to consider.
-Watch your abrasion protection. Split line around the AC line hole is best per the video. Watch them down by the bottom of the shroud where they connect to the hardlines. Zip tie them good to the AC lines...just ensure nothing moving can get anywhere near them obviously.)
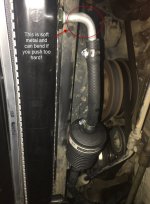
-Watch the driver's side tranny cooler input L-bend line. It's soft metal and will bend. I pre-lubed it with tranny fluid and that helped but I could still only get it on so far. If you try too hard you will bend that line so be gentle.
-I did buy my condenser and drier on Amazon. The condenser came with box open (never good). As is apparently common (from forums and reviews), from the top it looked warped which I did not like but had no blunt or big fin damage so I installed it which was fine. It charged up and held a charge fine as well. I know it's lightweight alloy and many come this way, but compared to my stock I didn't like that bend/warp in it. Oh well. Napa wanted $130 for the same part so on it went.
-Try and minimize the time your AC lines are open. I immediately removed and replaced the lines but if they are off for an extended period of time put electrical tape over the ends of them.
GREEN TO RED COOLANT CHANGE NOTES:
So since I did a pretty thorough job here I decided to swap from green to red. This was not too bad but because I was doing this I added the following steps for the initial drain:
Initial Drain of Green
- Drain at petcock on Rad, remove lower hoses, let drain thoroughly (recommend overnight). I also jacked the rear up to get a bit more. Careful doing this...chalk front wheels. (Also, on ATF lines, if you are doing a cooler you'll have to drain them since you will be tapping into the hardlines. If you are NOT doing that, secure them upward and not much will drain out.)
- Remove and rinse the overflow
- Find the passenger side drainage plug and use it (don't remove it, just loosen and let it drain). I got quite a bit more this way. Look for threads on this, just need LONG extensions.
- Remove thermostat...you'll get some this way (admittedly I didn't do this myself with this project)
- System is almost exactly 2 gallons! Keep this in mind
- IF you put a tranny cooler on as part of this, BEFORE you start engine, check your tranny fluid just to see (should be low) and add about a quart of ATF as well just to be safe (you likely lost more than that when you pulled the lines and the cooler will take some too so 1 quart is a good place to start but you WILL NEED TO CHECK AGAIN after you get rad fluid squared away and several times after driving it around for a few weeks after.)
Flush & Refill Method
-Once you have the new rad it and all, fill rad to top with distilled water and start engine (just leave cap off). Get it warm and open heater(s) full blast. Let it run for awhile...20 min or so this way until you start getting heat from heaters (just basically leave heater(s) on full blast through all this. Check all underneath and on all your connections for any leaks. Watch your temp gauge through all this. It should be good. Mine never moved even near halfway. If you have a decline driveway etc, you can move the vehicle around if need be and get it on a slight decline if you can (not necessary just helps a bit with flow when you start draining). Get your favorite drain pan and open petcock on bottom of rad. Let it start draining. Since I had done such a full drain initially I was getting green but a lot more faint/yellow than the initial drain. Let it drain like this while running...every few minutes, pour more distilled water in until it's topped off. If your drain pan gets full you can shut the petcock temporarily, ensure rad is topped off, drain pan into gallon jugs etc. then resume. Rev engine a bit throughout this process. Keep doing this until you start to get basically clear water through. I ran 8 gallons through this way and it was pretty clear...just really faint yellow at that point. On your next to last gallon, once it's all gone in the rad and the rad is full, shut off the engine and let it drain out one final time until it's just a drip. Now you can assume you have 50% water in the system (retained in block and heater cores). Screw petcock back in and fill rad with coolant to the top. Start it and let it run quite awhile again with heaters full blast again etc. You're now in mixing phase. Keep checking fluid, it will go down a little but not a ton. At some point before it's too hot, put cap on and if you had it on a decline, now turn the vehicle around to be on a slight incline (not necessary but helps with burping.) Take cap back off (again ONLY if it's not too hot which it should not be) now keep topping off very slightly and burping. Also, mix up some 50/50 distilled and coolant and fill the overflow at this time. Squeeze the top rad return hose and look for bubbles. At some point, call it good and drive it around a little, park and let it sit overnight. Next morning check the fluid and top off if you want. You're done. (AND DON'T FORGET TO CHECK AND ADD ATF NOW TOO if you did a cooler.)
-True to the Toyota Red Coolant bottle, by doing this method I was able to get one full red coolant bottle in plus a bit more (and some for overflow mix). So I think I have about 60/40 mix in there or just slightly less...perfect.
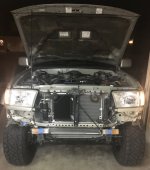
PICS
Here are the pics! Hope at least one of these tips help someone else!