Easy Weekend Mods

nerf bar steps

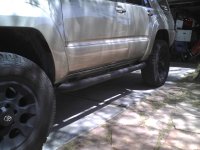
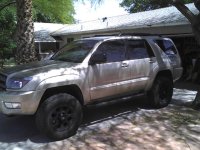
BIG thanks to Chmura this was my wknd mod , hope you can see them , 1 day trip killed 2 birds deal my son had BBall tourney n Corona so it was a perfect fit ! I was glad to find these & nice of him to hold on to them , found I needed steps with my mild lift , to get my ol ass up ! :thumb:
 

Attachments

  • 130415_0002.jpg
    130415_0002.jpg
    67.9 KB · Views: 9,313
  • 130415_0001.jpg
    130415_0001.jpg
    84.4 KB · Views: 9,320
BIG thanks to Chmura this was my wknd mod , hope you can see them , 1 day trip killed 2 birds deal my son had BBall tourney n Corona so it was a perfect fit ! I was glad to find these & nice of him to hold on to them , found I needed steps with my mild lift , to get my ol ass up ! :thumb:


Lookin' good, glad you like them!
 
Last edited:
It seems like every "easy" mod I attempt turns into an entire weekend project. haha. Oh well. Ive put tons of work in my 05 sr5 4r over the last year. Check out my pics.

This is my first post by the way :)
 
The way I understand it, is that the purpose of the sleeve is not to fit inside of the bushings, but to adapt the 3/8" diameter thread of the eye bolt to the 1/2 inch through-hole of the sway bar with minimal slop. If you pay attention to the assembly of the Energy End Links, there are portions of that part group where the bushings ride directly on bolt threads without a sleeve in between them. The sleeve is cut to an approximate length of 1/4" because that is about the same as the thickness of the pinched end of the sway bar that the eye bolt fastens through. There would have to be a huge amount of movement between the eye bolt and the bushings for the threads to chew through them. So much so, that if the assembly was moving that much, it would probably not be functioning as intended, and be obviously useless.

Pressing the full length of the sleeve into/through both bushings and the sway bar, may actually prevent you from being able to tighten the nut enough to exert adequate clamping force between the bushings and the sway bar. In other words, the length of the sleeve, plus the thicknesses of the washers is going to limit how tight you can torque down the nut, and that limit may not be enough torquing for a good "coupling" effect to exist between the sway bar and the eye bolt. After looking at the pictures again, I suspect this may be the case.. Try it out though, post pics, and report back. I'm curious to see the outcome.

So day 3 on the new end links with the full steel sleeve and I have no complaints at all. In fact it rides just like it did before the lift and feels much more natural now that the rear end isn't so limited with the 2'' taller springs and stock sway bar length, I am really impressed with the improvement! I don't see any disadvantage to the full sleeve yet, and I hear you about getting full compression on the bushings and I can assure you all that I did, the sleeve didn't seem to interfere at all. I forgot to mention that I also used loctite on all the nuts as well. I haven't posted any pics because my email has a file size limit on my office computer here and don't have a way to get pics on from here haha - my setup looks identical to the prev pic posts about the mod though, not one difference :) If anything changes with the performance of the mod or have any problems I'll report them right away! :lookout:
 
So day 3 on the new end links with the full steel sleeve and I have no complaints at all. In fact it rides just like it did before the lift and feels much more natural now that the rear end isn't so limited with the 2'' taller springs and stock sway bar length, I am really impressed with the improvement! I don't see any disadvantage to the full sleeve yet, and I hear you about getting full compression on the bushings and I can assure you all that I did, the sleeve didn't seem to interfere at all. I forgot to mention that I also used loctite on all the nuts as well. I haven't posted any pics because my email has a file size limit on my office computer here and don't have a way to get pics on from here haha - my setup looks identical to the prev pic posts about the mod though, not one difference :) If anything changes with the performance of the mod or have any problems I'll report them right away! :lookout:

Good deal!
 
Find a friend with a little mechanical skill and do an actual lift and remove cheezy spacers. Great weekend idea. Port and polish your upper and lower plenum for an actual hp gain was a great mod (friend works as machinist) I got a constant 20-22mpg on highway and gained 15hp and 23ft lbs torque.

Any more info on this?
 
In Vehicle Hi-Lift Storage

Those of you that have a Hi-Lift and have not yet found a good secure spot to store it for daily driving or even for off road trips, here is a pretty easy mod.

Secure your jack to the factory rear seat hinges. This will keep the jack out of the way, secured tightly to the vehicle, and safely out of the elements:

IMG_20130512_171956_007_zps08bb11e6.jpg
IMG_20130512_172007_593_zps98d3a3b9.jpg~original


Mounting Hardware - About $20
Qty 2 = 1/2" x 3" full thread flange studs w/size 13 threads
Qty 2 = 1/2" nylon lock nuts
Qty 2 = 1/2" wing nuts
Qty 2 = 1/2" lock washers
Qty 8 = 1/2" fender washers

Mounting Location
Far right hinge on passenger side seat
Middle hinge on passenger side seat

I chose to do both hinge location points on the same "wide" rear seat so I can still fold down one seat and leave the driver side rear seat to allow for my kids' carseat to maintain in use position; otherwise you will be required to fold down both seats


Mounting Instruction - About 30 Minutes
I used a 1/2" metal drill bit and with the seat bottoms folded down, drilled through the center of metal hinge and out through the plastic covers. I decided to leave the plastic covers on to maintain the factory look across the entire rear seating area.

Next, was to put one fender washer on the bolt and slide through the hole, then a second fender washer followed by a nylon lock nut and tighten down. The outside passenger hinge is very easy to secure as there is ample access to hold the bolt straight while tightening. The middle passenger hinge however is quite another story. Since the drilled hole is only about 3/16" and the bolt is 3", once the nylon lock engages it will be extremely difficult to keep the bolt from wanting to twist out of alignment, also with little to no room to maneuver a ratchet it is very hard to get enough leverage to turn it straight. Take your time on this one otherwise it will get 'frozen' half way and you'll get stuck **ask me how I know**.

Once both bolts are tightly secured to the hinges, fold the seat bottoms back up. Although not required, I sheared down the remaining 4 fender washers so they had two flat or square sides so the entire washer fit into the grooves of the Hi-Lift I-beam. Slide on one fender washer, which will go against the back of the nylon lock nut on each stud, the fit your Hi-Lift onto the studs in the desired center holes (play around with your wanted positioning). Once you have the Hi-Lift in the holes you want, put on the last two fender washers, then a lock washer on each side followed by the wing nuts and tighten them down.

Your Hi-Lift should now be tightly stowed away out of the elements and keep you from being harmed.

:cheers:

 
Last edited:
thinking of plasti dipping my wheels...wondering which colour is best...

1. charcoal [dark gray]
2. black

my tuck is galactic grey mica...........for a titanuim silver car, what color would be better?
 
High Beams upgrade
stock: 9005, 12.8V, 65W, 1700 lumens, 320 hours
new: 9011, 12.8V, 65W, 2530 lumens, 320 hours

The 9011 bulbs have a double-wide top ear on the plastic bulb base, this is to comply with the law requiring different bulbs to have different bases.
The extra-wide plastic top ear is easily trimmed or filed to make the bulb fit your headlamp's bulb receptacle. Once that's done, they go directly into the headlamp, and the existing sockets snap on. Please see HIR bulb base modification for details.

Do not use 9011 in a lamp originally designed to accept a
9006 bulb, it's neither safe nor wise. And most fog lamps cannot effectively focus the large amount of light from a
9012 or 9011 bulb without creating dangerous (and illegal) levels of glare regardless of lamp aim.

Alternative slightly less expensive the HL78310
Susquehanna MotorSports - Auto Performance Product. But given the short life span of these bulbs and higher wattage I wont use them.


Blacked out headlamps.
06-09 TOYOTA 4RUNNER black projector | eBay

Low beams H11 to H9 (some modification required)


Some great info on this site
http://www.modifiedlife.com/2006-toyota-4runner-light-bulb-replacement-guide/

2006 Toyota 4Runner Light Bulb Replacement Guide
Low Beam Headlight Bulb Size: H11
High Beam Headlight Bulb Size: 9005 or 9005 HID Upgrade Kit
Parking Light Bulb Size: 168NA
Front Turn Signal Light Bulb Size: 4157NALL
Rear Turn Signal Light Bulb Size: 992 (7440A)
Tail Light Bulb Size: 7443
Stop Light Bulb Size: 7443
High Mount Stop Light Bulb Size: 921
Fog/Driving Light Bulb Size: 9006
License Plate Light Bulb Size: 168
Back Up Light Bulb Size: 921
Front Side Marker Light Bulb Size: 168NA
Rear Side Marker Light Bulb Size: 7443
Glove Box Light Bulb Size: 37
Map Light Bulb Size: 168
Dome Light Bulb Size: DE3175
Step/Courtesy Light Bulb Size: 194
Trunk/Cargo Area Light Bulb Size: DE3175
Daytime Running Light Bulb Size: 4157

I highly recommend Daniel Stern for all of your lighting needs/questions.
http://www.danielsternlighting.com/products/products.html
 
Last edited:
Those of you that have a Hi-Lift and have not yet found a good secure spot to store it for daily driving or even for off road trips, here is a pretty easy mod.

Secure your jack to the factory rear seat hinges. This will keep the jack out of the way, secured tightly to the vehicle, and safely out of the elements:

IMG_20130512_171956_007_zps08bb11e6.jpg
IMG_20130512_172007_593_zps98d3a3b9.jpg~original


Mounting Hardware - About $20
Qty 2 = 1/2" x 3" full thread flange studs w/size 13 threads
Qty 2 = 1/2" nylon lock nuts
Qty 2 = 1/2" wing nuts
Qty 2 = 1/2" lock washers
Qty 8 = 1/2" fender washers

Mounting Location
Far right hinge on passenger side seat
Middle hinge on passenger side seat

I chose to do both hinge location points on the same "wide" rear seat so I can still fold down one seat and leave the driver side rear seat to allow for my kids' carseat to maintain in use position; otherwise you will be required to fold down both seats


Mounting Instruction - About 30 Minutes
I used a 1/2" metal drill bit and with the seat bottoms folded down, drilled through the center of metal hinge and out through the plastic covers. I decided to leave the plastic covers on to maintain the factory look across the entire rear seating area.

Next, was to put one fender washer on the bolt and slide through the hole, then a second fender washer followed by a nylon lock nut and tighten down. The outside passenger hinge is very easy to secure as there is ample access to hold the bolt straight while tightening. The middle passenger hinge however is quite another story. Since the drilled hole is only about 3/16" and the bolt is 3", once the nylon lock engages it will be extremely difficult to keep the bolt from wanting to twist out of alignment, also with little to no room to maneuver a ratchet it is very hard to get enough leverage to turn it straight. Take your time on this one otherwise it will get 'frozen' half way and you'll get stuck **ask me how I know**.

Once both bolts are tightly secured to the hinges, fold the seat bottoms back up. Although not required, I sheared down the remaining 4 fender washers so they had two flat or square sides so the entire washer fit into the grooves of the Hi-Lift I-beam. Slide on one fender washer, which will go against the back of the nylon lock nut on each stud, the fit your Hi-Lift onto the studs in the desired center holes (play around with your wanted positioning). Once you have the Hi-Lift in the holes you want, put on the last two fender washers, then a lock washer on each side followed by the wing nuts and tighten them down.

Your Hi-Lift should now be tightly stowed away out of the elements and keep you from being harmed.

:cheers:

how is the foot room with this mod, it seems a little in the way.. would back seat riders have it touching the back of their calves, are those bolts gonna be rubbing up against the passengers ... good idea
 

Members online

Forum statistics

Threads
278,309
Messages
3,554,068
Members
248,016
Latest member
Advally Service

Trending content

Back
Top