Fully Customized Stereo Install...SQ not SPL

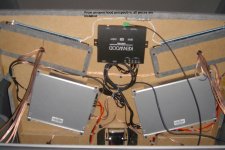
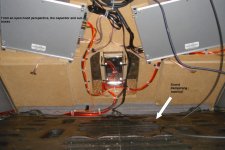
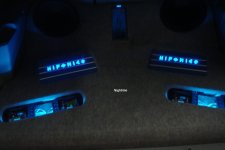
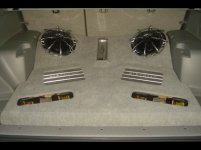
Everything is installed. The only loose cables under the floor are the speaker cables to the front and the digital fiber cable for the DSP. I didn't want to risk having that cable break. Everything elese is zip-tied or screwed down.
 

Attachments

  • custom stereo install 025-small.jpg
    custom stereo install 025-small.jpg
    164.1 KB · Views: 5,033
and the rest from the bottom.
 

Attachments

  • custom stereo install 026-small.jpg
    custom stereo install 026-small.jpg
    167.4 KB · Views: 5,016
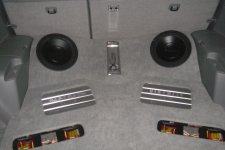
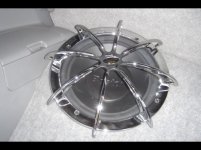
And here she is...unpowered. I have some Tsunami fishman grills coming in, but they haven't arrived yet. Next week I'll be able to finish them off.
 

Attachments

  • custom stereo install 038-small.jpg
    custom stereo install 038-small.jpg
    151.1 KB · Views: 5,033
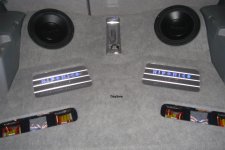
Final shot. I haven't completed the trim for the head unit yet, so I won't show that until it is complete, but the ICELINK is installed now and works great.

I hope you all enjoy the shots and I'm interested in getting your opinions. Sorry some of the shots are blurry, I'll try to fix some of those later. If you want to see something else (battery fuse holder, etc.) let me know.

Cheers!
 

Attachments

  • custom stereo install 042-small.jpg
    custom stereo install 042-small.jpg
    132.8 KB · Views: 5,071
I'm impressed !!! Great job. I bet it took You a lot of time to do all this. But it is realy something. If You have any pictures of you HU please post it. Did You design all this by yourself or someone helped You with it? Watching those pics makes me thinking why am I still listening stock sound....
Great job !
 
very very nice.. looks awesome! :)

also looks like you were able to use the stock brackets to attach the h/u.. sweet :)


on the speakers.. did those trim pieces come with the speakers?
 
TRD04RUNNER :

1. I have shots of the HU, but since my trim isn't yet complete I'm not going to post. Once the trim is complete, I'll post everything. I will however take a shot today to show how I mounted the IPOD.

2a. ICELINK is a device which allows you to connect an Apple IPOD up to your system instead of using a cassette adapter or FM modulator. It provides an auxillary in to your stock or aftermarket HU...that depends on what you want. They have a kit for the stock 4Runner stereo and they have kits for various aftermarket stereos. For the kenwood, it just connected on one end to the cd changer port and on the other to an IPOD mount. It also charges the IPOD while it is connected.

2b. The SWI-X was easy to install. I tapped into a ground wire, and connected the three wires that I cut from the stock steering wheel control connector (i posted a picture of this connector). Once it is installed, you program it like a learning remote control and then mount the LED. This was the most annoying part because the LED MUST have line of sight to your HU's infrared eye. I will try to mount mine near or in my trim piece to improve my line of sight.

krosno3:

1. I wish I could take all of the credit. I did design the layout of the box, but I spent a week straight with a German stereo installer and we built it, carpeted it and installed it. He runs a company called Golden Sound here in Germany. I believe he is also the CROSSFIRE rep in Germany. So, there were two of us working on this box (the arm in the picture was his).

alpha:

1. I've heard a lot of discussions about the HU trim and mounting pieces for the 4th Gen, but it wasn't difficult to do. The 4Runner uses the standard Japan ISO mount that is common to toyota's, nissan's, etc. So, yes, I used the stock mounting brackets that I pulled from the factory radio. Then I bolted them to the side of the kenwood (fit perfectly) and then fit it into place. The problem with the 4th Gen is that the sides are wider than a normal HU, so I have gaps on the sides but the top and bottom fit just right. This is why I have to build a custom trim ring for the HU...to fill the side gaps.

2. The pieces I used as speaker trims were actually the factory speakers. I cut the cone, voice coil, magnet, etc. from the middle of the entire piece and this left me with trim rings that I could use to mount the bostons. I forgot to take a picture before I cut them, but if you look at yours then look at my pics you'll see what I mean.

 
Thank you for the compliment.

Oh and somebody asked me so I'll tell you...SQ stands for sound quality and SPL stands for sound pressure level. I wanted quality sound which is why I got the Boston speakers. I could have gone with JL or Crossfire or some other but I wanted a small enclosure with very tight bass. Anybody who's heard the Boston Pro series subs can attest to their sound and power. These 10s are rated to 1100 watts at 2ohms. I have them in wired in parallel so I'm able to maximize the 1000watts at 1ohm from my Brutus.
 
I've always been a Boston Acoustic fan. I just feel they make some of the best sounding speakers around (whether home or auto). That said, it sounds awesome. I get the exact amount of bass I want; rock, rap, hip hop, alternative it doesn't matter. It always sounds good. The addition of the Kenwood DSP really adds to the clarity and pre out voltage (from 2 volts to 4.5 volts). This helps the amps push a cleaner sound signal. Much has to be said about cables as well. DON"T SKIMP ON CABLES! About $120 of my install was just for the RCA interconnects. These baby's will make or break your sound. Finally, building the right box for what you want. If I wanted rumbling bass I would have opted for ported/vented boxes. I didn't. I wanted tight crystal clear bass that would be a joy to listen to. Don't get me wrong, at a 1000 watts these baby's will rattle the 4Runner to the point I get worried about damage, but I can also ride around with tremendous amounts of bass that only I and my passengers can enjoy...not every other joker with a system that is continuously looking for a DB Drag.
 
job well done brick!!:thumb: if you dont mind, how much all in all did you spent on your system? and where did you learn to do those kind of stuffs? do you install car audios for a living?
 
The equipment was purchased from www.indoaudio.com and cost the following (except the subs that I bought individually from eBay):

Amps came to $415
Front and Rear speakers $620
Subs $390
Kenwood HU $800
Kenwood DSP $275
SWI-X $45
Icelink $160
Custom install (cables, labor, materials for box and a tip) $800

Now, I've been slowing buying pieces and preparing for this since March. Way too much money to drop at one time, and I'm not rich.

As for my experience...I've got none. I went to an installer and told him what I wanted, then I took a week off from my job and went to his shop (1 man install shop) and worked on the install with him (from open till close). This is why I said at the start is was a terrific learning experience. After partaking in all of the steps necessary I have a better understanding of how the processes work and I know where all of the cables are and how it was installed in case I need to change some thing after I leave Germany.

As for my job...I'm an US Air Force Officer.
 
Last edited:
Thanks again for the postitive comments!

Here are some pics of the Fishman grills
 

Attachments

  • custom stereo install 006-small.jpg
    custom stereo install 006-small.jpg
    57.4 KB · Views: 4,072

Members online

Forum statistics

Threads
278,309
Messages
3,554,071
Members
248,016
Latest member
Advally Service

Trending content

Back
Top