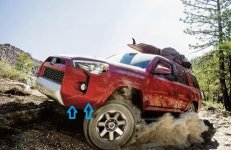
Got the SSO high clearance mod done today

This will most likely be my first MOD (My used TRD PRO came with a SSO bumper already). A few questions:

1) As someone who's never done body work would you recommend me install this myself?
2) Has anyone put any protective mesh in the exposed area to protect things like the fog light wiring?
3) My bumper isn't pre-drilled for the high-clearance kit. Is it easy to figure where to drill the extra hole into the Hybrid Bumper?

All of your trucks look great! Thanks for your time.
 
If you are going to hack away on your bumper w/o the stage 2 kit, watch YouTube for tutorial as where to cut but u may want to disconnect your fog lights and tuck the wires back when you cut. Other than that, hack away.


If you are planning to install the sso stage kit, that’s way more involved than just cutting. Wonder overland on YouTube has a great tutorial on this install as well
 
Last edited:
If you are going to hack away on your bumper w/o the stage 2 kit, watch YouTube for tutorial as where to cut but u may want to disconnect your fog lights and tuck the wires back when you cut. Other than that, hack away.


If you are planning to install the sso stage kit, that’s way more involved than just cutting. Wonder overland on YouTube has a great tutorial on this install as well

Haha, I'm not sure i'm brave enough to do it without a kit to give me a guide of some sort. Thanks for the vid! What a cool couple :thumb3:
 
Haha, I'm not sure i'm brave enough to do it without a kit to give me a guide of some sort. Thanks for the vid! What a cool couple :thumb3:

I did the unofficial version without the kit, just started cutting.

I just followed the below body line carefully and threw some weather stripping on over the lip. Took about 30 minutes total. Super easy, a lot less effort than going with the SSO kit I would imagine.
 

Attachments

  • trewtwrewrwer.jpg
    trewtwrewrwer.jpg
    55.3 KB · Views: 1,591
I did the unofficial version without the kit, just started cutting.

I just followed the below body line carefully and threw some weather stripping on over the lip. Took about 30 minutes total. Super easy, a lot less effort than going with the SSO kit I would imagine.

Haha, you have nerves of steel to just start cutting!

I like the idea of the kit because it has the metal extensions. I'm thinking I can mount a mesh grill/screen in the exposed area and mount the mesh to the metal extensions from the SSO Stage 2 kit.

However, without really looking at it I can't know for sure.
 
Haha, you have nerves of steel to just start cutting!

I like the idea of the kit because it has the metal extensions. I'm thinking I can mount a mesh grill/screen in the exposed area and mount the mesh to the metal extensions from the SSO Stage 2 kit.

However, without really looking at it I can't know for sure.

The side protection is nice. I would have been more inclined to go with SSO's product if the cut wasn't so aggressive. Picking the line I did was a more middle-of-the-road option that I think looks good.
 
Haha, I'm not sure i'm brave enough to do it without a kit to give me a guide of some sort. Thanks for the vid! What a cool couple :thumb3:


MY advice to you is with the SSO wings:

1. the tape has to meet at both measurements (bottom of bumper and near the wheel well).
2. the tape has to follow the straight edge below the fog light.
3. the tape has to lay down flat (if you are getting creases, its not straight).
4. View the tape from all the angles, if it doesn't look or feel right then it probably isn't.
5. If you aren't happy with steps 1 to 4, rip the tape off and start over. Do it over until you are happy. Waste as much tape as you want.

I spent a lot of time on step 5, and I'm glad I did. Every time I got frustrated, I started over, until the tape just fell into place....freaking weird.

One thing with the SSO kit is that if you have a heat gun you can melt/shape the inner fender lining and tuck it inside the braced wings. I didn't realize I could do that, so I chopped mine off....oh wells.


Now if you skip the SSO kit all together, you can cut it however you like so its more forgiving.

If I had to do it all over again, I would just hack my bumper apart, and if I liked the style and wanted to go higher with the cuts, that's when I would go the SSO route. Mainly, because the SSO cut is so high up that if you aren't running big tires and/or wide wheels, it looks a bit out of place. I'm running 285s w/ 17x8.5 w/ -40ish offset, and my wheels and tires look tiny now. Need more tire!!!!!!!
 
Last edited:
I went with the DIY route as well with my SSO. About 30 mins and a dremel!

Sawzall with fine tooth blade and edge trim. The SSO kit is nice, and adds a level of protection, but to me, it takes the cut too high.

Bro...just do it! I used zip ties to tuck the fog light wires up under, and spray painted the washer reservoir.

Below shot of the driver side.

I ordered these back in early November and they showed up this week. Took about 90" to get them installed and 2 Sip of Sunshine brews. Not a perfect fit secondary to my trimming, but pretty close and looks great.

Thanks all for your helpful photos. I just finished cutting mine, and it definitely worked out better thanks to this thread :dancin:
 
Ahhhh pics please!!
Sent from my iPhone using Tapatalk

I'm not ready for prime time yet haha. Trying to avoid edge trim so I still need to fine sand it. Mine is probably the least aggressive cut in the thread so far, but I think I like it this way. Of course, I can always go back and cut more. I'll be sure to post once finished.
 
Not sure how I feel about the kits yet. It looks like [MENTION=131444]C4 Fabrication[/MENTION] is about to come out with one as well (they are sharing lots of pictures via Instagram stories lately-I just ordered a low profile bumper from them).

I think [MENTION=290929]YellowSnow[/MENTION] really got it right proportionally with his cut lines. It's a nice even reveal that matches other lines along the fascia. I'm most likely going to shoot for that design and see how it works for my setup. You can always cut more. I'm hoping to make the cuts with a razor knife and finely sand it down so I don't need a trim piece. We'll see how realistic that plan is.

I did research and this is a pic of the new C4 Lo Pro High Clearance Mod

C4 Fabrication on Instagram: “Nice shot from @overlandiowa when he came to visit us a couple weeks back. His front end is featuring our Lo-Pro winch bumper with full…”
 
So if you just opt to hack it ... I know people have mentioned the bottle for the washer fluid and the fog wires being more exposed.

Do I really have to worry about anything being damaged? I’m so close to just getting the dremel out and just getting her done ... all That’s holding me back is that question

So driving in any weather is ‘a ok’???


Sent from my iPhone using Tapatalk
 
So, is there a way to secure the inside plastic once the cut is made???

Can it be reshaped with a heat gun to make it conform?
I know there are gurus that have done this mod that can chime in and maybe show photos of how it's done!!!!!!!!!!
 
Looks kilker! I did mine with a dremel, and $10 in rubber weather strip :thumb3:

Looks awesome! Cleanest cut line I’ve seen, better approach yet understated and classy compared to most. Can you provide more photos from different angles (underneath, inside wheel well)? Did you retain all the factory bolt locations? I’m itching to try to duplicate this on my 2020 Venture. Time to chop ‘er up
 
Looks awesome! Cleanest cut line I’ve seen, better approach yet understated and classy compared to most. Can you provide more photos from different angles (underneath, inside wheel well)? Did you retain all the factory bolt locations? I’m itching to try to duplicate this on my 2020 Venture. Time to chop ‘er up

His cut looks pretty similar to mine. If you do it right, you don't cut out any bolt locations. I ended my cut in the wheel well right under the last fender liner bolt.

I'll tell you right now that I cut out too much fender liner when I did this. My advice would be to leave as much as possible, only start cutting the fender liner once you know exactly how you're going to secure it in there, then cut the excess.

Dpeoy5r.jpg


ZF6hwAO.jpg


TfMBsLT.jpg
 
His cut looks pretty similar to mine. If you do it right, you don't cut out any bolt locations. I ended my cut in the wheel well right under the last fender liner bolt.

I'll tell you right now that I cut out too much fender liner when I did this. My advice would be to leave as much as possible, only start cutting the fender liner once you know exactly how you're going to secure it in there, then cut the excess.

Dpeoy5r.jpg


ZF6hwAO.jpg


TfMBsLT.jpg

Nice! Looks great. Thanks for the quick response. How much of the “guts” are exposed? I gather I’ll have to paint the washer bottle and tie up the fog light wiring. Anything else you’d recommend?
 
Nice! Looks great. Thanks for the quick response. How much of the “guts” are exposed? I gather I’ll have to paint the washer bottle and tie up the fog light wiring. Anything else you’d recommend?

With this particular cut, which I mentioned before is like the middle-of-the-road option, the washer bottle is not overly exposed. I spray painted mine black at first, but I'm not in a hurry to do it again now that the paint is wearing off. It's just not that noticeable.

A heat gun will be helpful to manipulate the fender liner how you want. And zip ties are perfectly adequate for holding it in place if needed. I like using the zip ties, since they are easy to put on, they hold well, and if you need to cut them off to get in there it's no biggie to replace. Sounds like a hillbilly fix, but it's effective and easy, and nobody will notice.

Also, I wouldn't worry about getting your cut edge perfectly smooth. The edge trim (which I recommend, obviously) will cover it up nicely, no need to sand it down.

Your fog wiring will be more exposed, depending on what you do with your fender liner. Definitely a good idea to tuck it out of the way, but like I said, keep as much fender liner as possible to try to keep it covered. This was my mistake.

Other than that, there's nothing to it. Cut conservatively and then shave off more if you need, it doesn't work the other way around.

EDIT to mention: Wear safety glasses and sleeves. You'll get hot melting plastic sprayed all over you. It won't burn your arms or anything, but it stings. And you definitely don't want it in your eyes.
 
Last edited:
With this particular cut, which I mentioned before is like the middle-of-the-road option, the washer bottle is not overly exposed. I spray painted mine black at first, but I'm not in a hurry to do it again now that the paint is wearing off. It's just not that noticeable.

A heat gun will be helpful to manipulate the fender liner how you want. And zip ties are perfectly adequate for holding it in place if needed. I like using the zip ties, since they are easy to put on, they hold well, and if you need to cut them off to get in there it's no biggie to replace. Sounds like a hillbilly fix, but it's effective and easy, and nobody will notice.

Also, I wouldn't worry about getting your cut line perfectly smooth. The edge trim (which I recommend, obviously) will cover it up nicely, no need to sand it down.

Your fog wiring will be more exposed, depending on what you do with your fender liner. Definitely a good idea to tuck it out of the way, but like I said, keep as much fender liner as possible to try to keep it covered. This was my mistake.

Other than that, there's nothing to it. Cut conservatively and then shave off more if you need, it doesn't work the other way around.

Sweet. Believe me, I am a huge proponent of zip ties, call me hillbilly if you like but those things are amazing!

I’m definitely going to do a conservative cut, I like the look better and given the fact that she’s my daily driver, I want to retain a fair bit of bumper to keep the aerodynamics reasonable, and wind noise down as much as possible. Thanks again for the solid advice.

I’ll post photos when I get the job done!
 

Members online

Forum statistics

Threads
278,316
Messages
3,554,110
Members
248,016
Latest member
Advally Service

Trending content

Back
Top