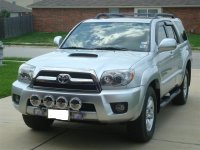
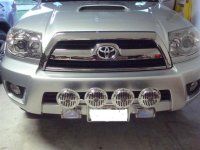
First let me say these are not "official" instructions by any means. There has not been any testing so I have no idea how they will work for extreme off-road use, but I personally think they would do fine.
The lights I chose to use for this project are the Hella 500 driving lights. I like these since they are realtively slim and won't stick way out from the front bumper. i will probably end up switching to the Hella Black Magic lights, but wanted to see if this would even work first. In this first pic, you will see the lights, the stock Hella 500 covers, the clear stone guards (purchased separately) and the brackets. The brackets are made from my trusty 1.5" x 1/4" steel strips, you can get at Home Depot. All I did was take them to a freind's house and bend them to a 90 degree angle.
<a href="http://s202.photobucket.com/albums/aa130/tylerstogner/?action=view¤t=102_1181.jpg" target="_blank"><img src="http://i202.photobucket.com/albums/aa130/tylerstogner/102_1181.jpg" border="0" alt="Photobucket"></a>
<a href="http://s202.photobucket.com/albums/aa130/tylerstogner/?action=view¤t=102_1180.jpg" target="_blank"><img src="http://i202.photobucket.com/albums/aa130/tylerstogner/102_1180.jpg" border="0" alt="Photobucket"></a>
Cool! I'd like to see the result. I'll wait for the pics.:wink2:Looks good. I actually added 2 more to mine as well. The original lights were Driving lights with pencil beams. I added a pair of fogs, so I have both options now. I will get some pics up when I get a break.
This is what it will look like with the bracket, washers and nuts. They are not tightened down so you could distinguish the parts.
@momo.......You gave me a great idea when I read this. I am going to take mine up over the bumper and below the hood. There is about an inch to get the steel through it. Pics up soon.I think they look really good on top of the bumper as well, but I didn't want to drill holes through the top of the bumper. I also wanted to be able to put them on and take them off easily for road trips. I can put both on, or take both off, within about 5 minutes. Now I just need to get the wiring done where they will be plug and play.![]()
@ momo.....did you have to remove any of the front bumper pieces to get those bolts in?This is what it will look like with the bracket, washers and nuts. They are not tightened down so you could distinguish the parts.
momo....what size are the bolts? 2" or 2-1/2"Here is a side view of the beam (in orange), the bracket and the order of the bolt, washers, lock-washer and nut.
You will see the two bolts in the beam with washers on them, then the washer and nut just outside the beam. When I put the brackets on, I first put a washer on, then the bracket, then another washer, lock-washer and finally the nut.

do yours shake when you are driving? mine do a bit and i and thinking of a way to solve it.That looks very similar to the brackets I made up for my 4Runner!
http://www.toyota-4runner.org/4th-g...iker-170-fog-lights-installed.html#post488829
![]()
![]()
![]()
Can anybody who has done this on a 2006+ confirm that the beams that the bolts go through have a hole facing the front of the truck?
I can obviously find the hole on the beam on the radiator side, but when I try to stick something in there to find the hole on the other side, I'm coming up empty. I figure I'd have to remove all the screws that are holding the front bumper on to be able to give my hand enough clearance to get in there and verify -- but I can't tell from just shoving something into the hole that already exists.
The hole that I used on the beam (under the rad) is threaded. Are you trying to figure out if the hole goes all the way through the beam? Can you circle where exactly you're looking.
No part of the brackets I made are bolted to the beam inside the bumper. I suppose if you were to use that beam as well the as beam under the rad, it would be plenty secure and shouldn't shake when driving.